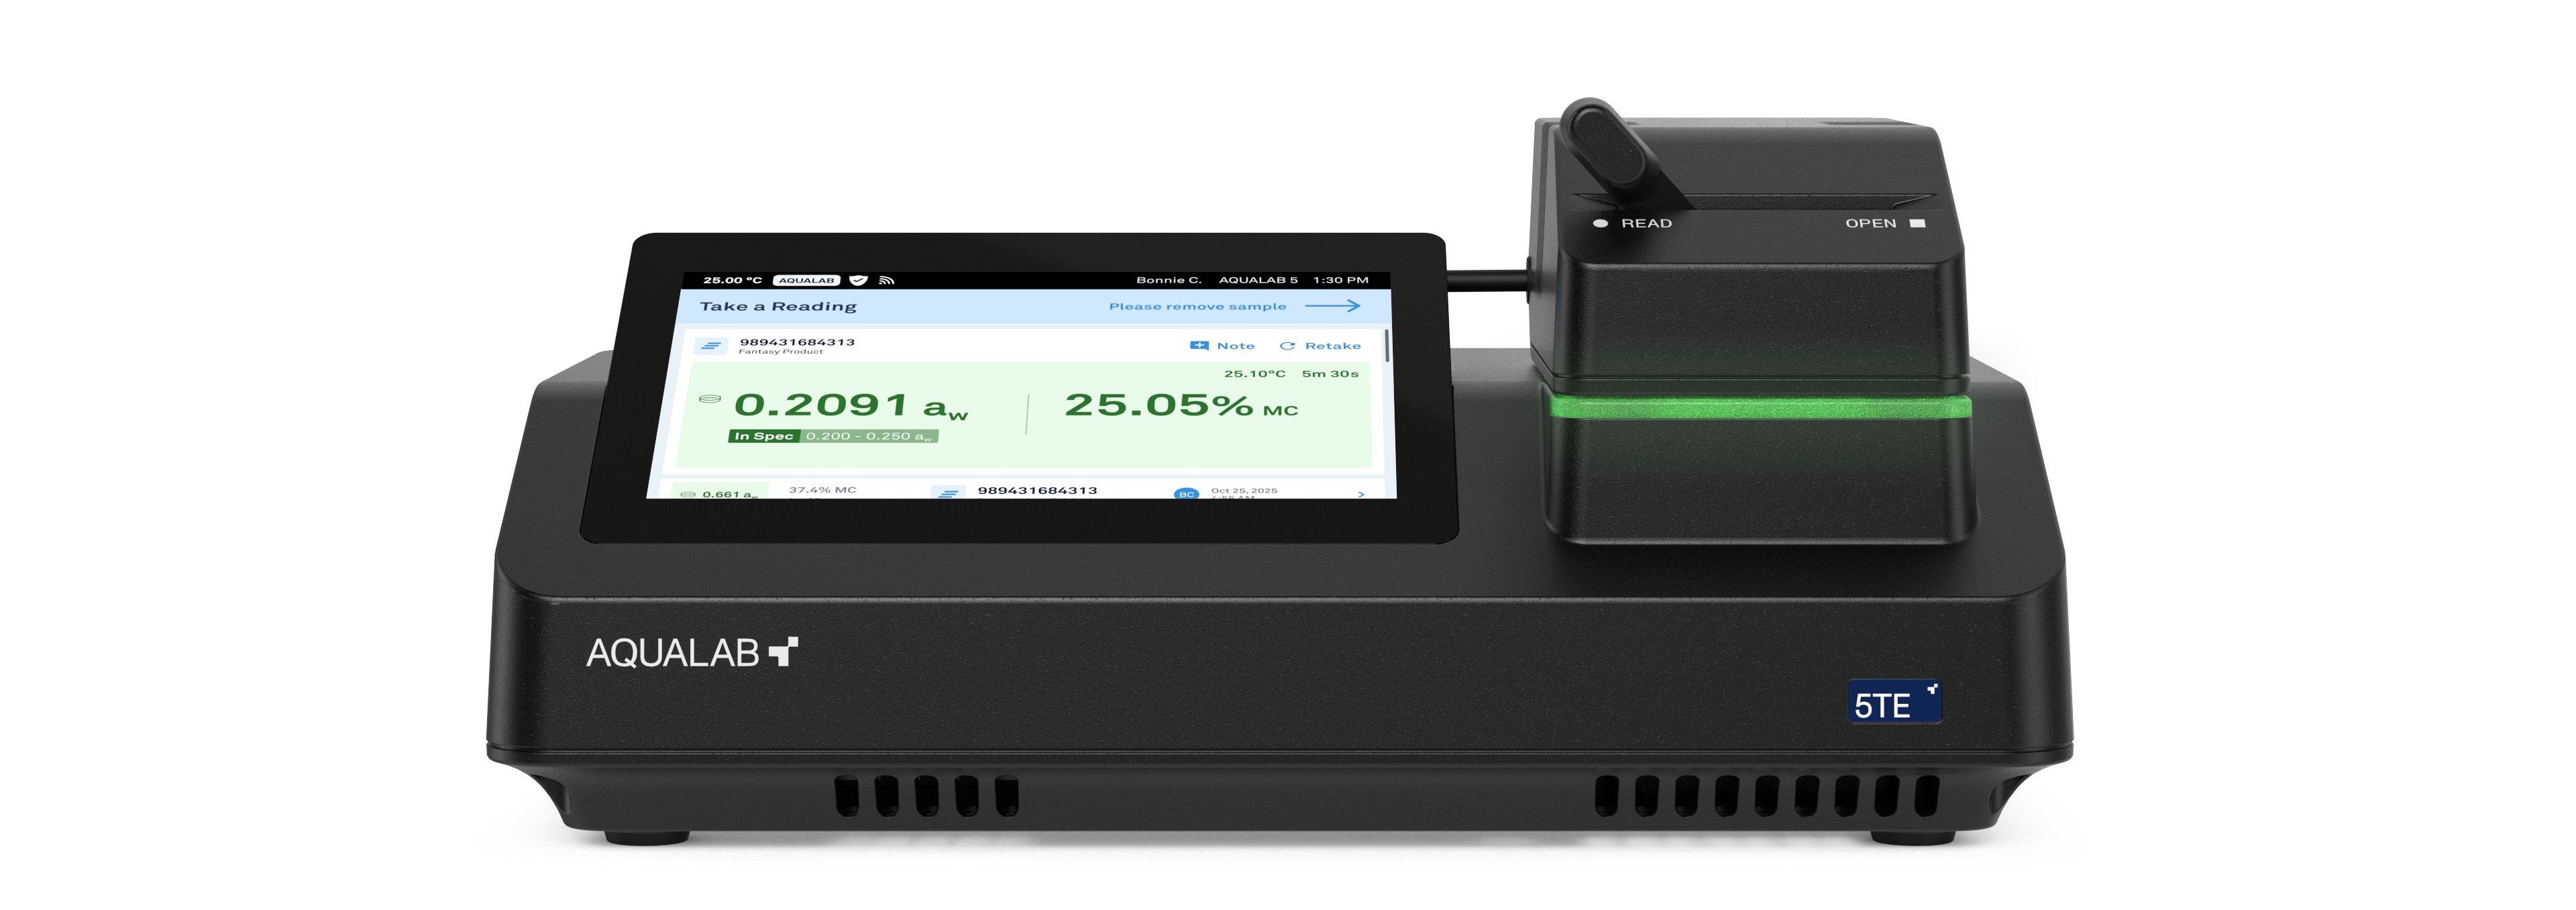
1. INTRODUCTION
Thank you for choosing the AQUALAB 5TE Water Activity meter from Addium, Inc.
The AQUALAB 5TE provides accurate and reliable water activity (aw ) measurements.
The instrument uses chilled-mirror dew-point sensor combined with a capacitive sensor to deliver fast and precise water activity readings. Integrated moisture sorption isotherm models allow moisture content to be reported alongside each water activity reading with an active AQUALAB Cloud license. A temperature-controlled sample chamber ensures consistent results in 5 minutes or less. With AQUALAB Cloud and One-Minute Readings, results can be obtained in as little as one minute.
This user manual provides instructions for operating, maintaining, and troubleshooting the AQUALAB 5TE. Please read this manual carefully before using the instrument to ensure proper operation and optimal performance.

Warning
To avoid electrical shock or damage to the instrument, do not remove covers or disassemble.
Warning
The protection provided by this equipment may be impaired if the equipment is used in a manner not specified by the manufacturer. This instrument is designed for water activity measurement in laboratory and food production environments. Use only as directed herein.
1.1 Included Components
Verify that all of the following items are present and undamaged upon receipt:
- AQUALAB 5TE Water Activity meter
- Wireless adapter (may not be included in all regions)
- USB-Ethernet adapter
- Certificate of Calibration
- Power supply and power cable, including 2.5 mm Ø to 2.1 mm Ø adapter
- USB A to USB B cable
1.2 Available Consumables
The following items are available for purchase from the Addium online store:
- AQUALAB disposable sample cups and lids
- AQUALAB cleaning swabs
- AQUALAB verification standards
(0.150, 0.250, 0.500, 0.760, 0.920, 0.984, and 1.000 aw )
(For ordering assistance, contact Customer Support.)
1.3 Chemical Safety - Verification Standards
AQUALAB verification standards are chemical solutions. Hazard classification differs by standard. Before handling any standard, read the Safety Data Sheet (SDS) for that specific standard and follow the handling, personal protective equipment, first aid, and disposal instructions it contains.
Safety Data Sheets are supplied with the standards and are available here.
Observe the following at all times when handling standards:
- Wear eye protection and chemically resistant gloves unless the SDS for the standard in use states otherwise.
- Do not ingest.
- Clean spills immediately and dispose of used standards, cups, and wipes in accordance with the SDS and local regulations.
2. INSTRUMENT OVERVIEW
This chapter describes the physical components, user interface, and hardware specifications of the AQUALAB 5TE.
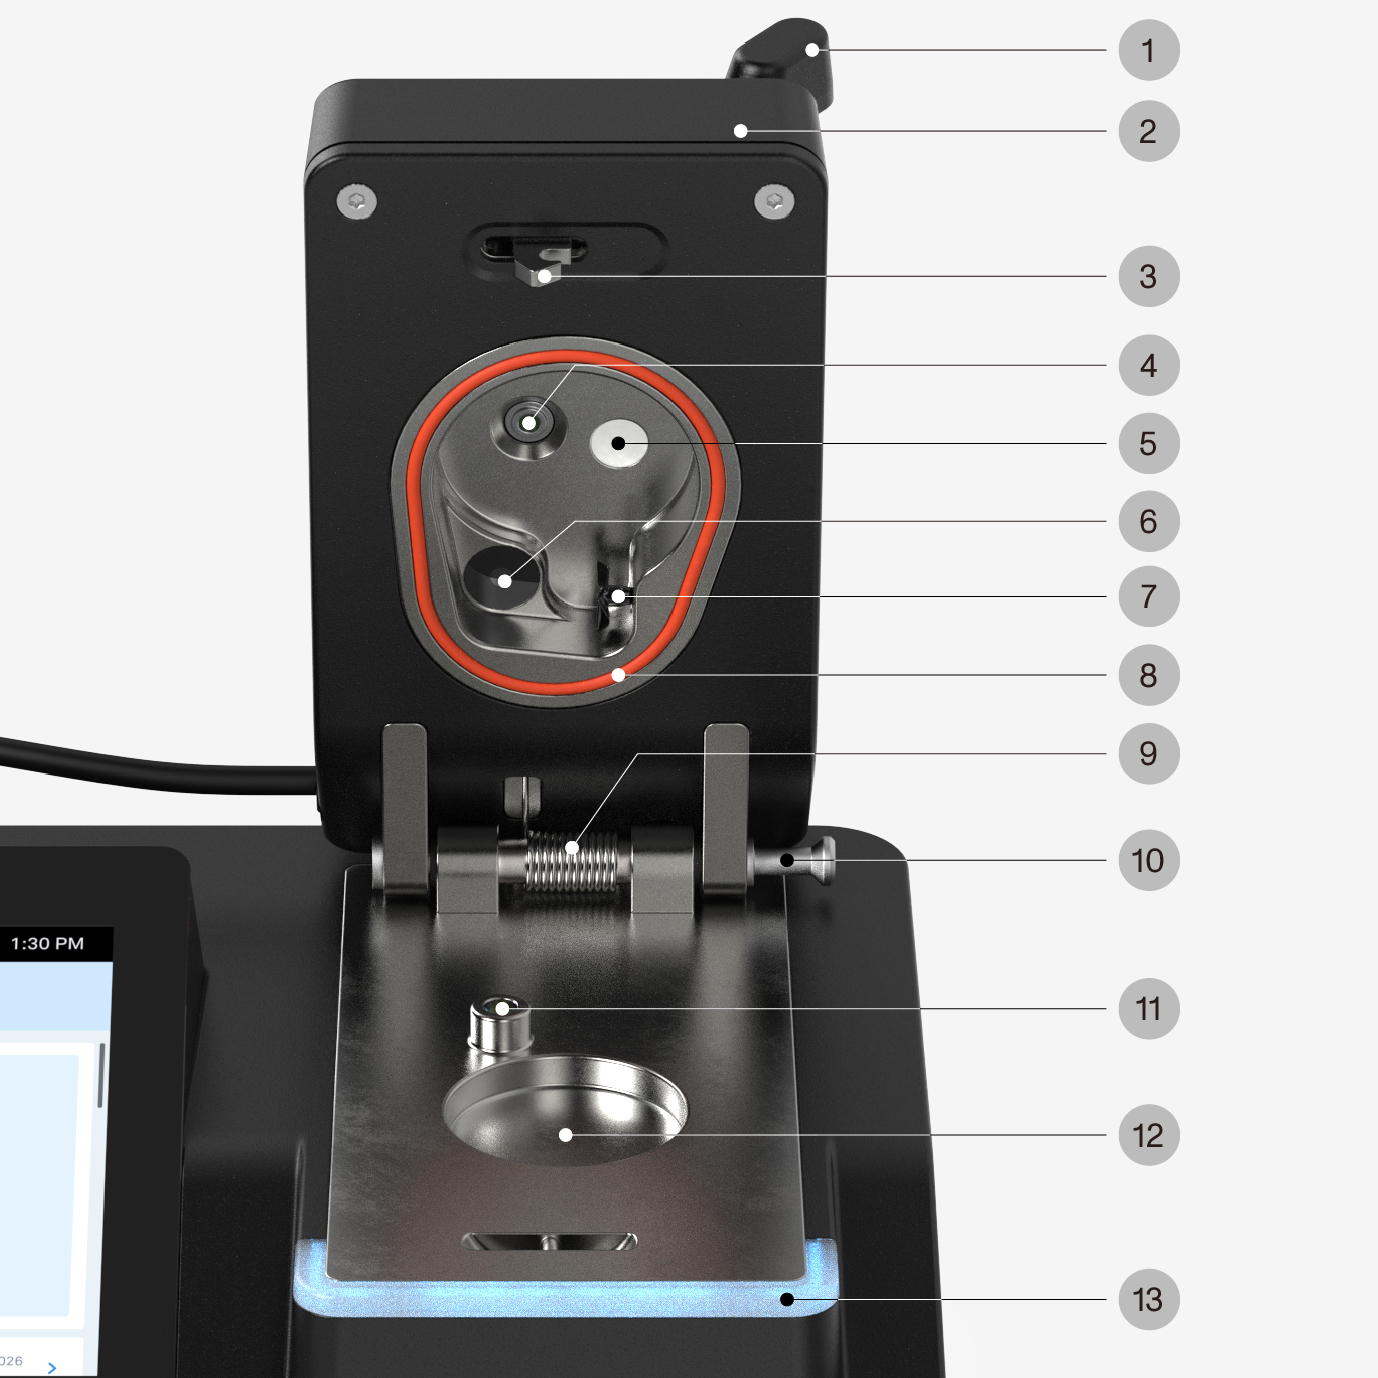
2.1 Sensor Block Assembly
[[1]] Lever
[[2]] Lid
[[3]] Latch
[[4]] Thermopile
[[5]] Capacitance sensor with filter
[[6]] Chilled-mirror dew point sensor
[[7]] Fan
[[8]] O-ring
[[9]] Spring
[[10]] Hinge pin
[[11]] Optical sensor
[[12]] Sample cup holder
[[13]] Indicator light
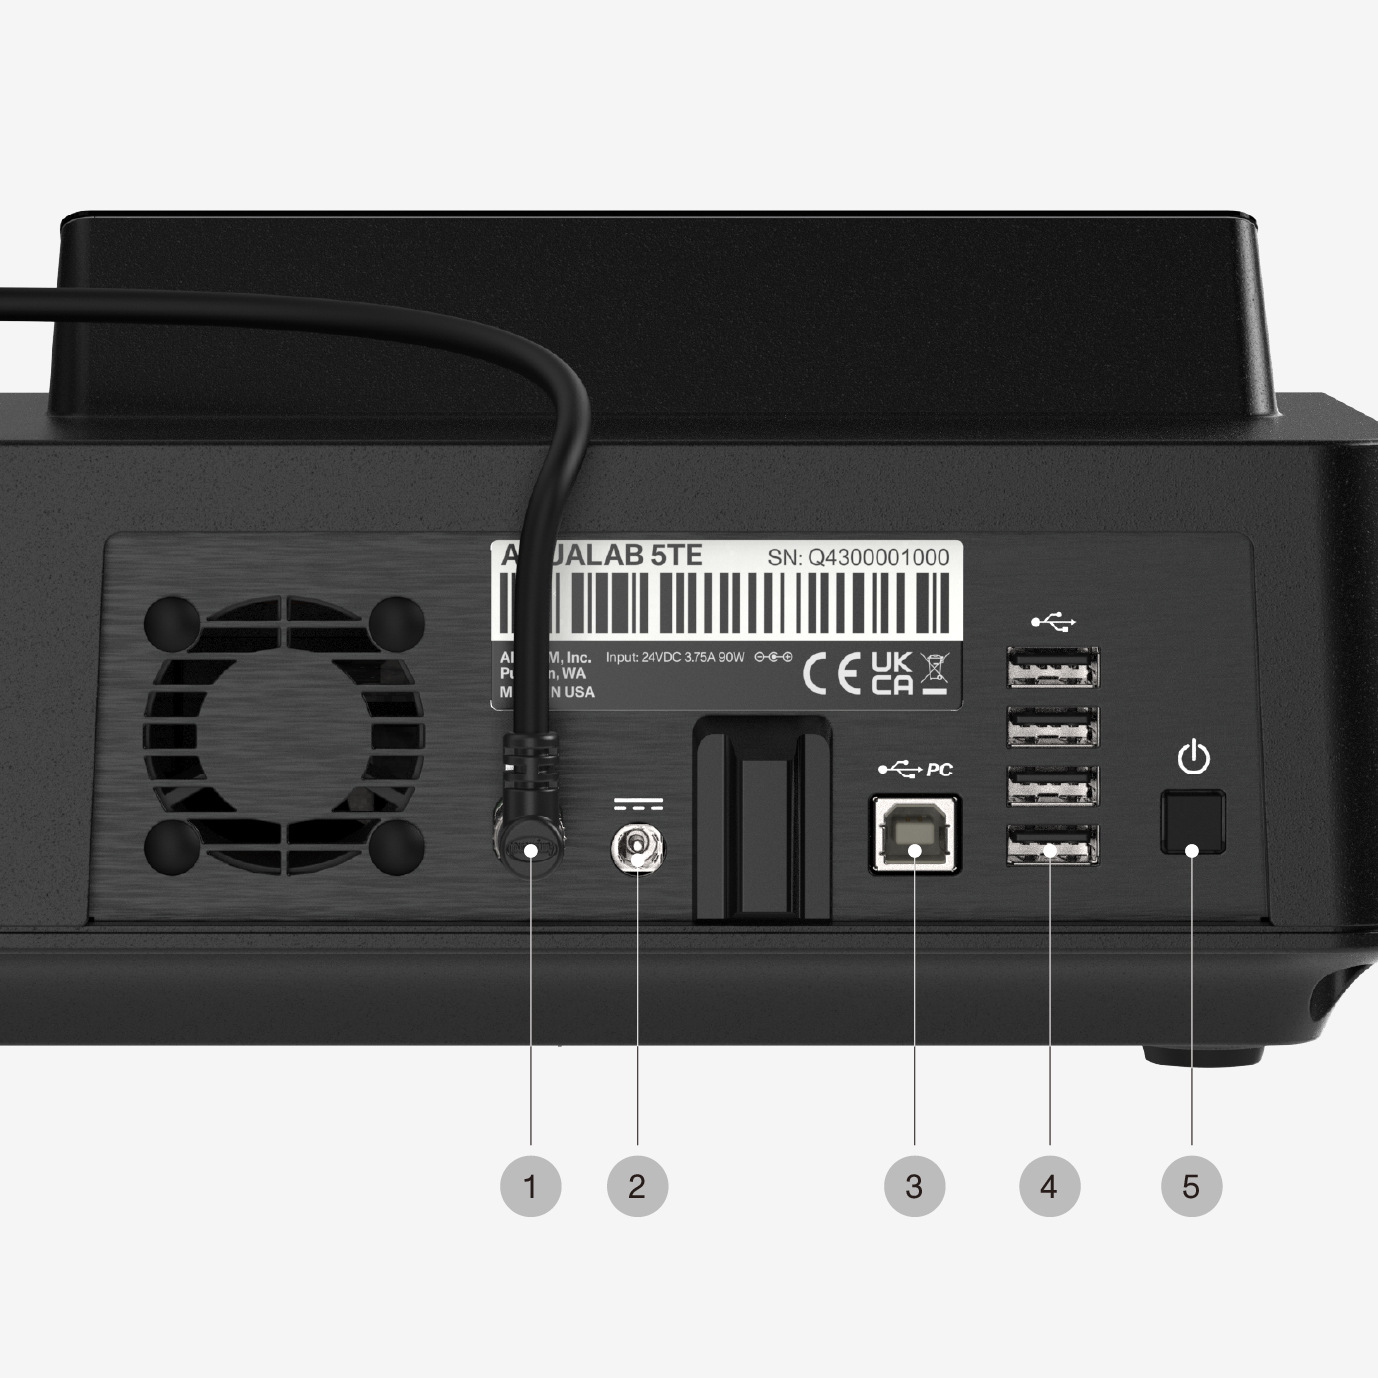
2.2 Rear Panel
[[1]] Sensor block connector
[[2]] Power connector
[[3]] USB-B port
[[4]] USB-A ports
[[5]] Power button
2.3 User Interface
The AQUALAB 5TE is operated via the front touchscreen. Standard tap and swipe gestures are supported. The touchscreen is compatible with latex, nitrile (single or double layer), butyl, and neoprene gloves.
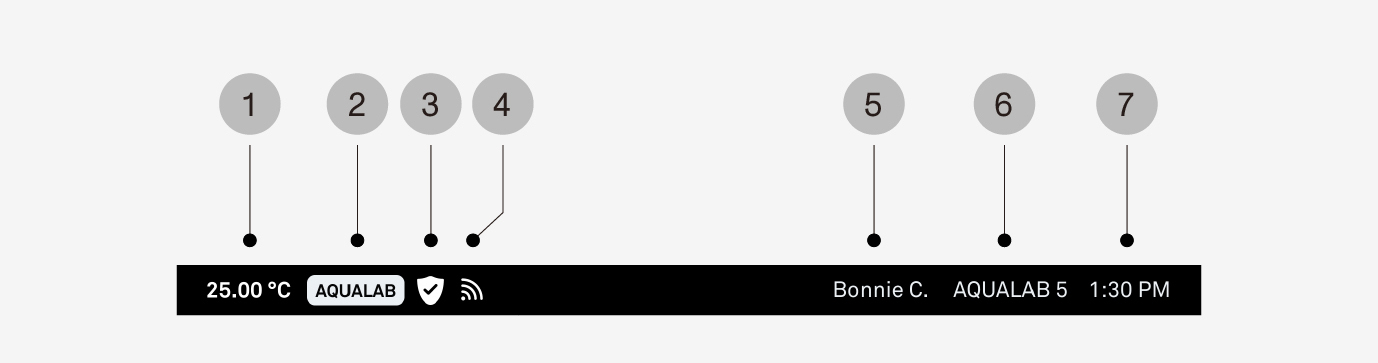
2.3.1 Status Bar
The Status Bar at the top of the display shows key system indicators.
[[1]] Base temperature
Displays live readout of AQUALAB 5TE base temperature.
[[2]] AQUALAB Cloud license status
Displays license and connection status.
[[3]] Verificatiob status
Displays the current verification status.
[[4]] Network connection status
Displays Ethernet or wireless connection status. Shows signal strength for wireless connections.
[[5]] User status
Displays the logged-in user. Hidden if user access is not enabled.
[[6]] Instrument name
Displays instrument name. Default is the instrument's serial number.
[[7]] Time
Displays current time.
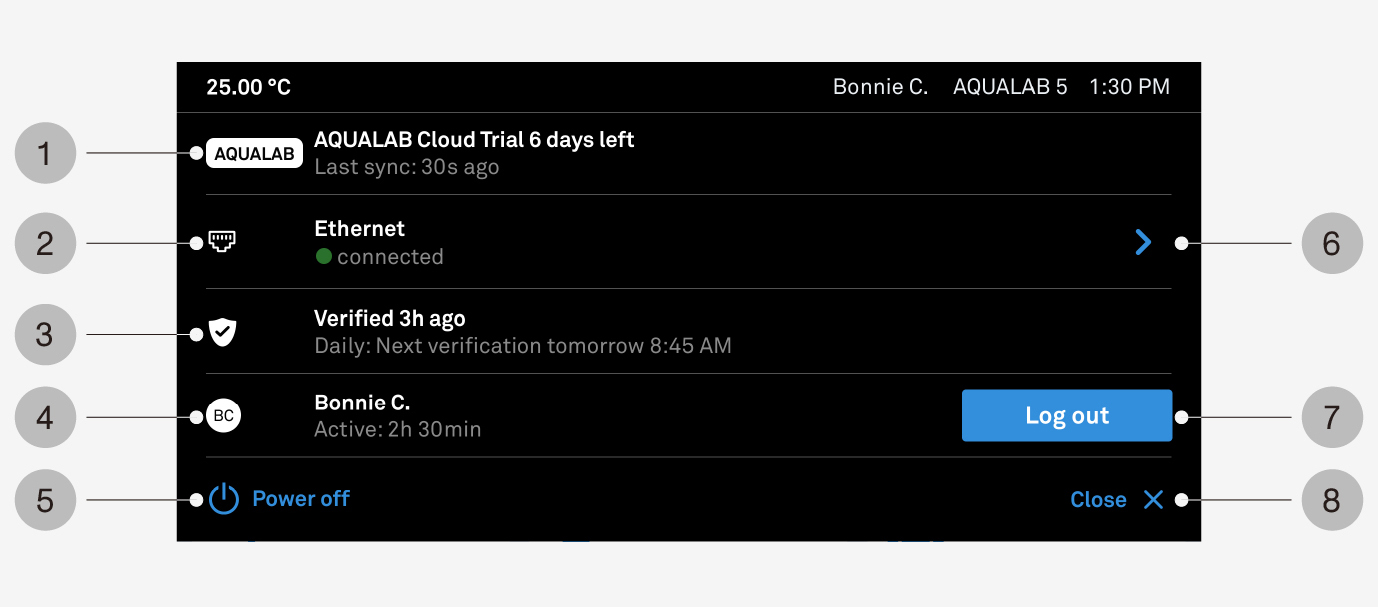
2.3.2 Expanded Status Bar
Tapping the Status Bar opens the Expanded Status Bar, providing additional system information.
[[1]] AQUALAB Cloud status
Displays license and synchronization status.
[[2]] Network connection status
Displays Ethernet or wireless connection status.
[[3]] Verification status
Displays status, last verification, and scheduled verification information.
[[4]] User status
Displays the logged-in user and session duration. Hidden if user access is not enabled.
[[5]] Power off
Provides options to log out, reboot, or power off the instrument.
[[6]] Network connection settings
[[7]] Log out
Logs out the active user and locks the instrument.
[[8]] Close X
Closes expanded status bar.
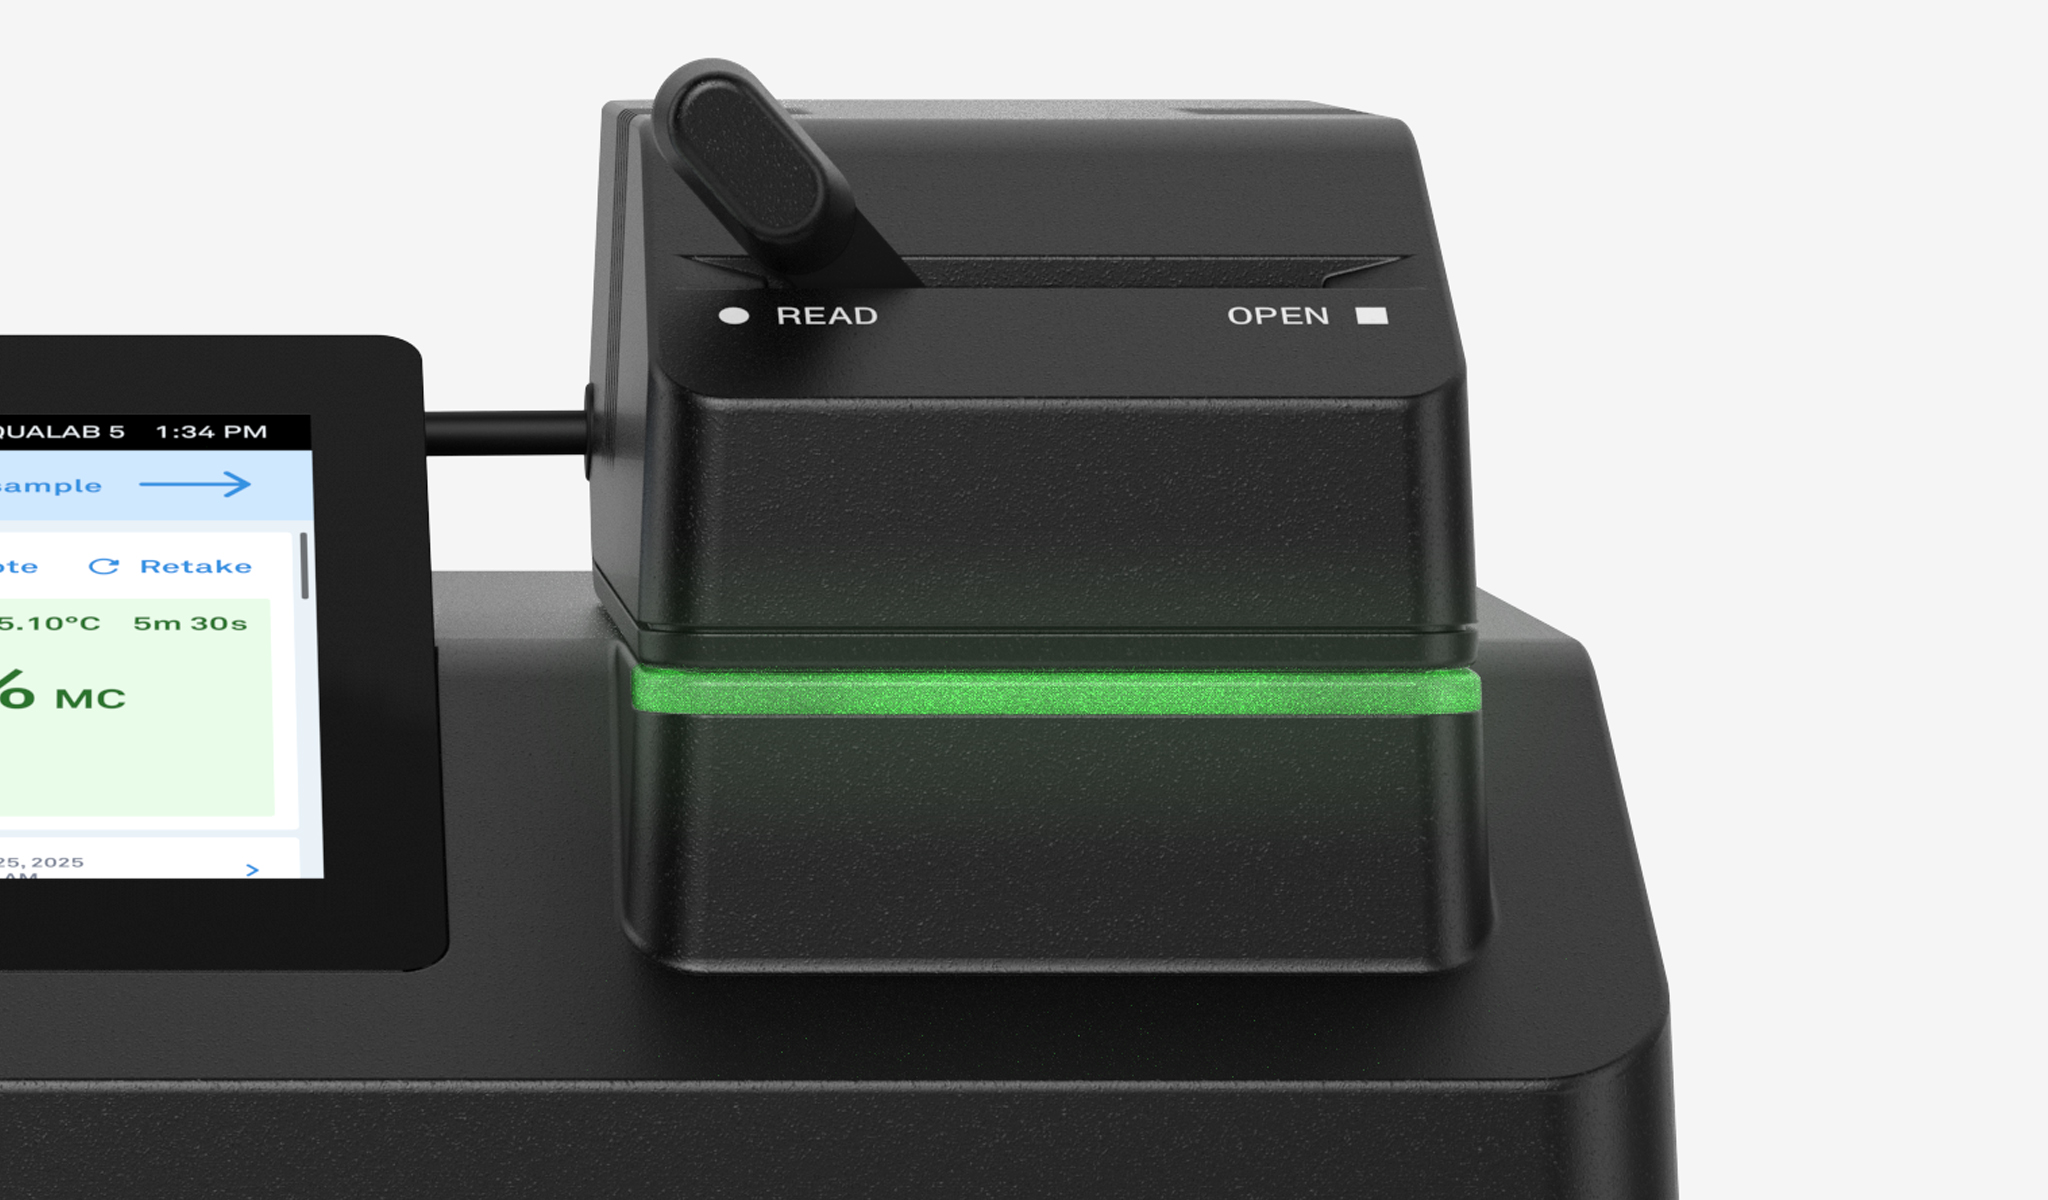
2.3.3 LED Indicator Lights
The LED light bar on the instrument indicates system status.
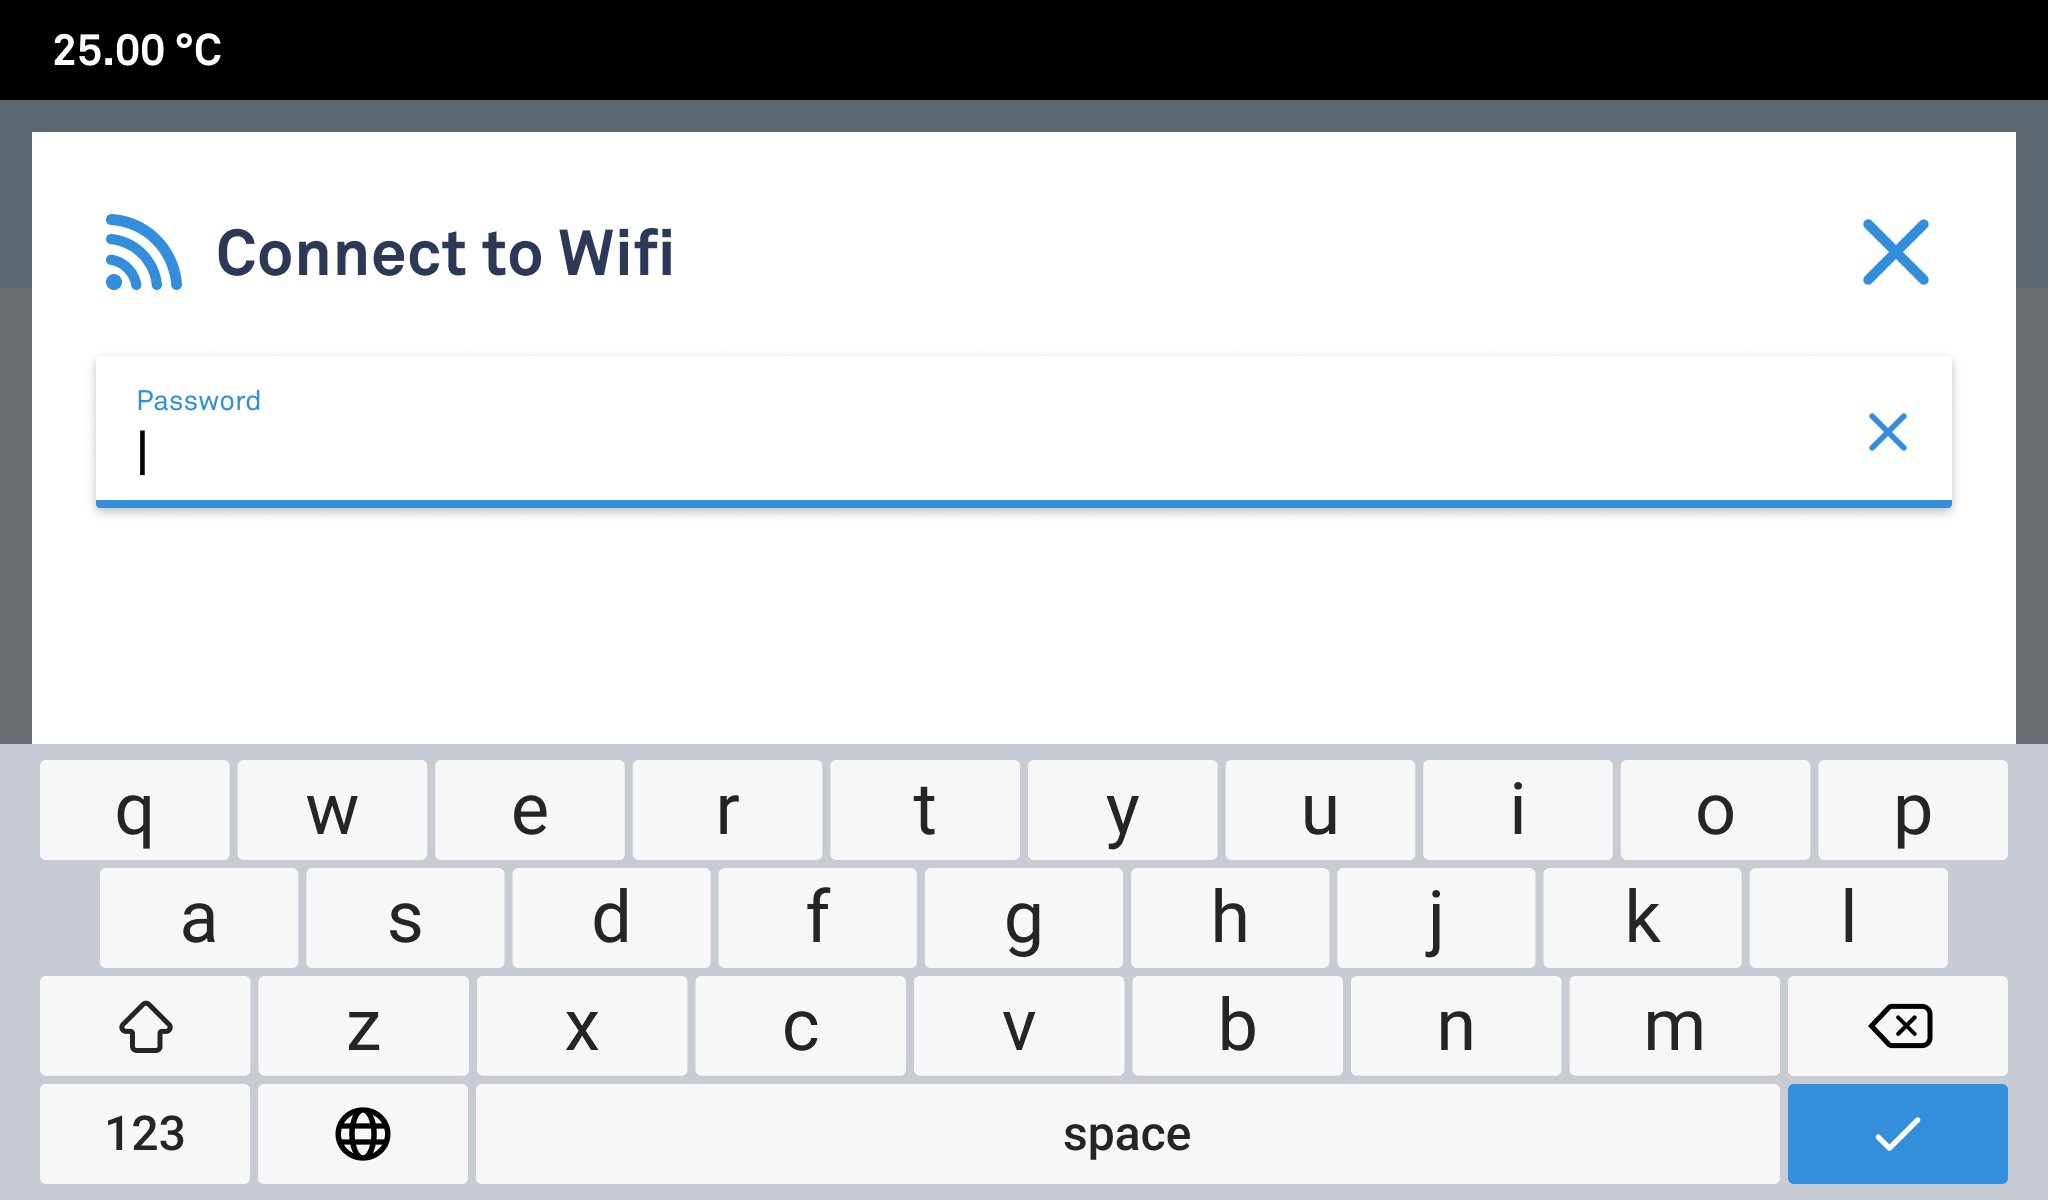
2.3.4 Data Entry
An on-screen keyboard or numeric keypad appears automatically when data entry is required. Alternatively, an external keyboard can be connected to a USB-A port for input.
On the on-screen keyboard, press and hold the
 key to enable caps lock for continuous uppercase input.
2.4 Hardware Specifications
3. OPERATING MODES
The AQUALAB 5TE may operate in one of the following modes:
3.1 AQUALAB Cloud Connected
Connecting the instrument to the internet and linking it to an AQUALAB Cloud account enables the full feature set:
- One-Minute readings
- Moisture Content readings
- Automatic Data Backup
- Product and Batch configuration
- Enhanced Data Analysis and Reporting
- Sync Settings across devices
- Over-the-Air (OTA) system updates
- Automatic date and time synchronization
Connection may be established via Ethernet (recommended) or wireless network.
When setting up wireless mode, ensure that the wireless dongle is installed.
3.2 Standalone with Internet
If Company Registration is skipped during onboarding, the instrument operates in Standalone mode. OTA updates and automatic time synchronization remain available, but AQUALAB Cloud features are not accessible.
3.3 Standalone Offline
The instrument operates fully offline. Date and time must be set manually. System updates require a USB drive.
Internet access can be configured later from Instrument Settings > Network.
4. INITIAL SETUP
This chapter covers first-time instrument setup: placement, power connection, and the onboarding process.
Warning
To avoid electrical shock or damage to the instrument, do not remove covers or disassemble.

CAUTION
Use only the provided power supply. An incorrectly rated supply may degrade performance or cause damage. Always connect to a grounded outlet or power strip.
4.1 Select Location
Place the instrument on a stable surface with consistent ambient temperature.
Avoid proximity to vents, windows, heaters, and air conditioners. Maintain a clean environment to prevent contamination of the sample chamber.
4.2 Connect to Power
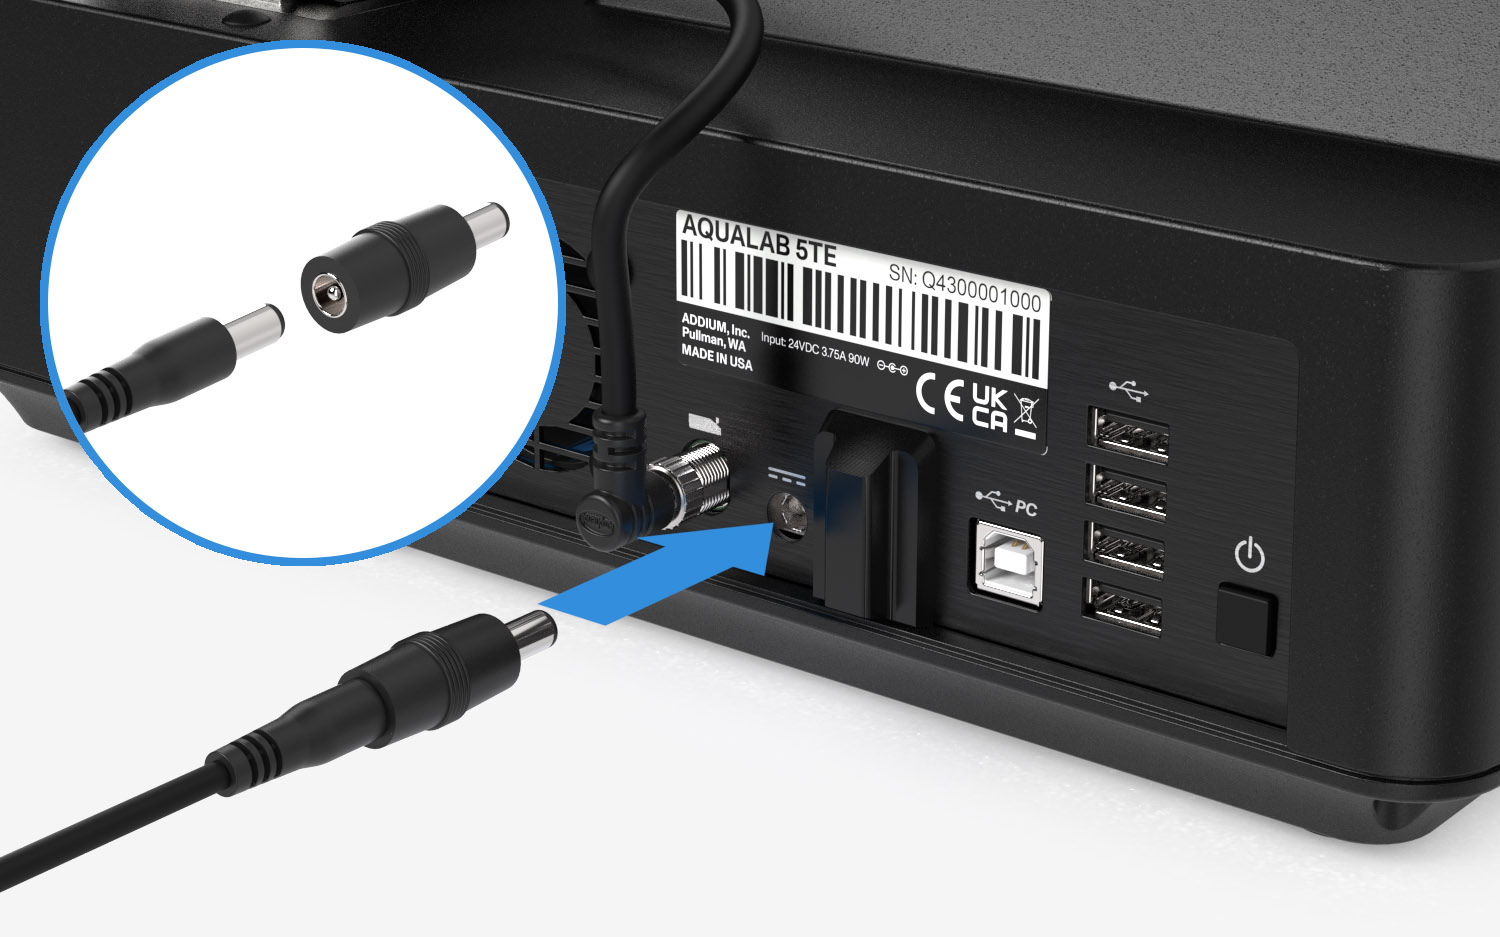
Plug the power cable into the DC barrel connector on the rear panel and connect the other end to a grounded power source.
Caution
To prevent instrument malfunction or damage, ensure the barrel adapter is installed before connecting the power cable.
4.3 Power On
The AQUALAB 5TE powers on automatically when connected to a power source. If it does not start automatically, press the power button on the rear panel. During initialization, the boot screen is displayed.
4.4 Onboarding Wizard
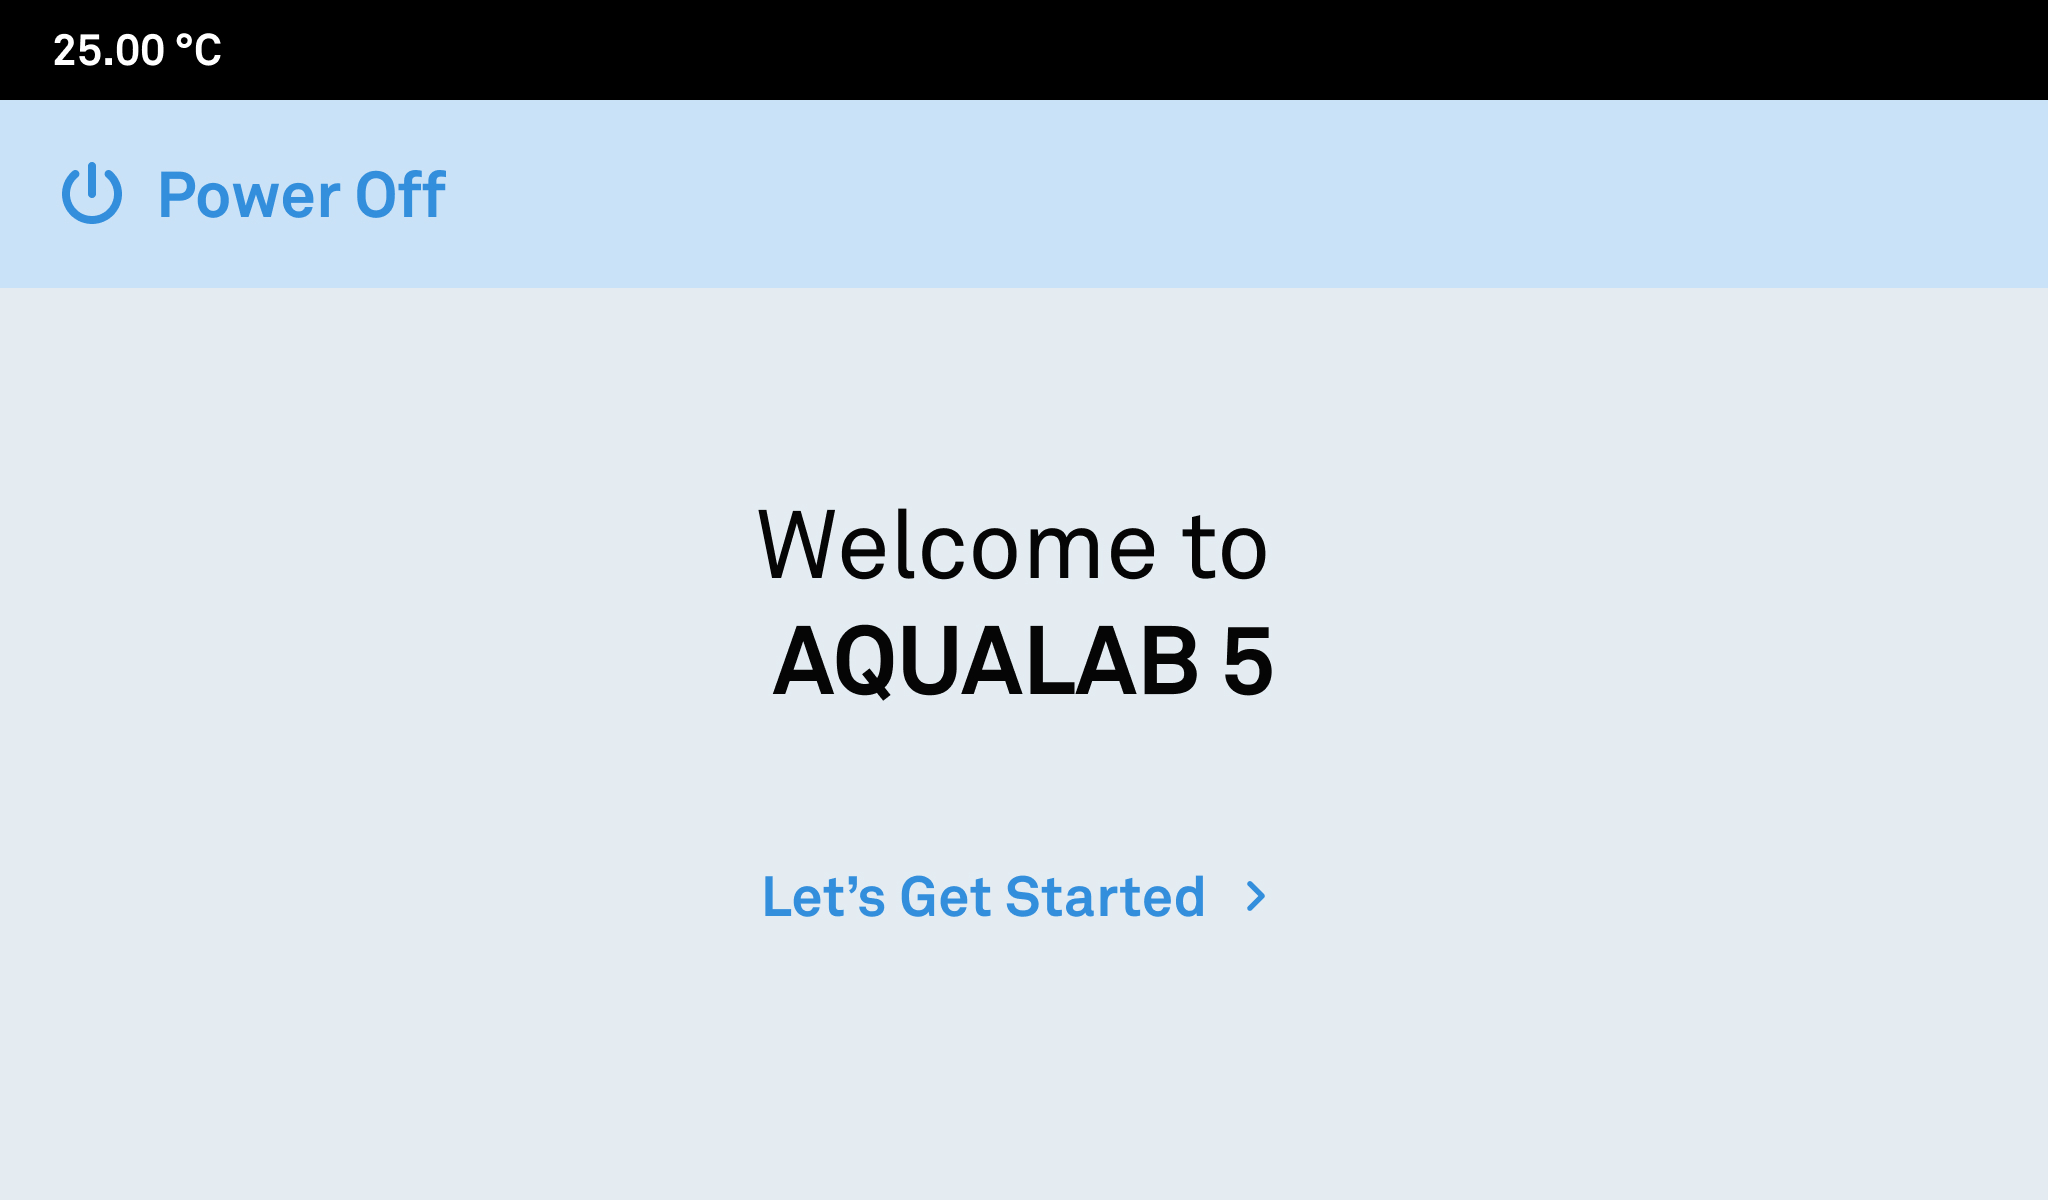
After boot-up, the Welcome screen appears.
Tap
 to begin the guided onboarding process.
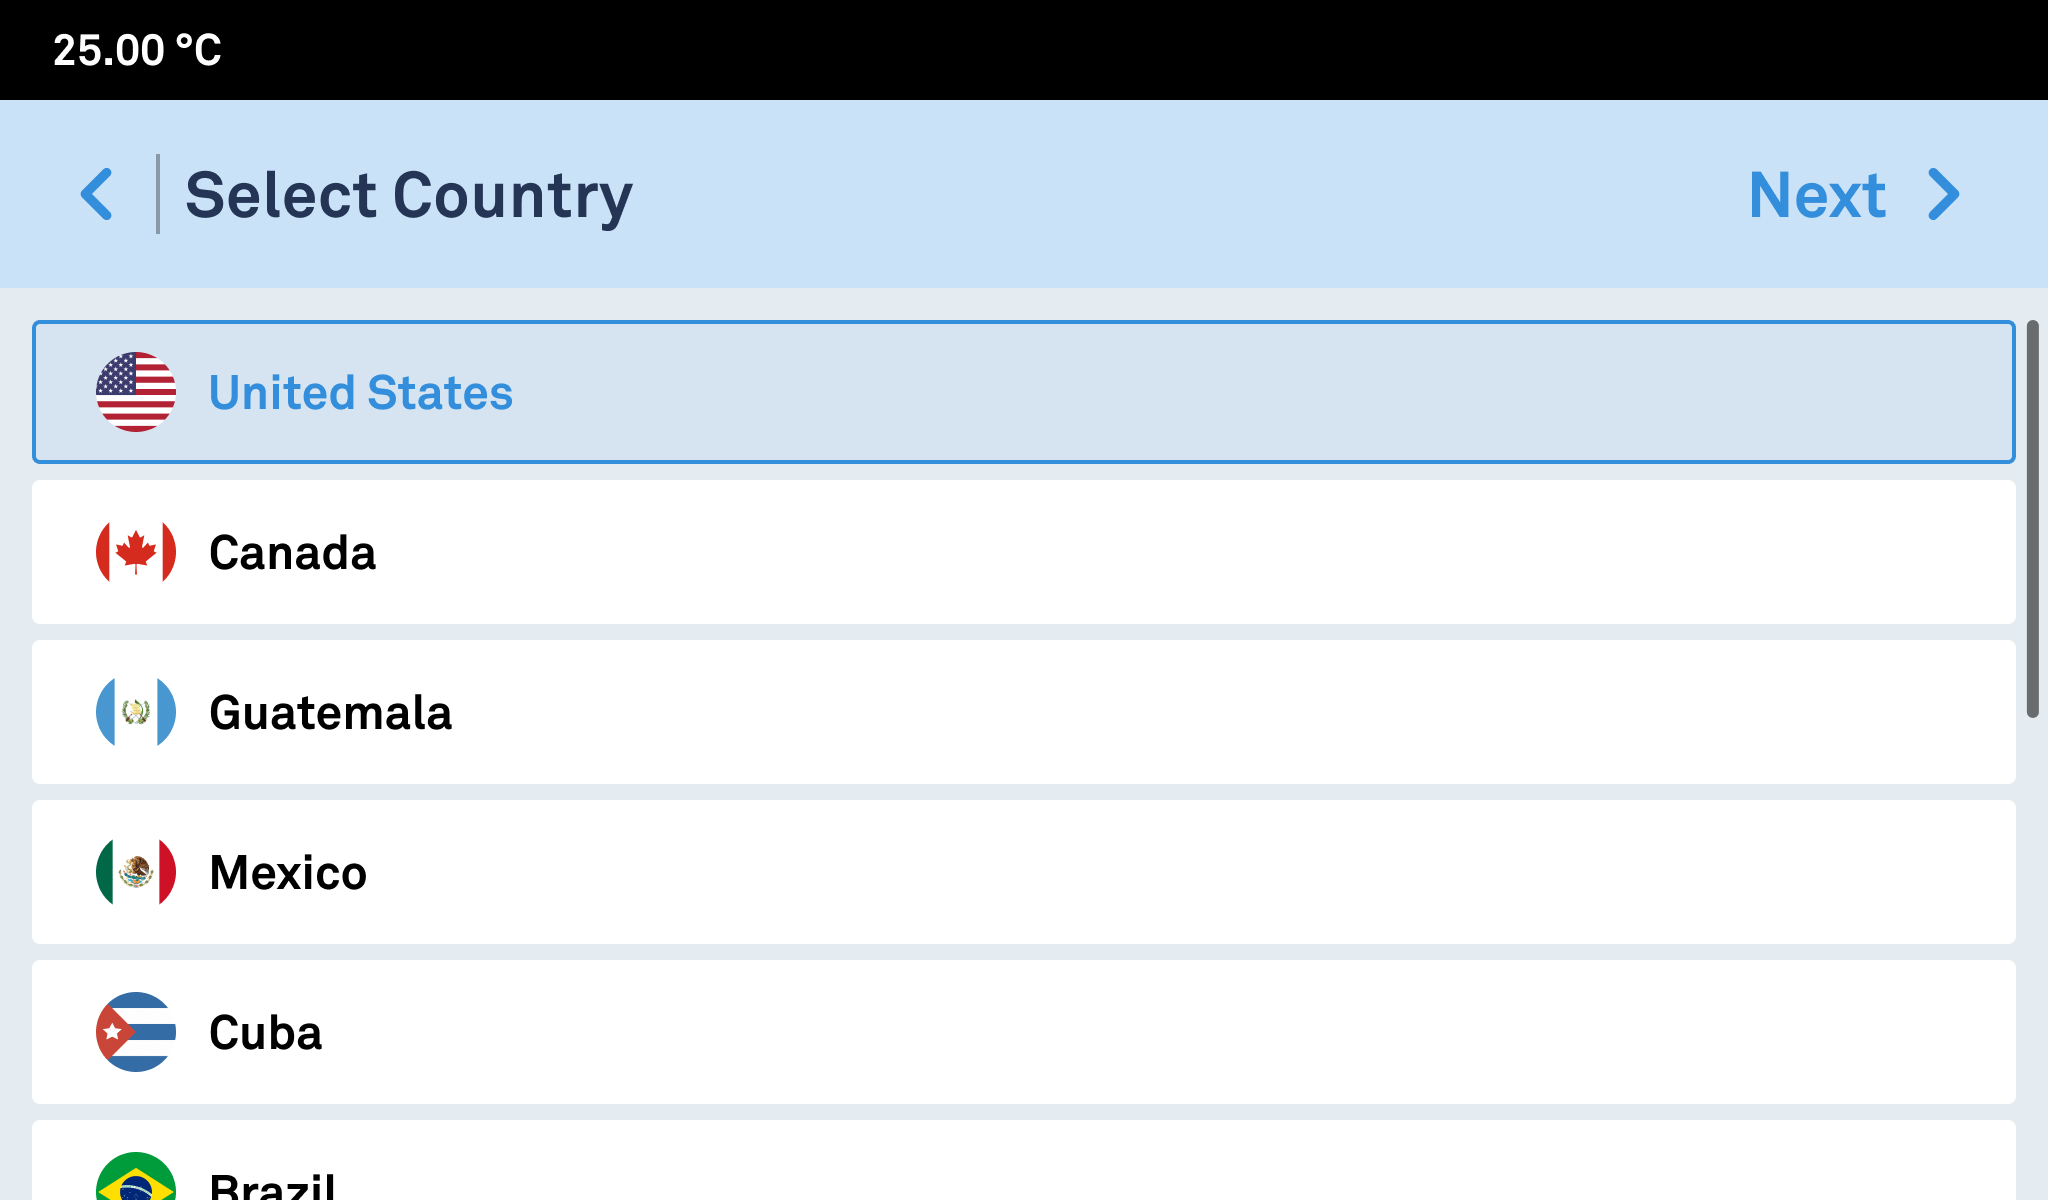
Select the region and interface language.
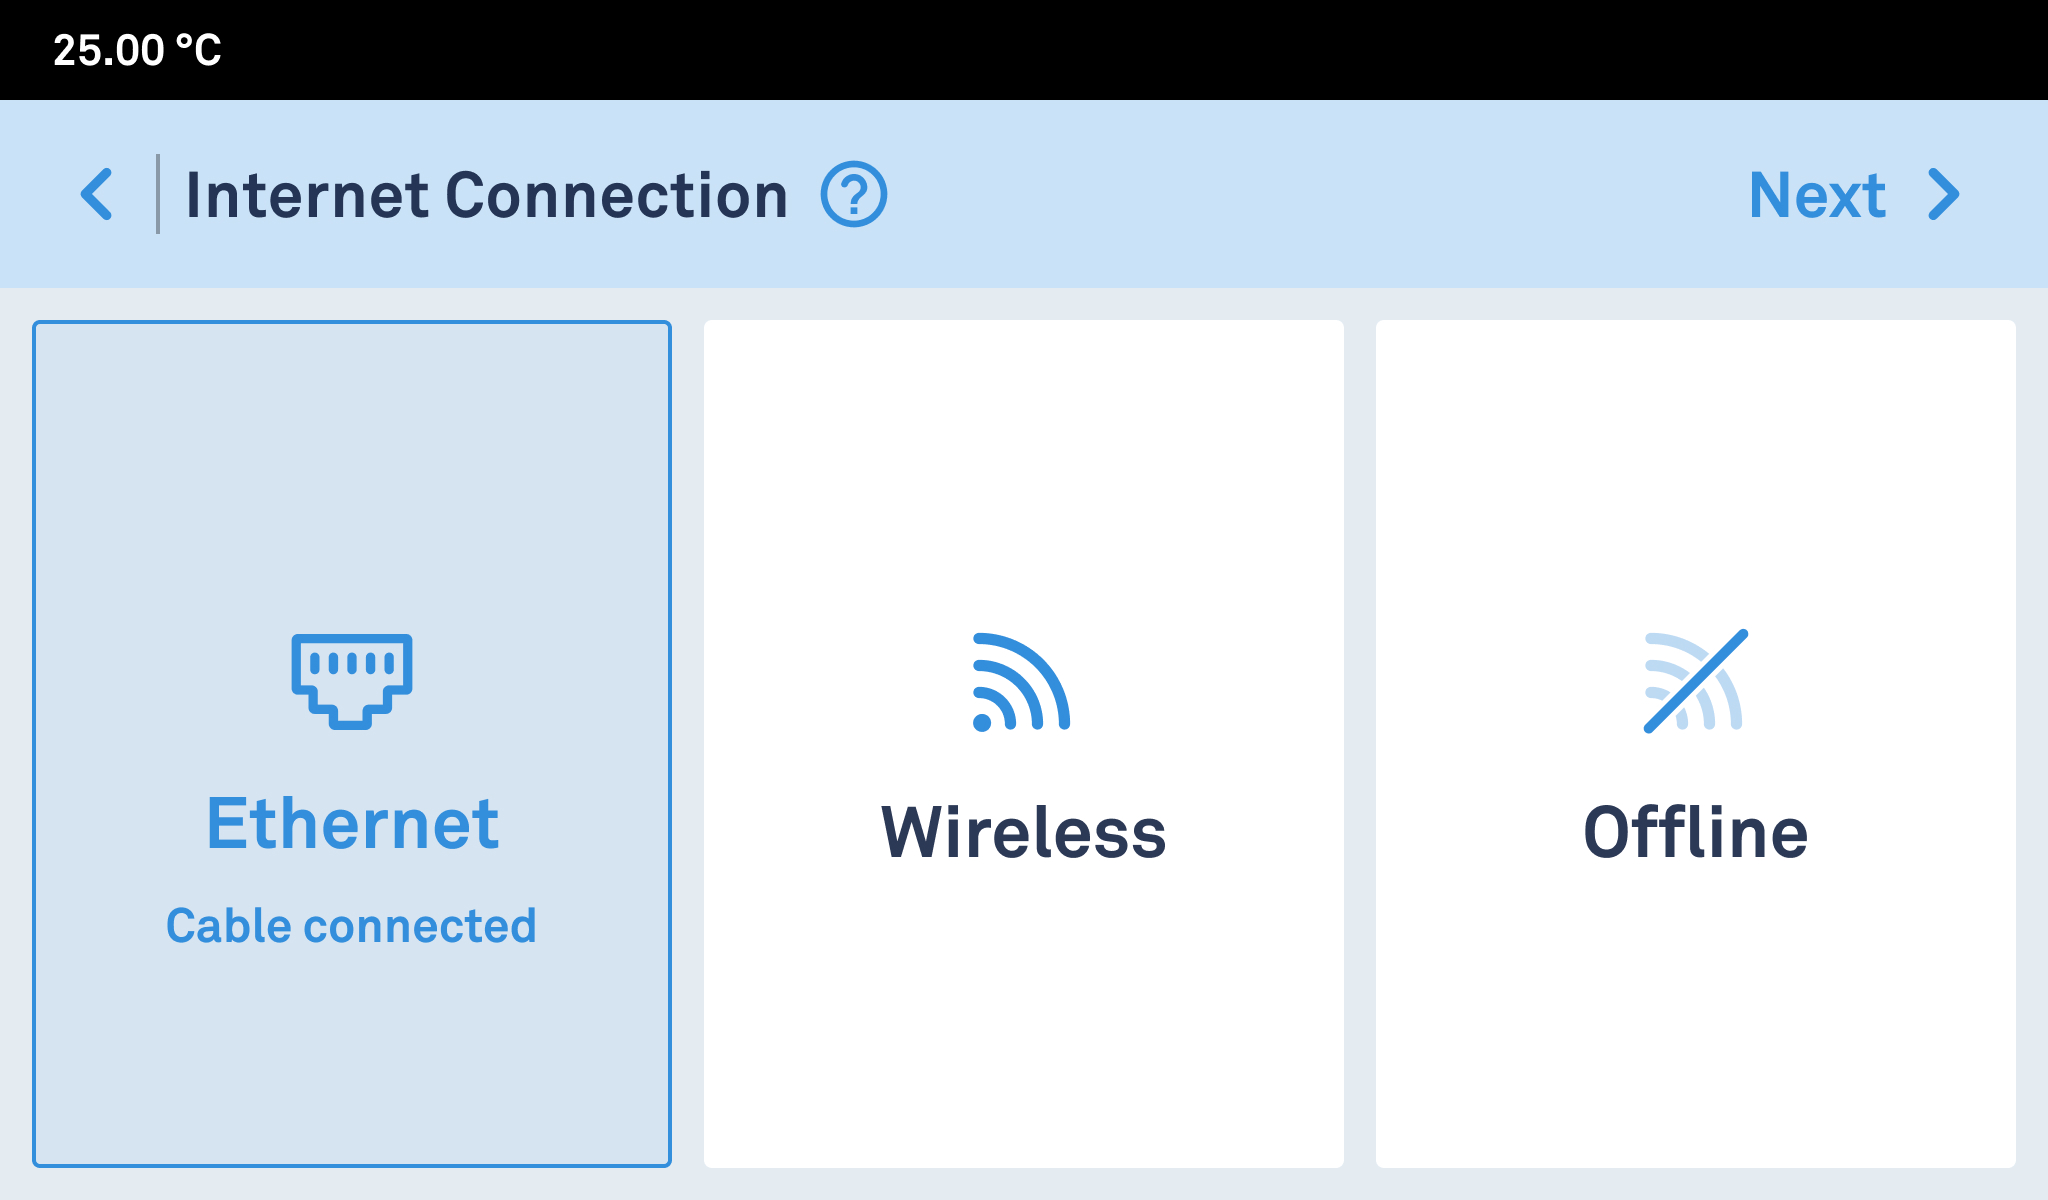
Configure the network connection (Ethernet, Wireless, or Offline).
To use AQUALAB Cloud or enable features such as OTA updates and automatic time and date synchronization, select an internet connection option.
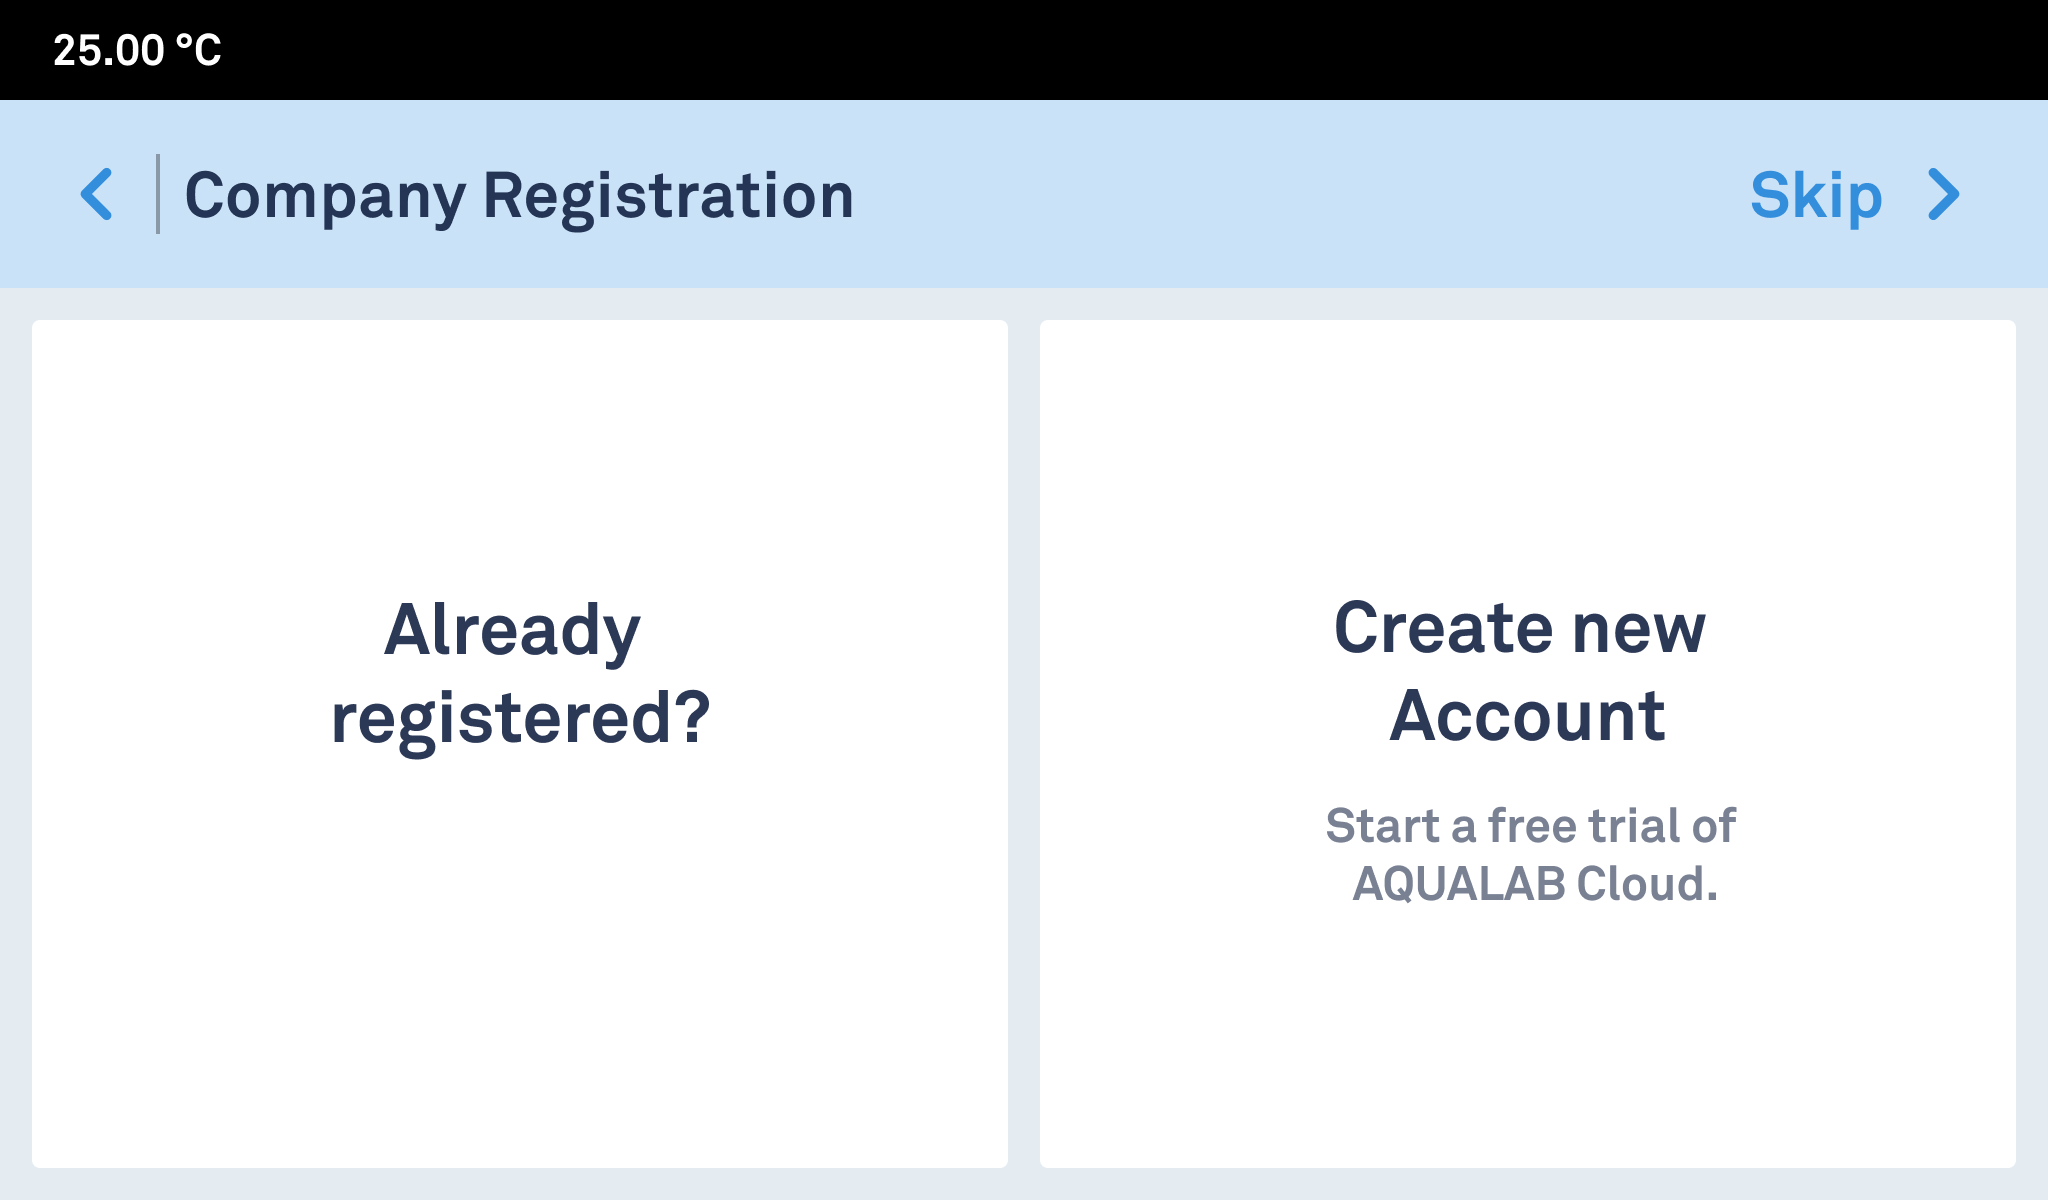
Set up an AQUALAB Cloud account or configure the instrument for standalone operation:
- If the company already has an account, tap Already registered?.
- To create a new account, tap Create new Account.
- To use the instrument in standalone mode without a cloud connection,
tap Skip >.
Learn more about the AQUALAB Cloud feature set here.
Caution
Skipping registration will set up this AQUALAB 5TE in Standalone mode, with no connection to AQUALAB Cloud. Connecting your AQUALAB 5TE to AQUALAB Cloud at a later point will require a full system reset, which clears stored readings, so export your data to your computer beforehand.
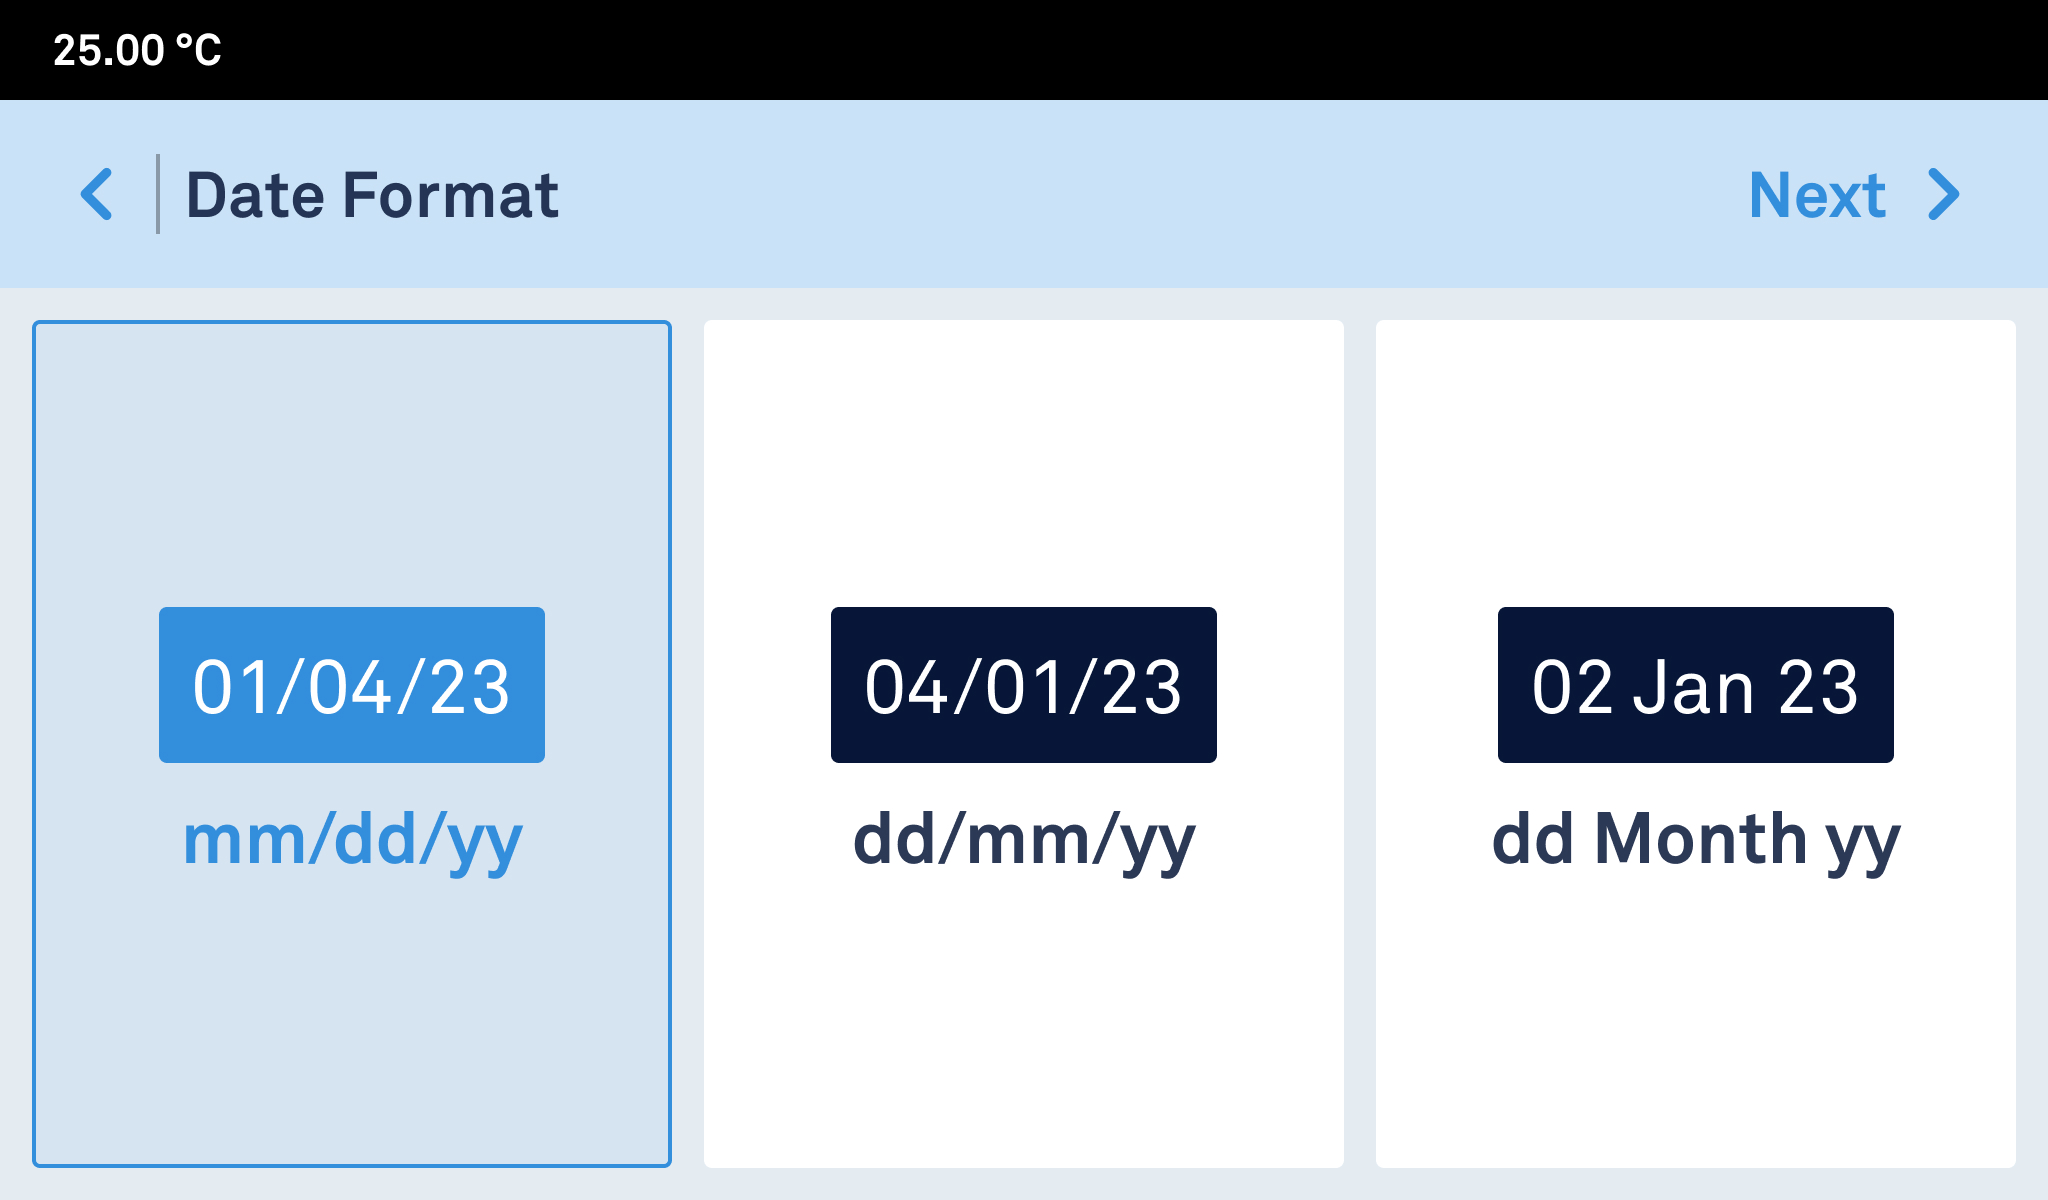
Set date and time (required for offline instruments; automatic for internet-connected instruments).
5. USER ACCESS MANAGEMENT
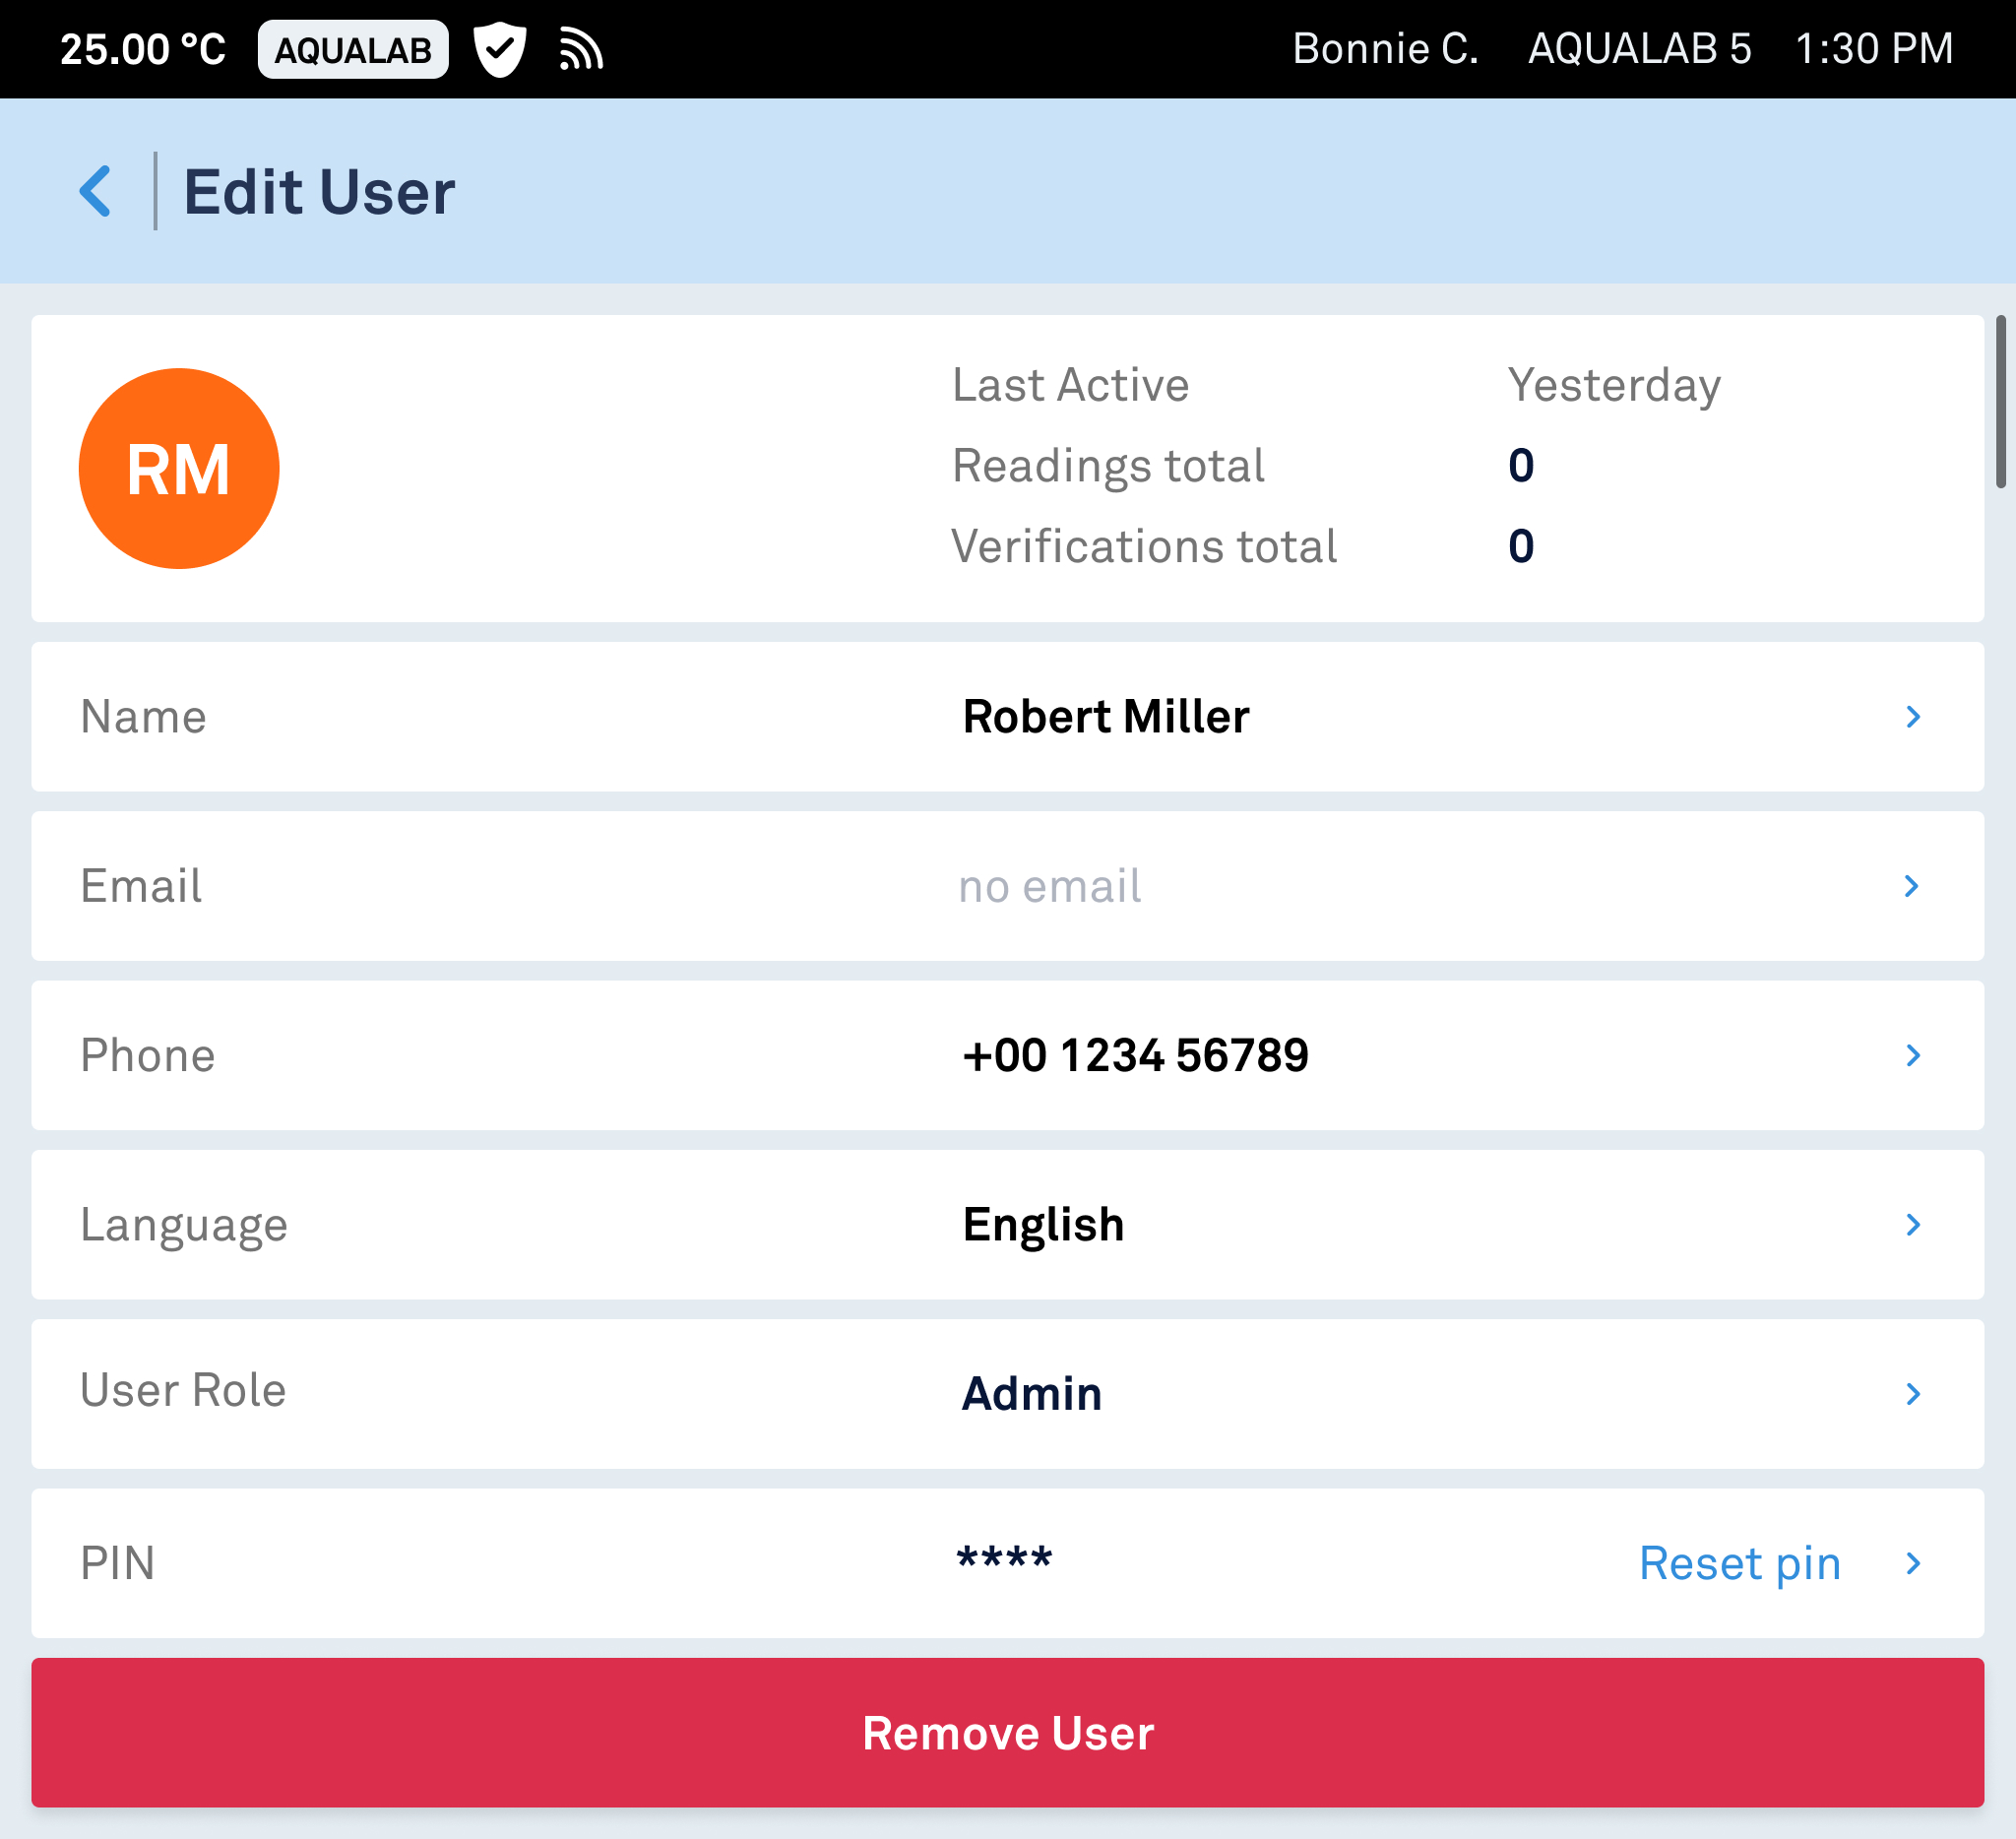
Access Control enables role-based permissions on both cloud-connected and standalone instruments. Access Control is enabled by adding a first user through Manage Users > + Add User. When it is disabled, all functions are available without logging in.
5.1 Logging In
When Access Control is enabled, the instrument displays the login screen at startup, after a session timeout, and after a user logs out.
To log in:
- Select your name from the user list.
- Enter your PIN.
- Tap [Log In].
To log out, tap the Status Bar to open the Expanded Status Bar, then tap Log Out. Logging out locks the instrument.
5.2 User Roles
Admin – Full access:
- Manage users (add, edit, remove)
- Manage instrument settings
- Create and archive products
- Take readings and perform verifications
Technician – Limited access:
- Edit own profile (except role)
- Take readings and perform verifications
Products are created in AQUALAB Cloud. See Section 10 - Products.
5.3 First Admin User
When Access Control is enabled, at least one Admin is required. The first user created is automatically assigned the Admin role.
Warning
On standalone instruments, store the first Admin PIN in a secure location. It cannot be recovered if lost. The only recovery is a System Reset, which permanently deletes all data from the instrument.
5.4 Adding Users (Admin Only)
New users are added from the Manage Users screen. The generated temporary PIN must be securely communicated to the assigned user. Users must change the PIN upon first login if required by facility policy.
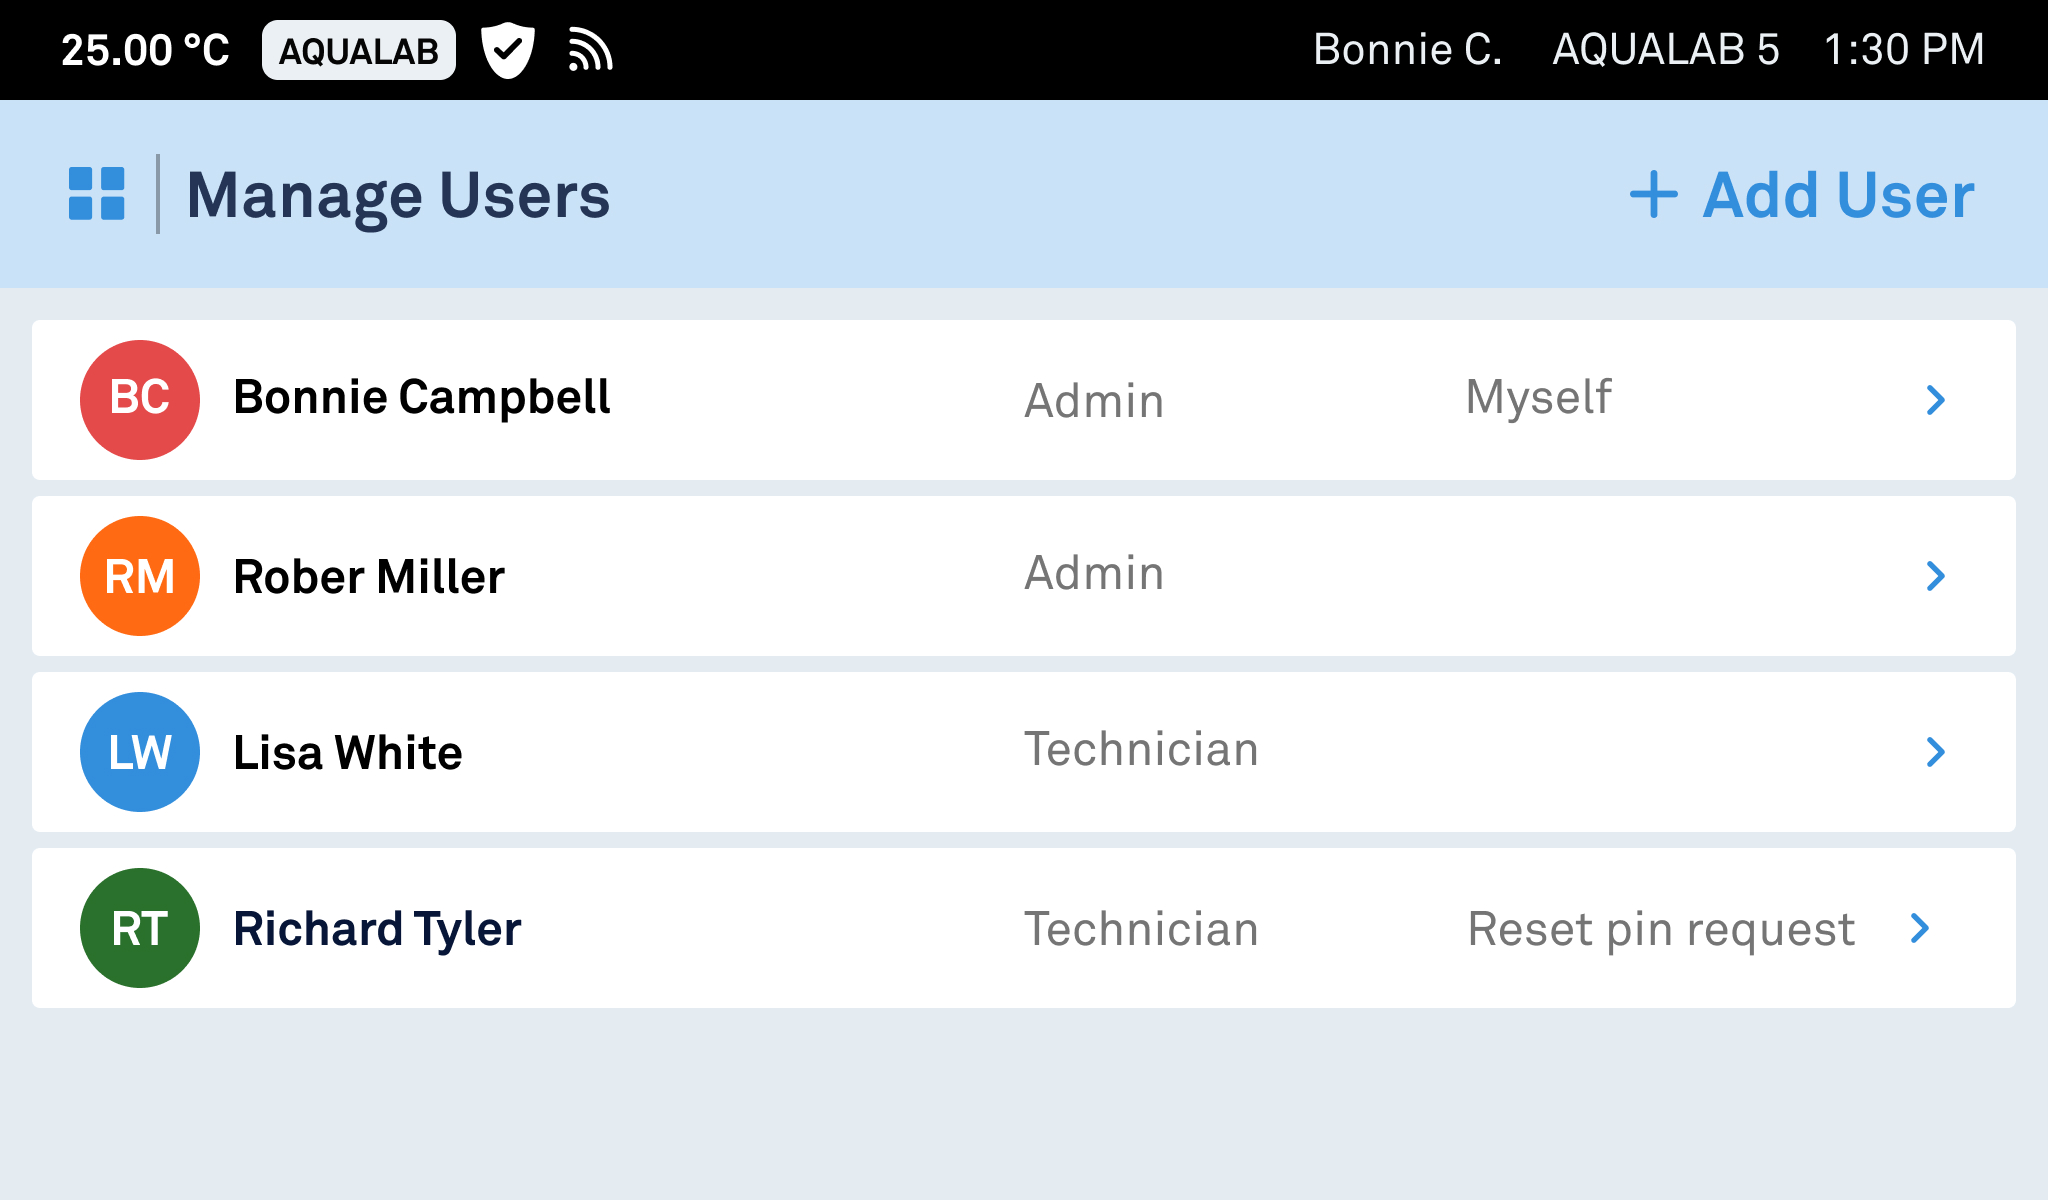
5.5 Removing User (Admin Only)
Select the user in Manage Users, tap
 , and confirm. Removed users remain associated with their previous readings for audit traceability. An Admin cannot remove themselves.
5.6 Editing User Profiles
The Admin user can edit all fields in any user profile. Technicians can edit all fields in their own profile except their assigned role.
6. INSTRUMENT SETTINGS
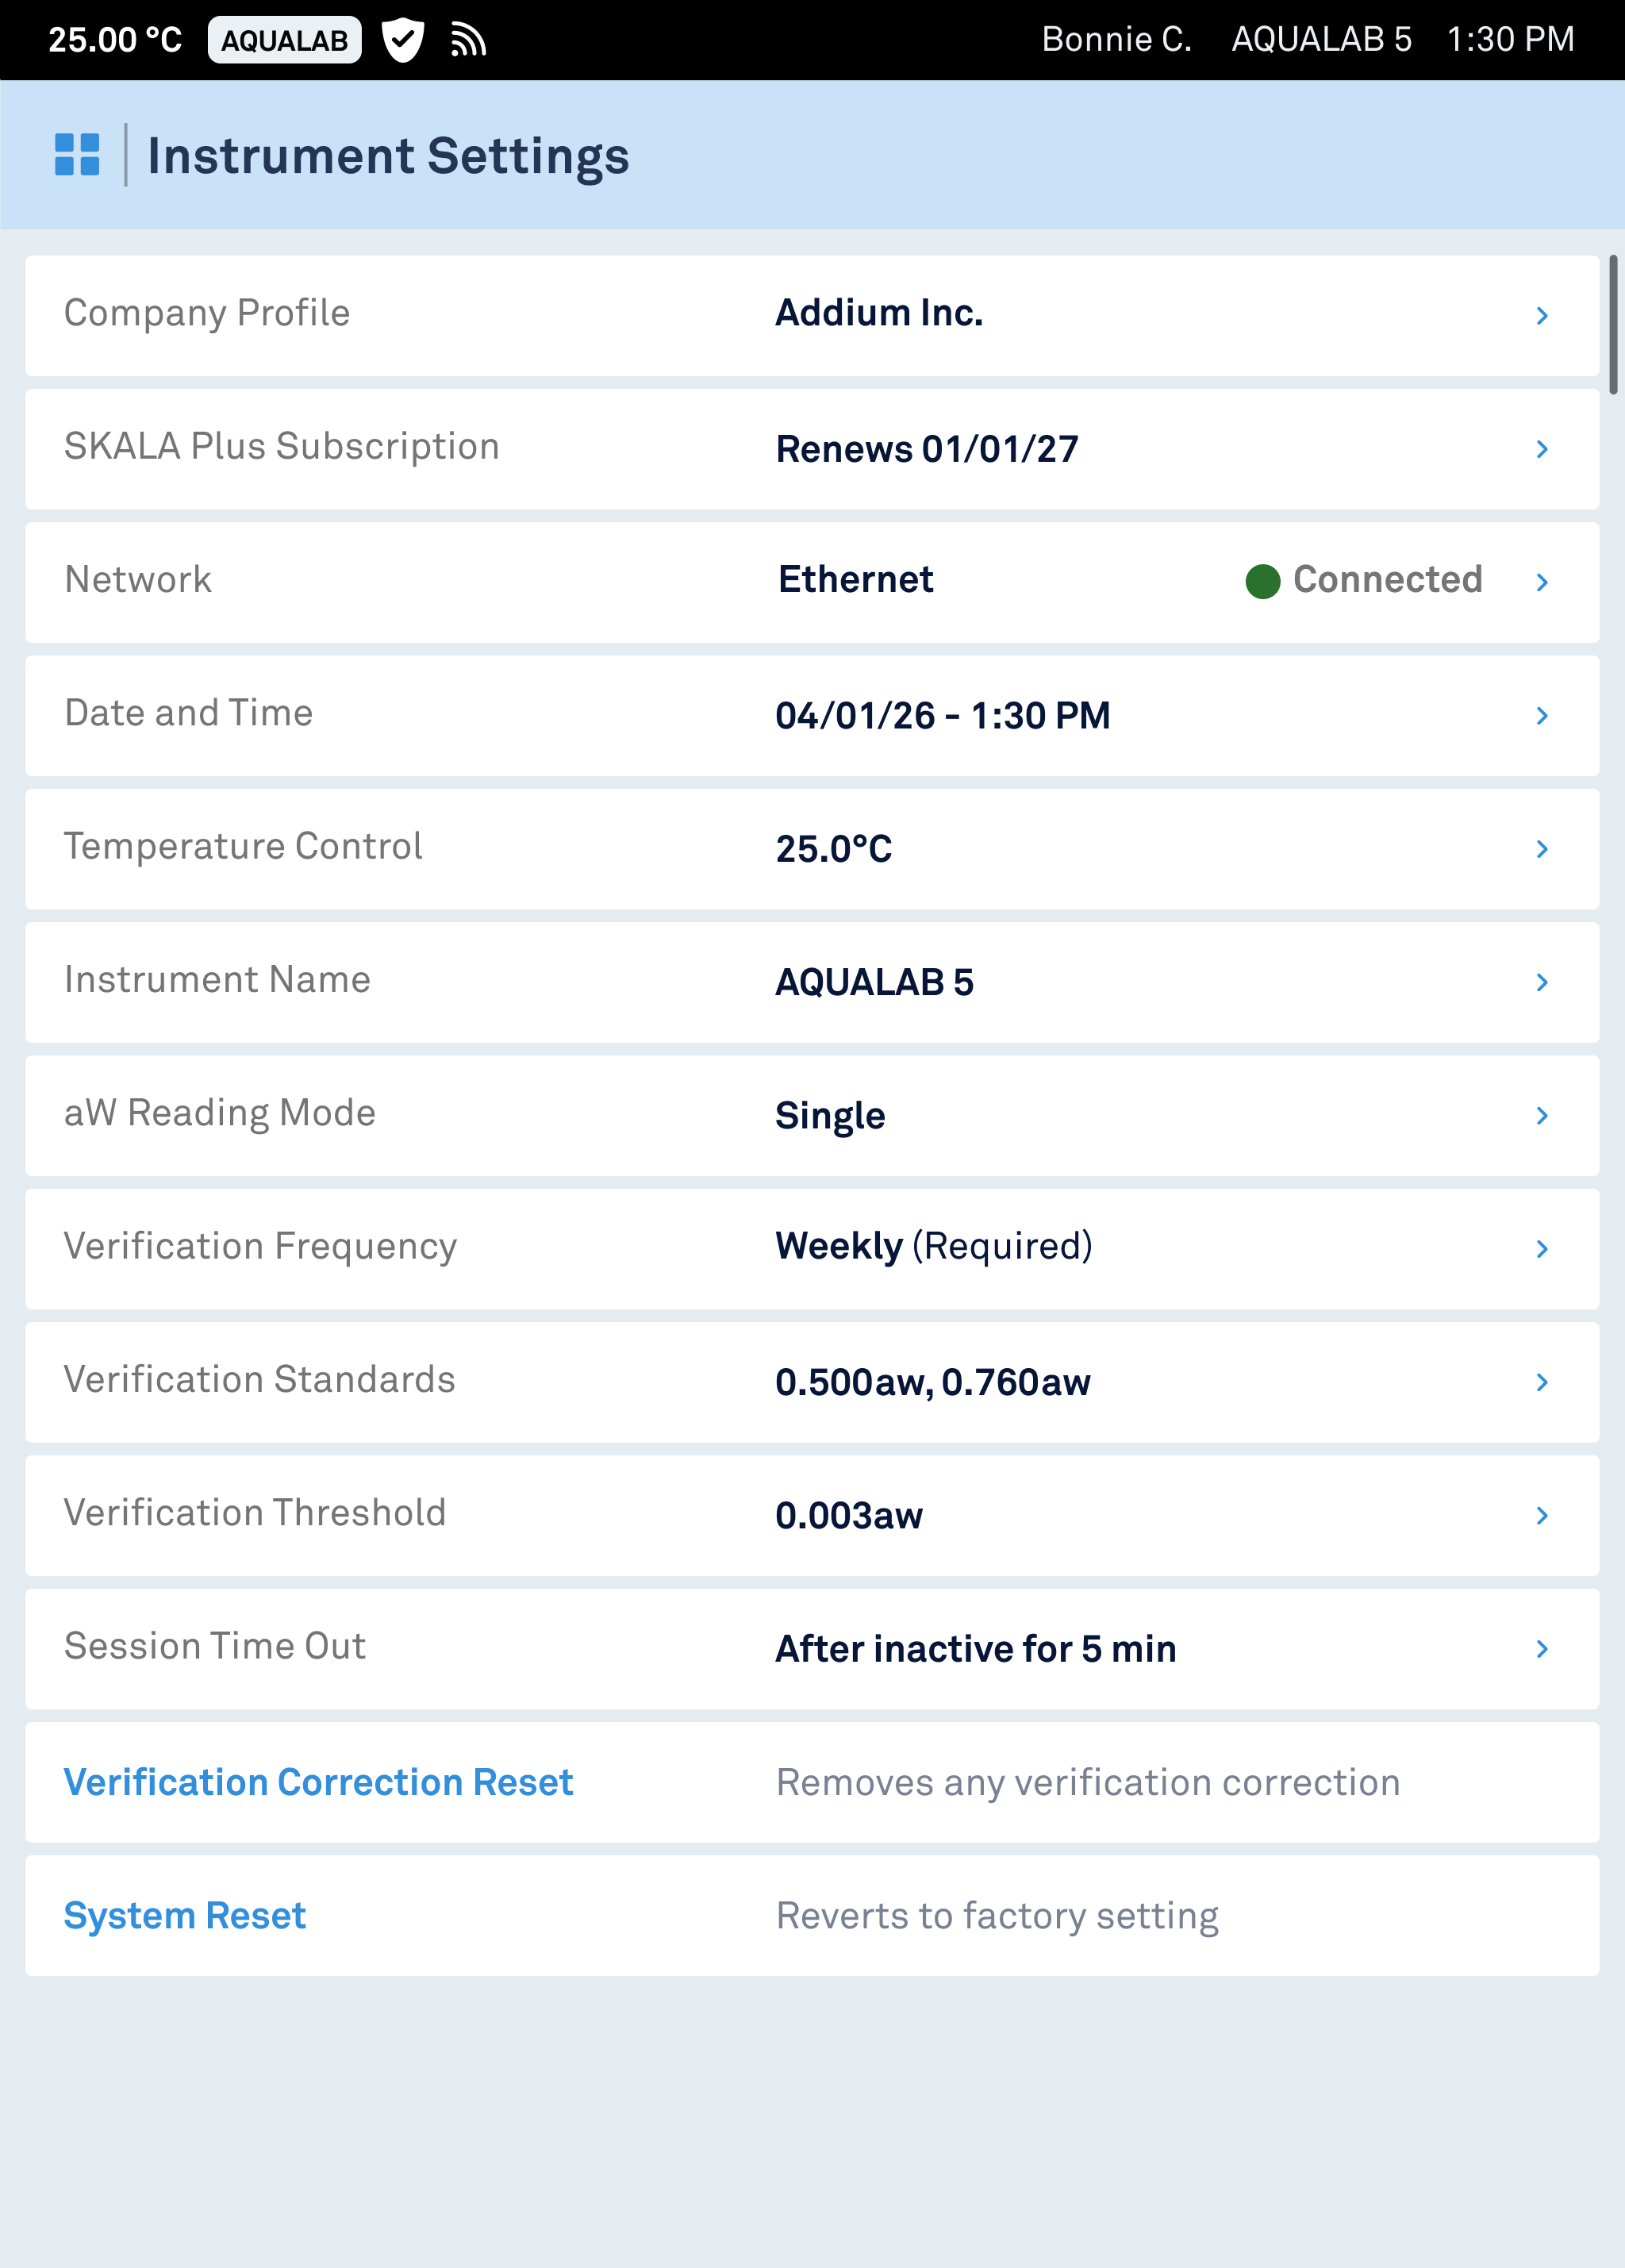
Only Admin users can modify instrument settings.
Access settings from the Home screen by selecting Instrument Settings.
Company Profile
Company information included in exports. Read-only on cloud-connected instruments (managed in AQUALAB Cloud). Editable on standalone instruments.
Network
Displays and configures Ethernet or wireless connection.
AQUALAB Cloud License
Displays license status. License management is performed through the AQUALAB Cloud web interface.
Date and Time
Configures date, time, and display format. Internet-connected instruments synchronize automatically.
Temperature Control
Sets the sample chamber control temperature (15–50 °C). Setting this close to typical sample temperature reduces equilibration time.
Verification Frequency
Defines verification interval and enforcement level (“Required” or “Recommended”). Addium recommends daily or once-per-shift verification.
- Recommended: The instrument displays a notification when verification is due. Readings can still be taken.
- Required: The instrument blocks new readings until verification is completed.
Addium recommends daily or once-per-shift verification.
Verification Standards
Selects which standards are used during verification. Default standards are 0.500 aw and 0.760 aw. Select at least two standards that bracket the sample water activity range.
For more information on selecting the appropriate standards to ensure accurate verification results, see Selecting Verification Standards.
Verification Threshold
Maximum allowable difference between measured and expected values. Default verification threshold of 0.003 aw is recommended. Adjust to match facility accuracy requirements.
Water Activity (aw) Reading Mode
Four modes are available:
- Single: Reads sample until aw change is less than or equal to 0.0010 aw/min. (default).
- ISO 18787: Reads sample until aw change is less than or equal to 0.0003 aw/min. Complies with ISO 18787.
- Low Emitting: Uses relaxed equilibration criteria for faster results with reduced precision. Suitable for process monitoring of slow-equilibrating samples where speed is prioritized over maximum accuracy.
Reads sample until aw change is less than or equal to 0.0020 aw/min.
Instrument Name
Editable name included in exports. Default: serial number.
Session Timeout
Inactivity period before automatic lock.
Correction Reset
Removes any applied verification correction reverting to the most recent factory water activity calibration. Irreversible; does not affect historical readings. Creates a record in Verification History. Verification is recommended after resetting.
System Reset
Permanently deletes all local data, including readings, verifications, users, and configuration settings. This action cannot be undone.
This is the only operation that removes readings from the instrument. Individual readings cannot be deleted.
7. VERIFICATION
Verification confirms instrument accuracy by measuring certified water activity standards. Verification must be performed according to facility SOPs. Addium recommends daily or once-per-shift verification at minimum.
CAUTION
Always clean the sample chamber before verification.
Residual contaminants affect accuracy and reading speed.
7.1 Verification, Correction, and Calibration
These terms describe distinct operations and are not interchangeable.
Calibration
The controlled procedure that establishes the instrument's baseline measurement accuracy against reference standards. Calibration requires specialized equipment and reference materials and is performed only by Addium or an Addium-authorized service center. It cannot be performed by the user or by third parties. Calibration performed outside Addium's authorized service network is not covered by Addium's accuracy specification or warranty. Your instrument is calibrated before it ships, and recalibration is available through Addium service and authorized distributors. The most recent calibration is documented on the Certificate of Calibration supplied with the instrument.
Verification
The user procedure that confirms measurement accuracy by measuring certified verification standards and comparing the results to their known values. Verification is a check only: on its own it does not alter how the instrument measures. Every verification is recorded in the Verification History.
Correction
An optional adjustment applied after a verification. A correction uses a best-fit calculation across all measured standards to adjust the instrument's calibration values. Corrections affect future readings only and never alter readings already recorded. Applying a correction creates a permanent, time-stamped record in Verification History.
Offset Correction
The numerical values that an applied correction contributes to each sensor. The AQUALAB 5TE applies separate offsets to the chilled-mirror dew point sensor, used for full readings, and to the capacitive sensor, used for One-Minute readings. Current offset values are shown in Diagnostics & Help > Verification. Offset correction is not a separate procedure; it is the result of an applied correction.
Correction Reset
Removes all applied corrections and returns the instrument to its most recent factory calibration. Corrections are not removed individually. Correction Reset is irreversible, does not affect historical readings, and creates a record in Verification History.
See Correction Reset in Instrument Settings.
7.2 Selecting Verification Standards
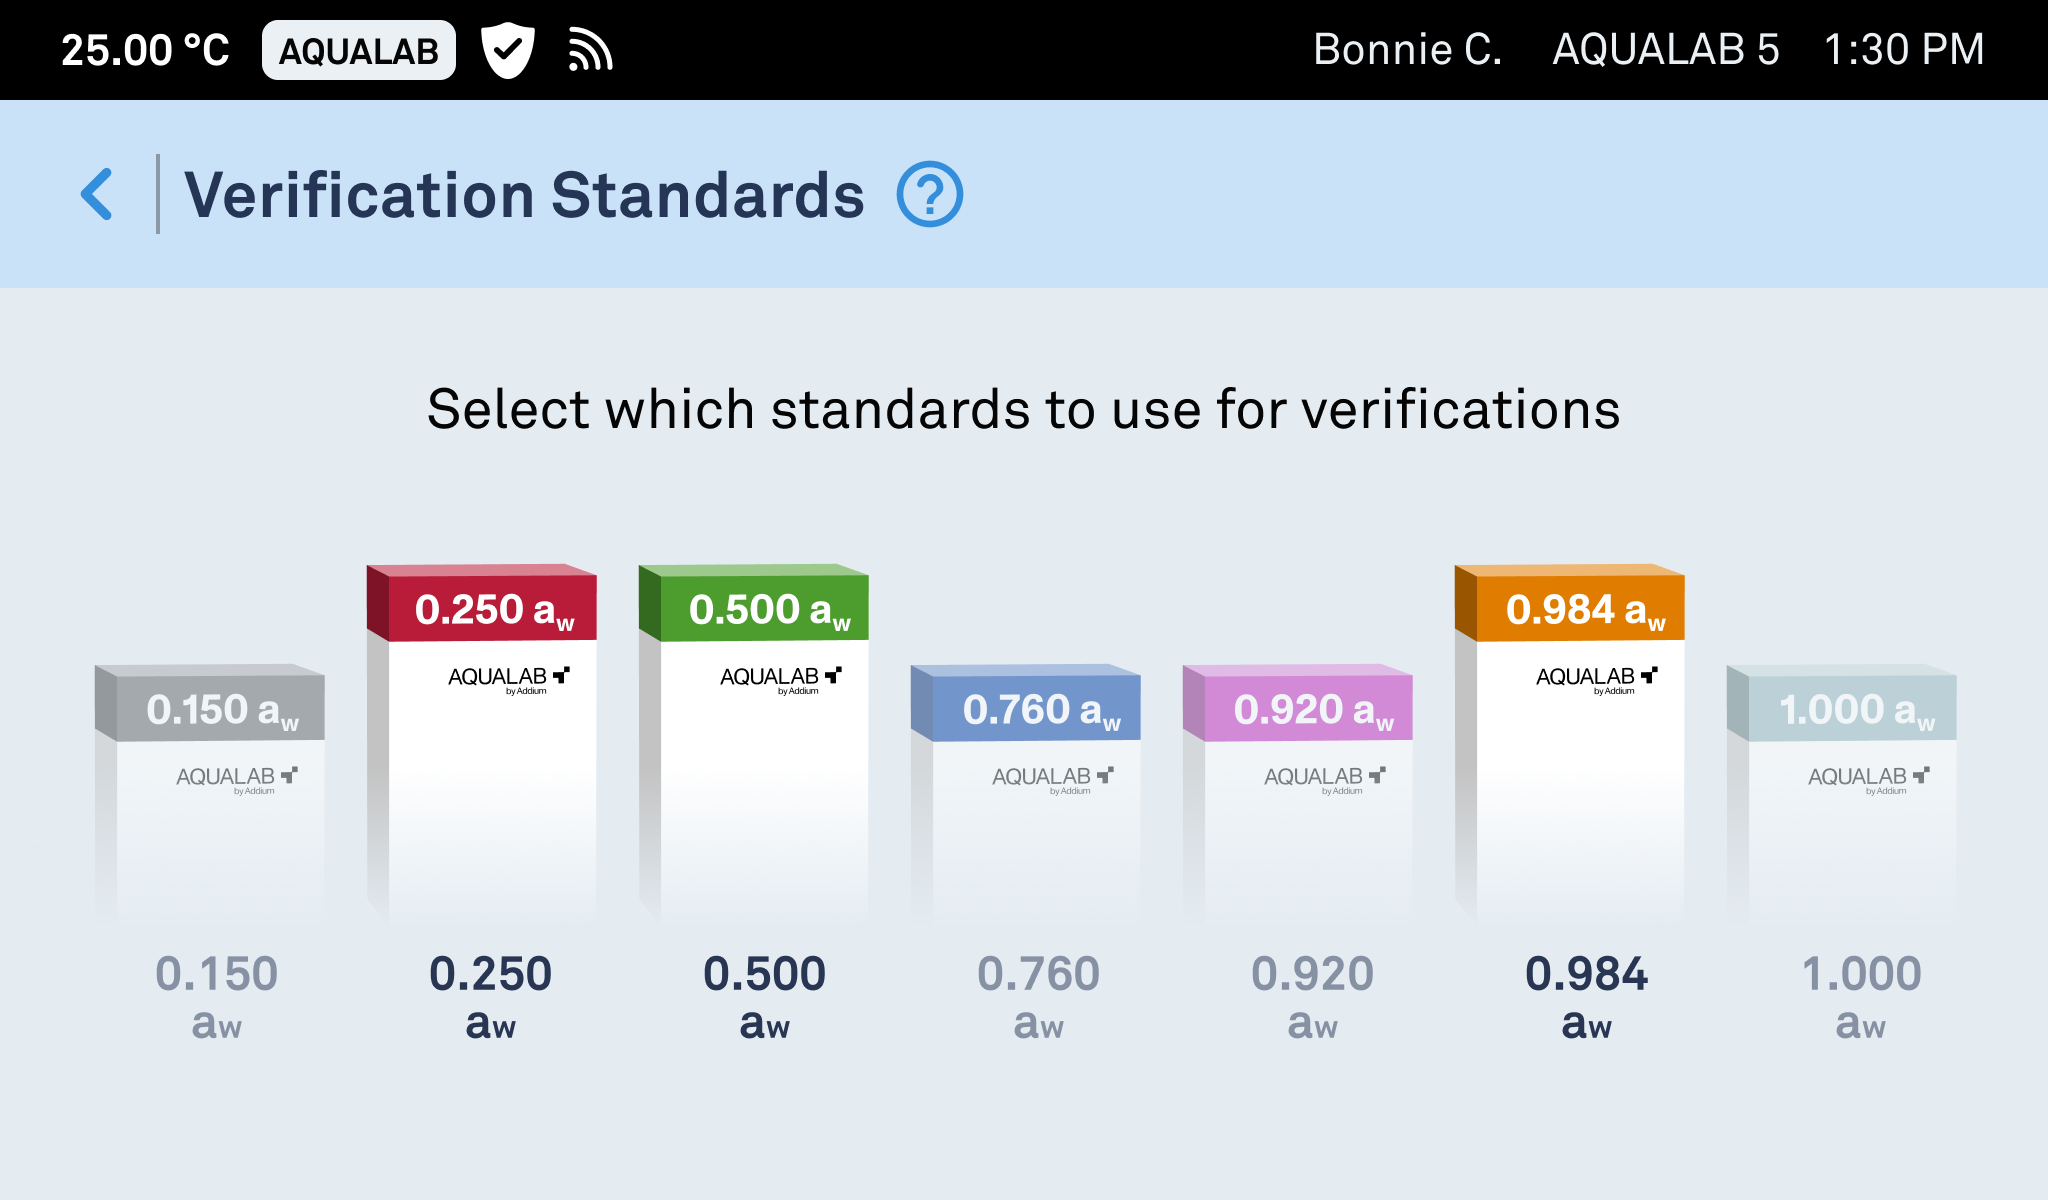
Select at least two standards that bracket the water activity range of the samples being measured. Additional standards within the range improve accuracy for products spanning a wide aw range.
Verification standards come in seven water activity levels (0.150, 0.250, 0.500, 0.760, 0.920, 0.984, and 1.000 aw) and must be purchased separately on the Addium online store.
Default verification standards are 0.500 aw and 0.760 aw. To change the active standards, navigate to Instrument Settings > Verification Standards.
CAUTION
Handle standards according to the Safety Data Sheet (SDS) for the standard in use. Hazards differ between standards.
7.3 Preparation
Complete the following before starting verification:
- Clean the instrument. (For detailed information, see Cleaning the Sample Chamber.)
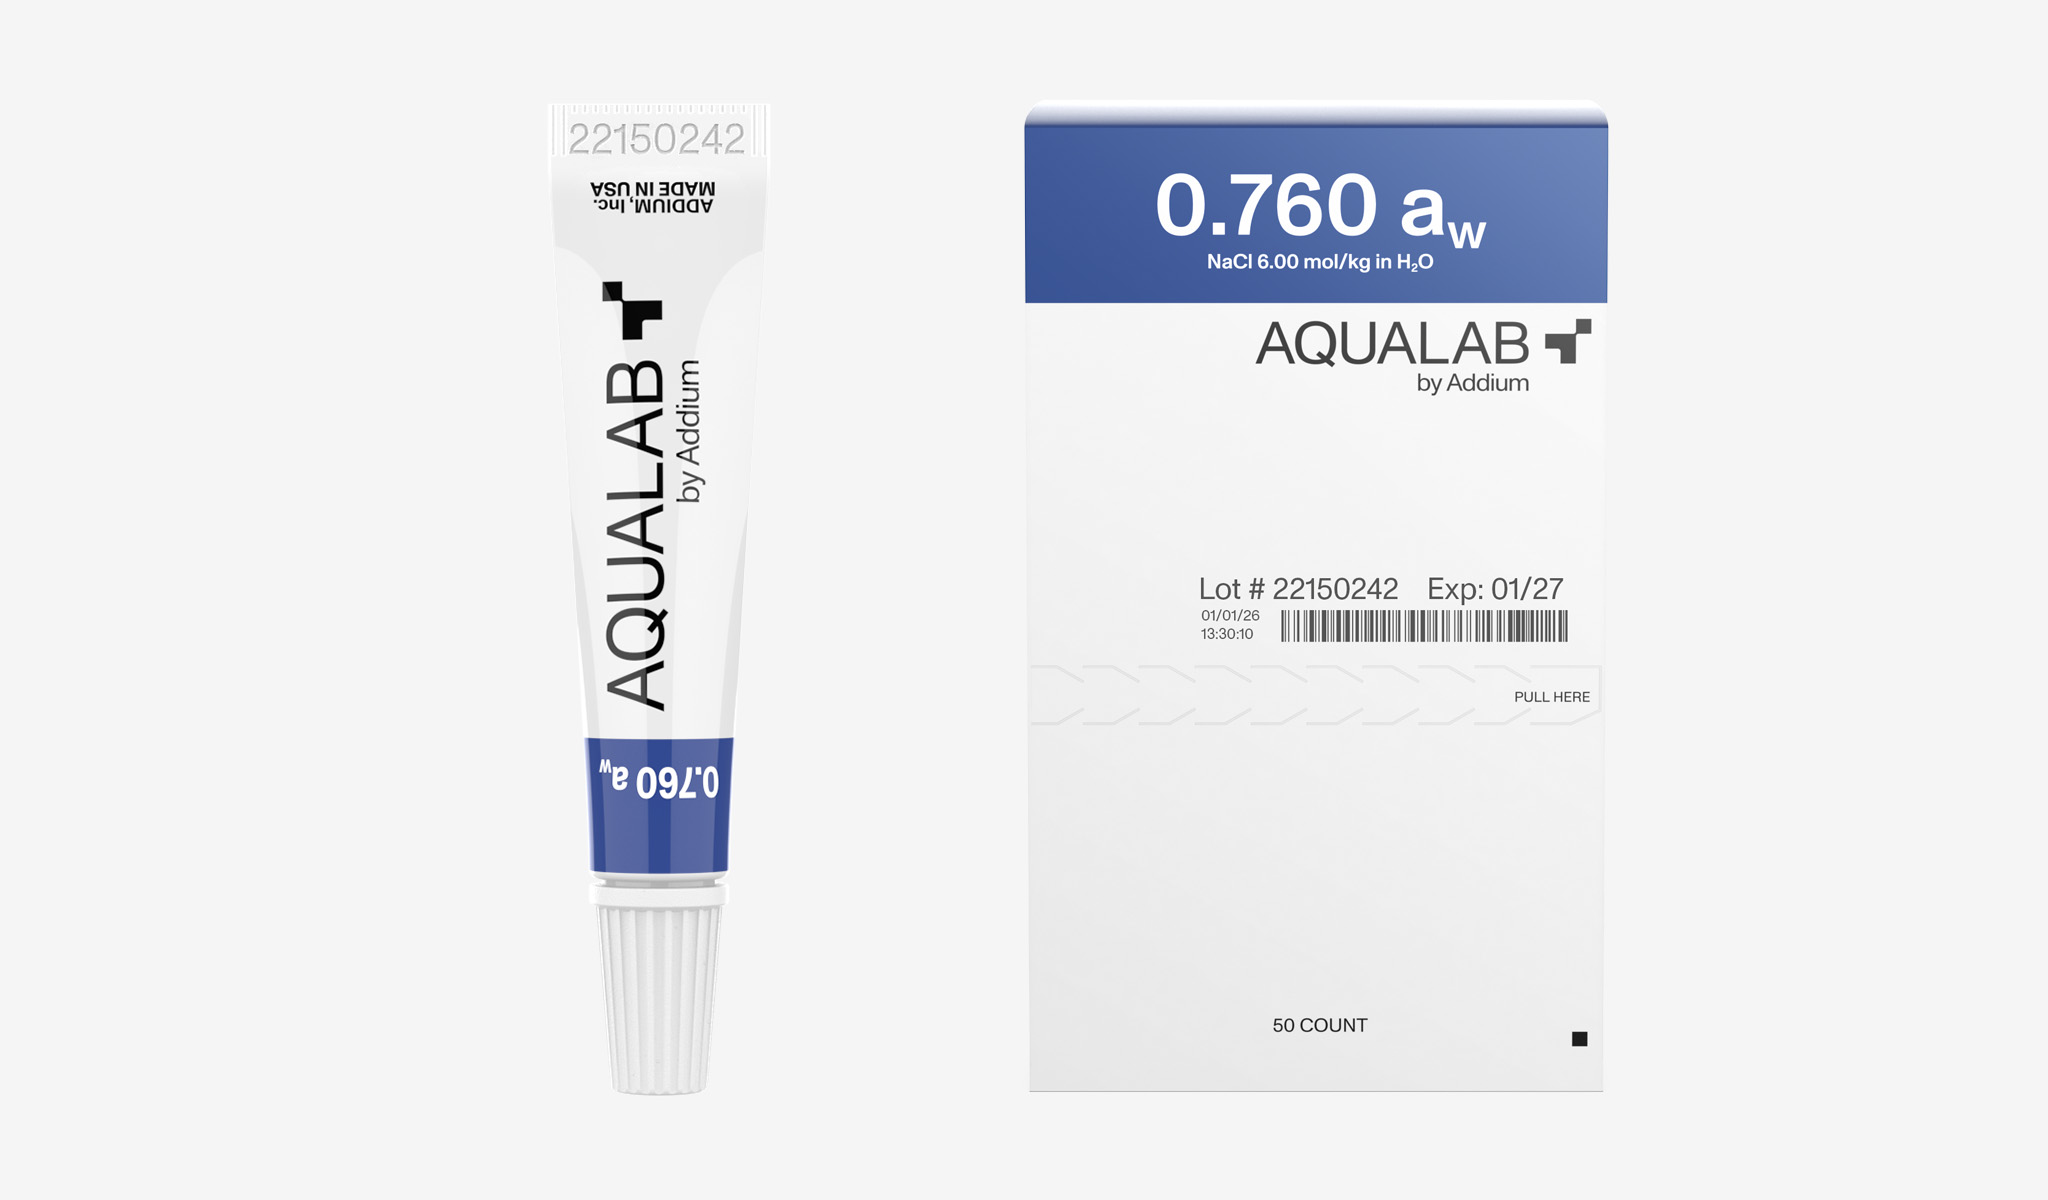
- Check standard expiration dates. Do not use expired standards. Dates are printed on the tube end and standards box.
- Use a new sample cup for each standard. Do not reuse cups.
Prepare the standard. Remove the twist top, puncture the foil seal with the back of the cap, and squeeze contents into the cup.
CAUTION
Ensure the cup rim and exterior are free of solution. Clean up spills immediately using a KIMWIPE® tissue or swabs – verification standards are corrosive.
7.4 Performing Verification
For each selected standard:
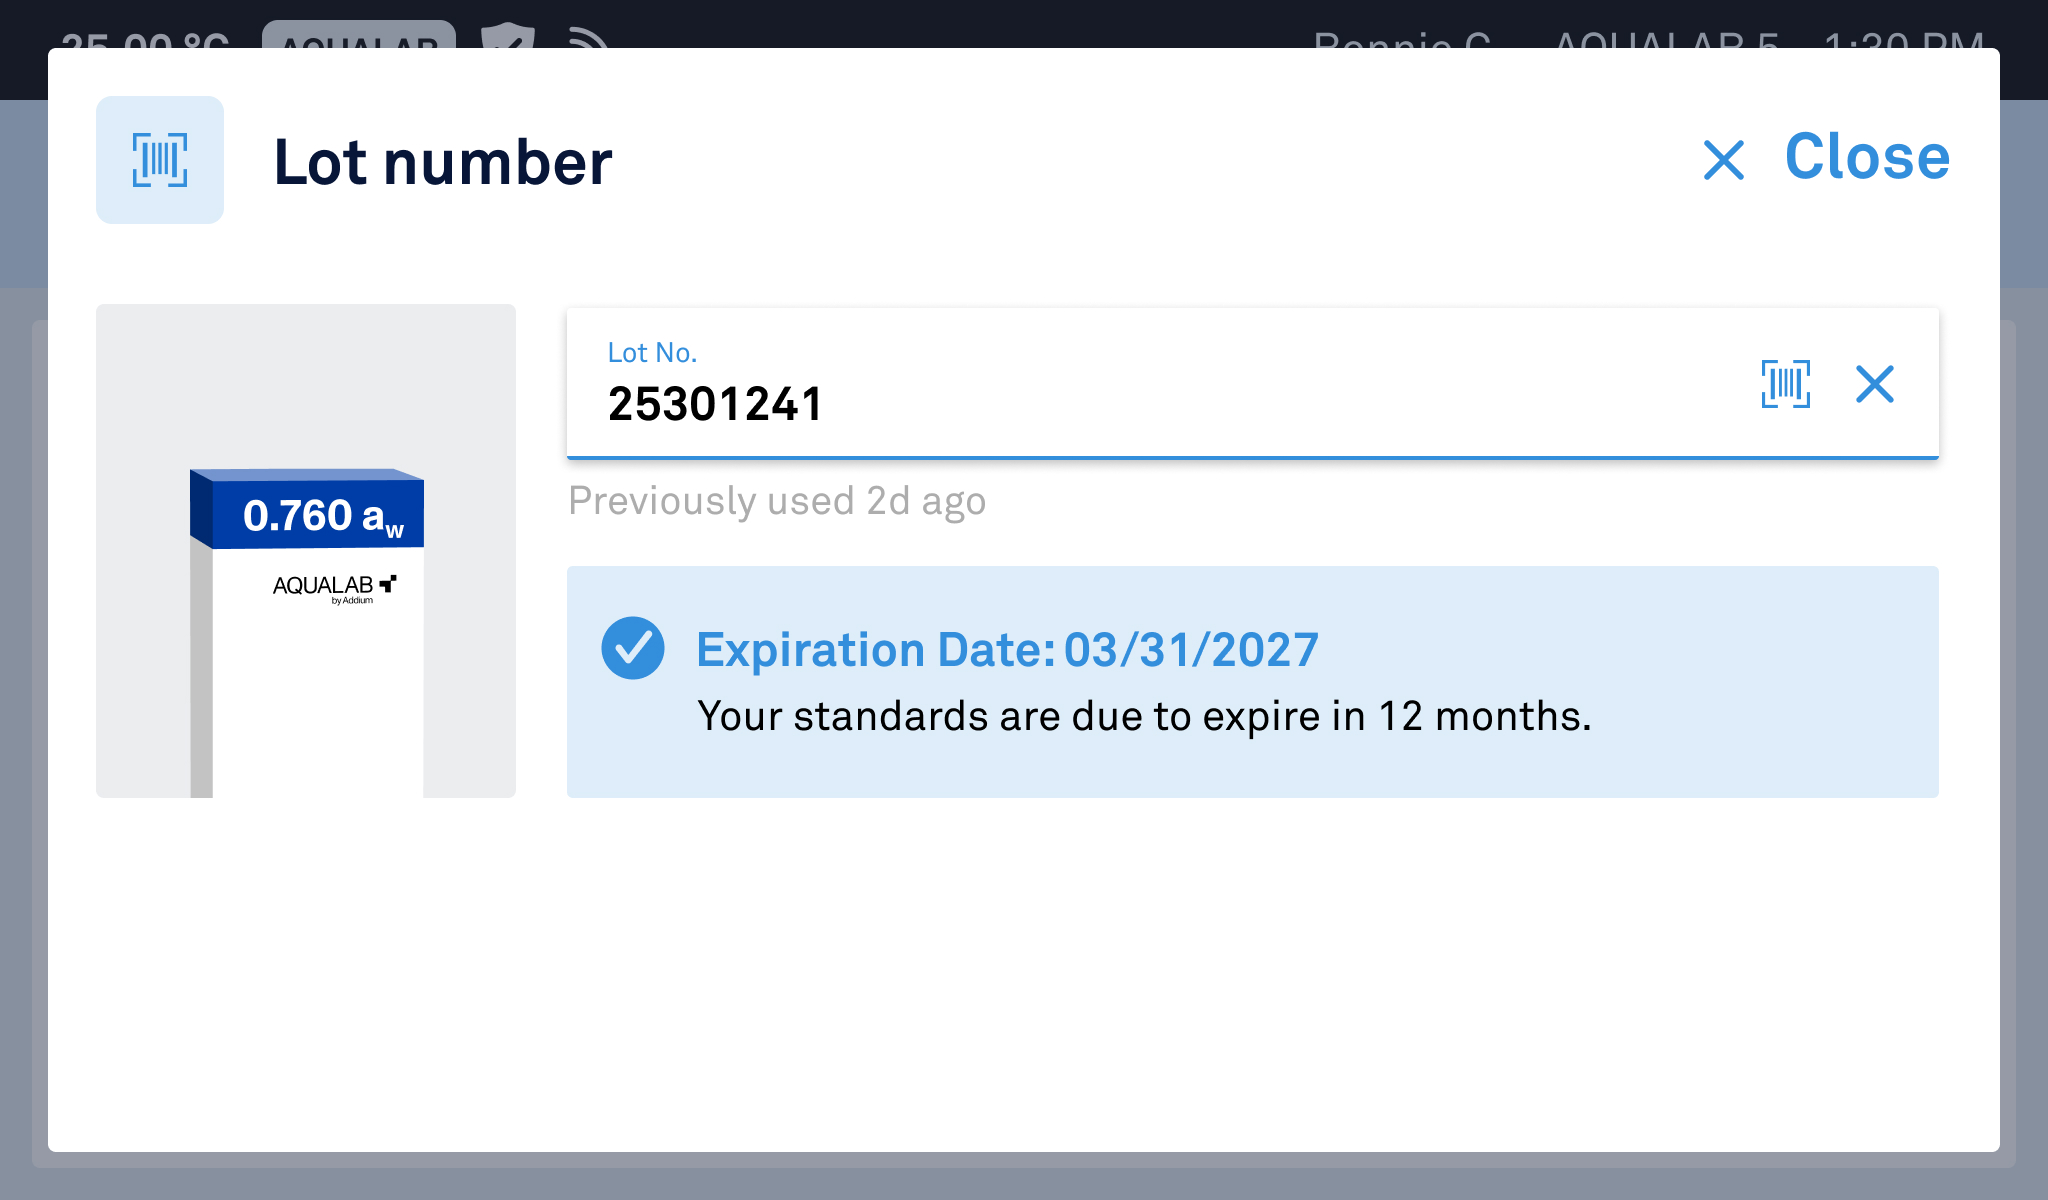
- Insert the filled cup into the sample chamber when prompted. Optionally use a barcode scanner or manually enter the lot number for traceability.
- Close the lid and move the lever to READ. The reading starts automatically. A preliminary value displays as “In Progress.” The final result displays as “Completed.”
- Remove the sample and proceed to the next standard. Repeat for all selected standards.

NOTE
If sample temperature differs from chamber temperature by >2 °C, the instrument adjusts the temperature first.
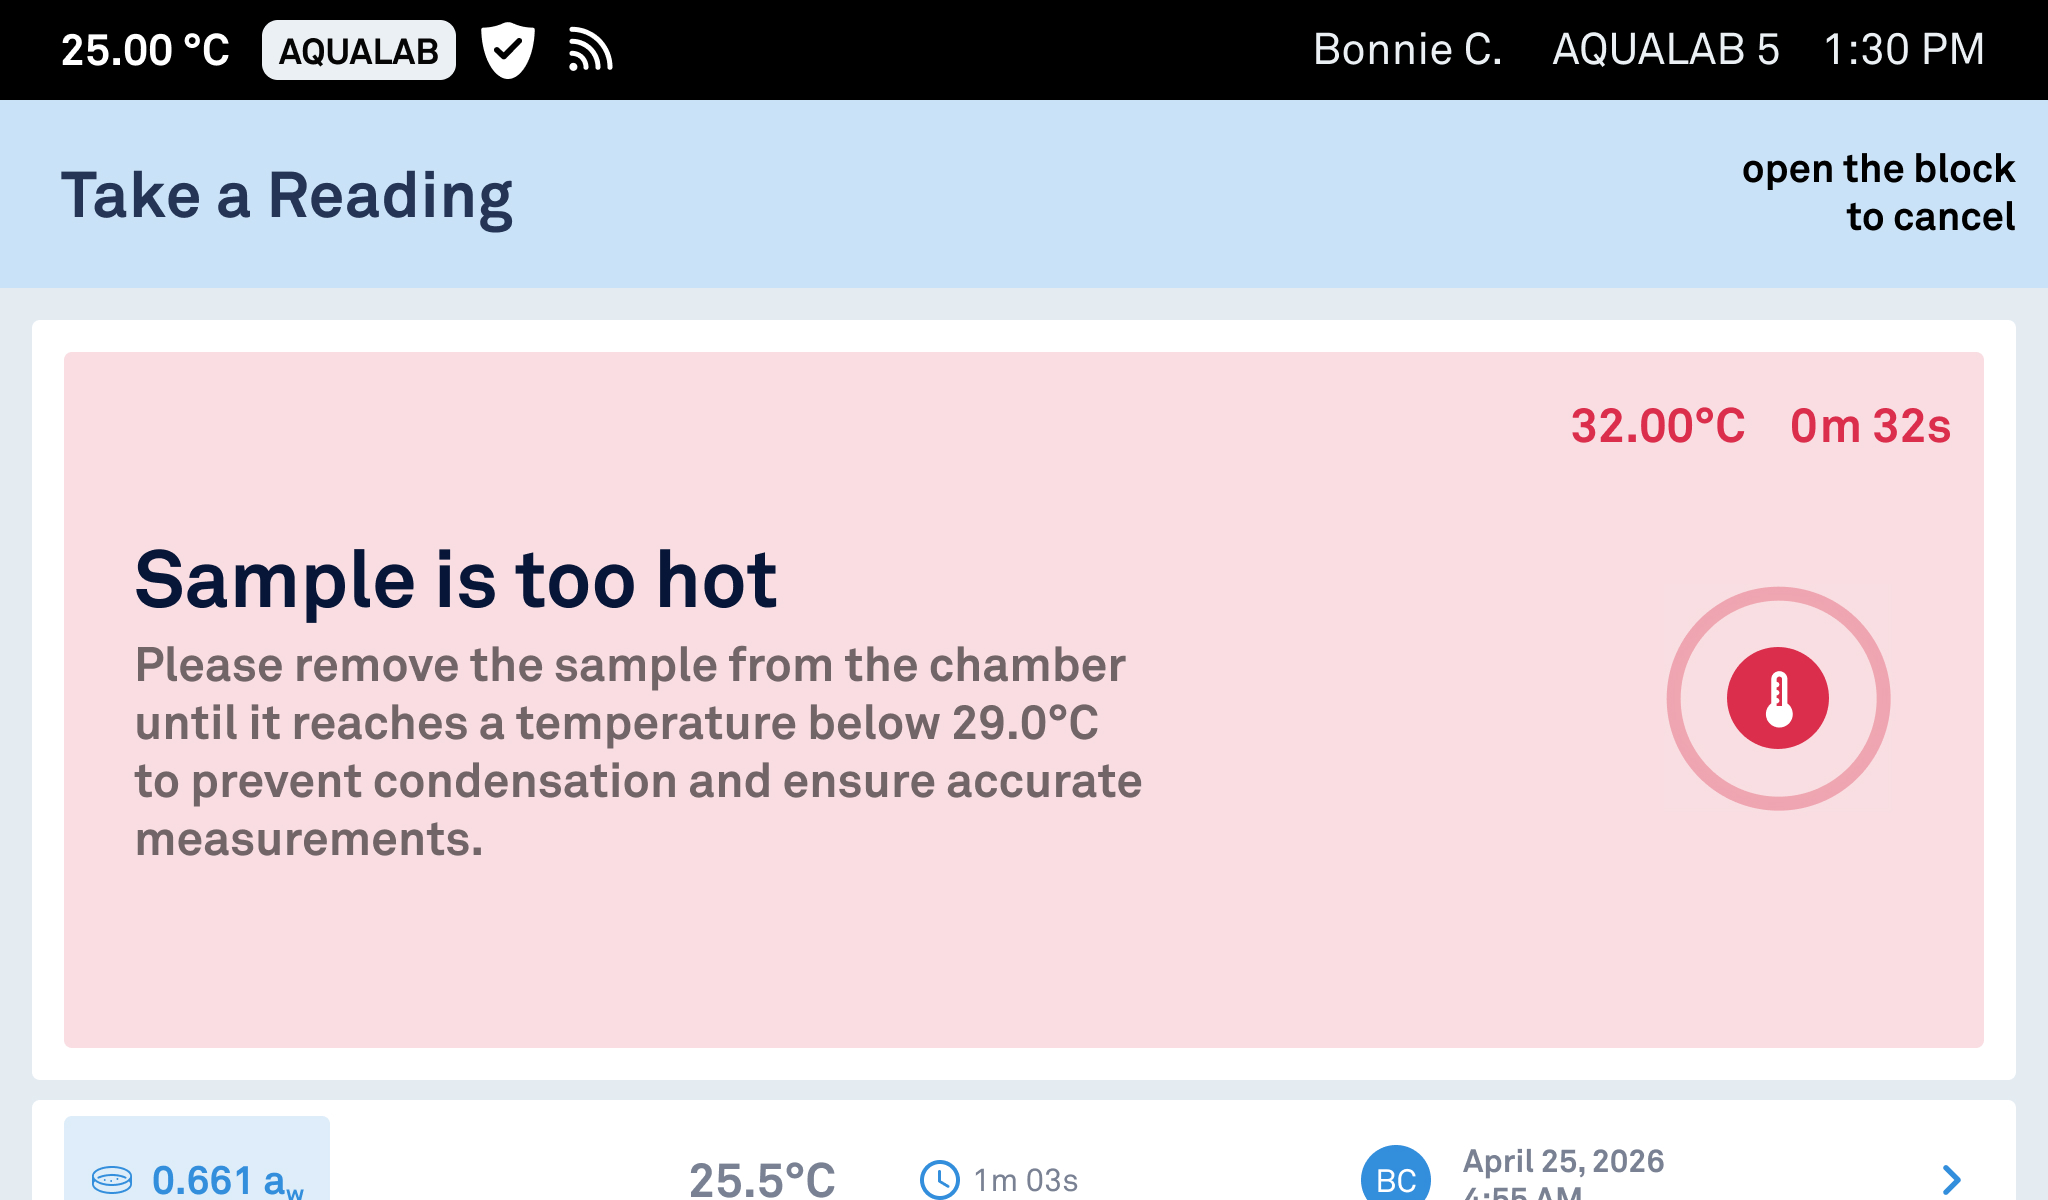
If the sample exceeds the chamber temperature by >4 °C, the instrument prompts sample removal for cooling, as inserting hot samples into the instrument can cause condensation within the chamber and affect instrument performance.
Cancellation options:
Single reading: Open the sensor block during the reading. The instrument returns to the insert-sample prompt for that standard.
Entire verification: Tap
 . Confirming discards all progress.
7.5 Verification Results
After all standards are measured, one of three outcomes is displayed:
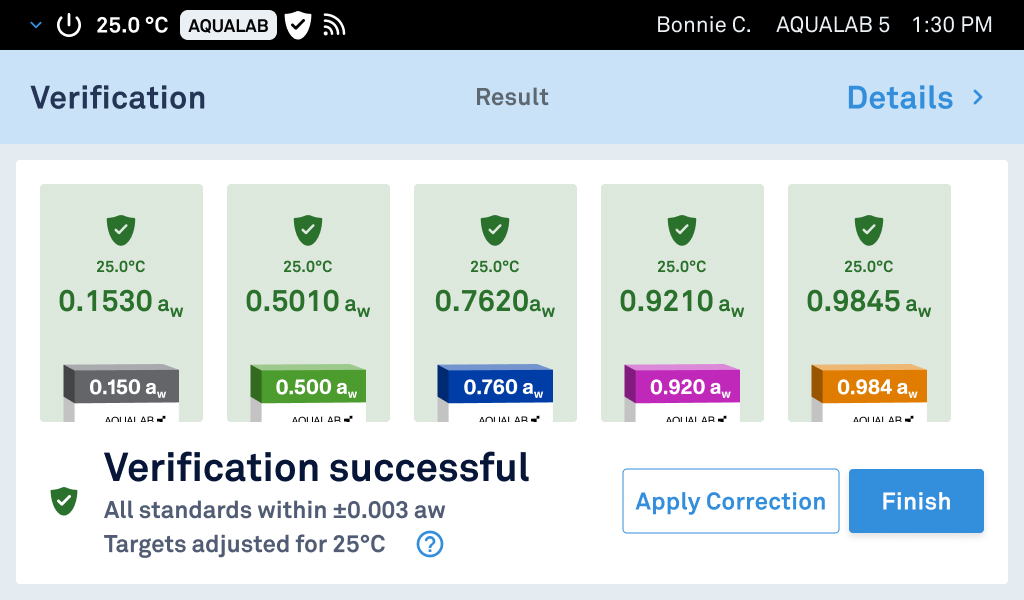
Verification Successful
All standards are within the configured threshold. Options: Tap
 (no correction) or
 (apply optional adjustment).
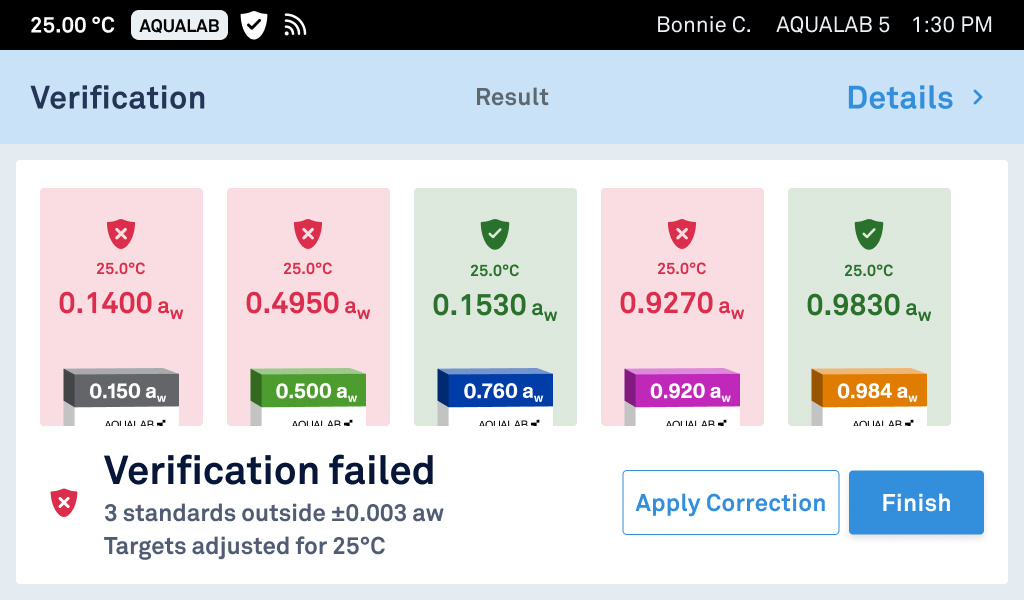
Verification Failed – Correctable
At least one standard exceeded the threshold, but a correction can bring all within range. Tap
to apply or
to leave the instrument unverified.
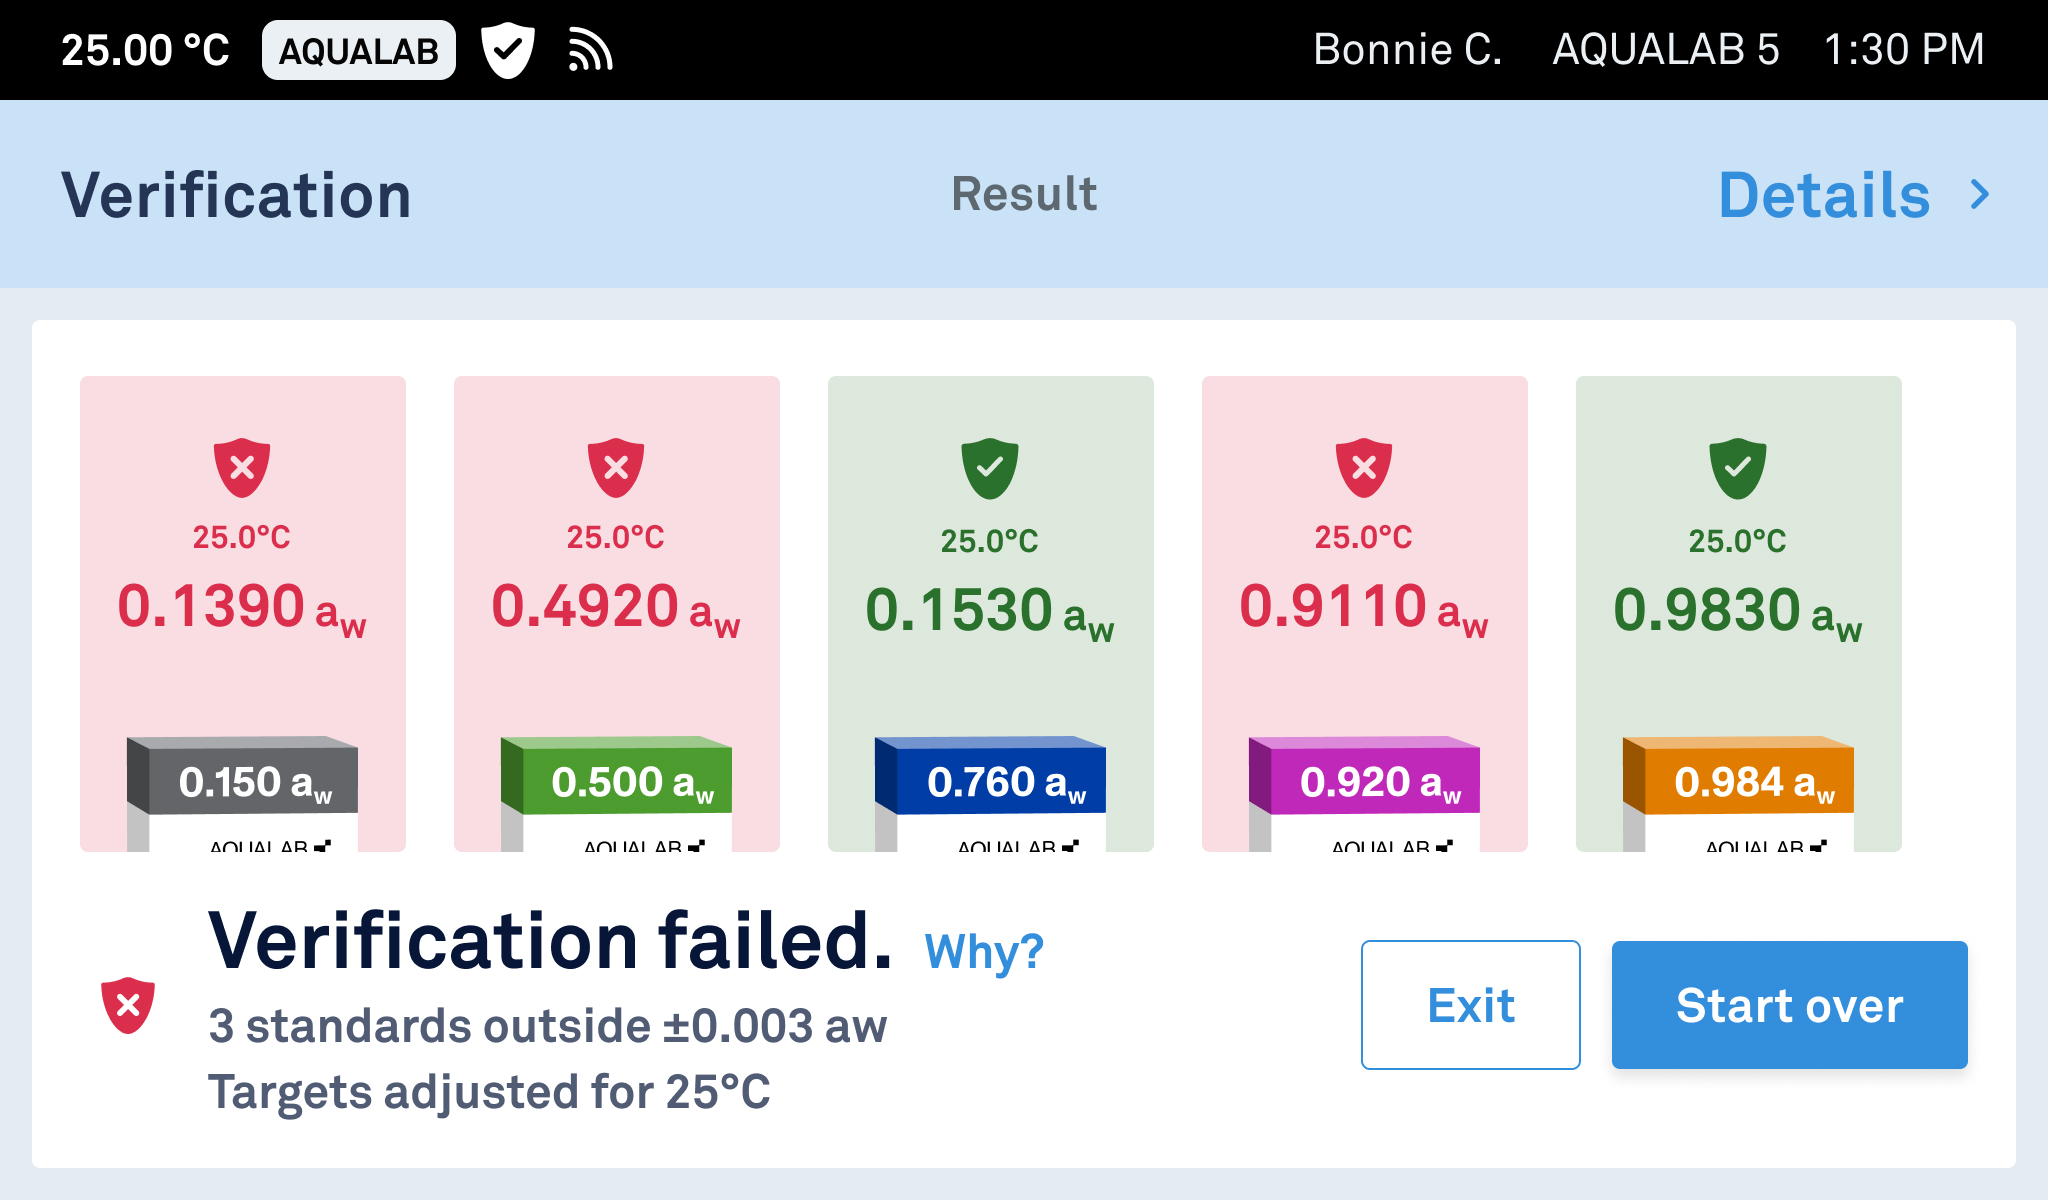
Verification Failed – Not Correctable
At least one standard exceeded the threshold, and no correction can resolve it.
Tap
 or
or
 .
.
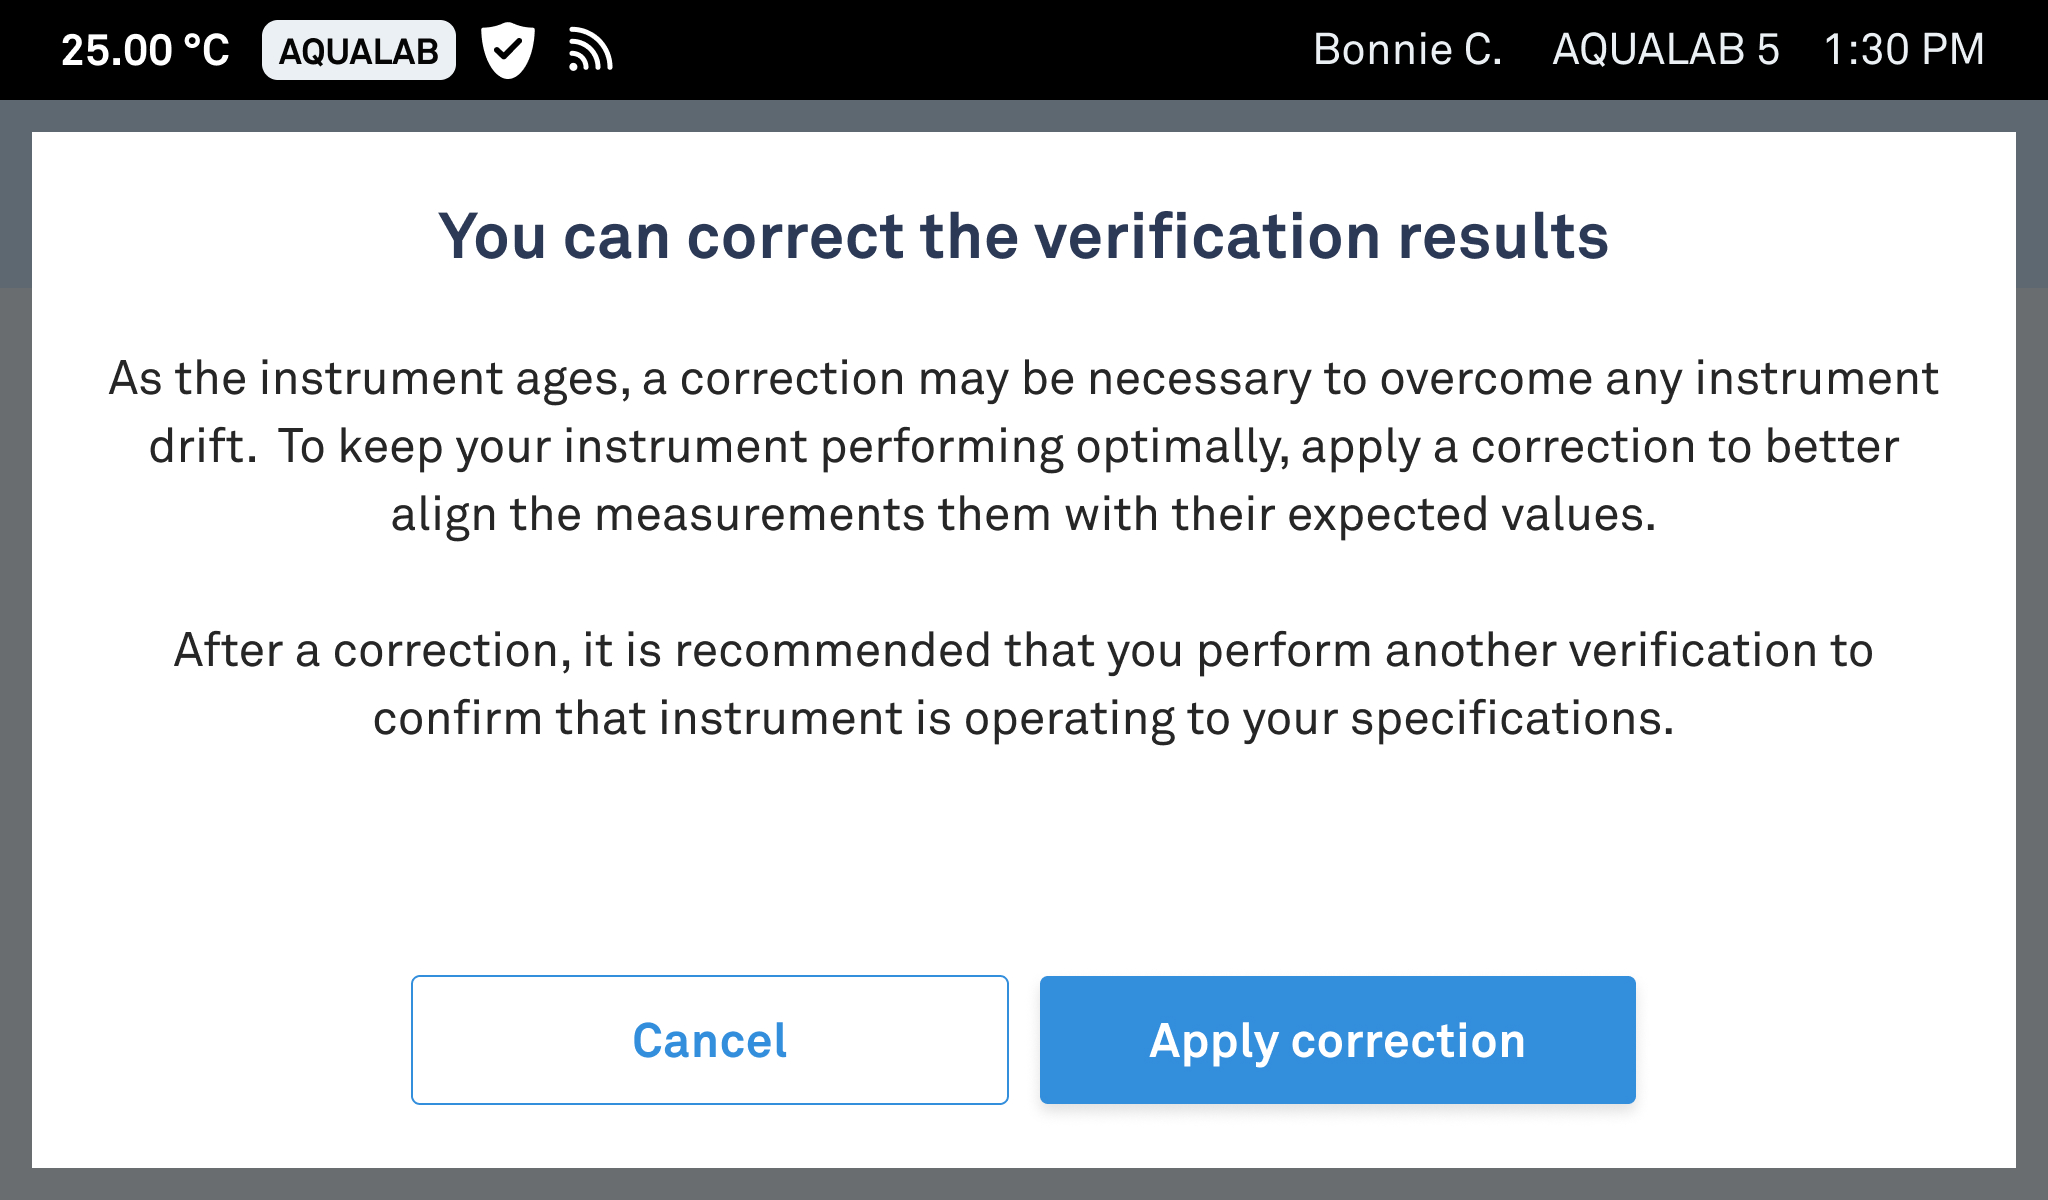
7.6 Correction
A correction mathematically adjusts calibration values using a best-fit calculation across all measured standards. Applying a correction is optional and creates a permanent, time-stamped record in Verification History. Applying a correction will only affect future readings.
Addium recommends re-verifying after applying a correction. Corrections can be removed at Instrument Settings > Correction Reset.
7.7 Troubleshooting Failed Verification
If verification fails, review:
- Was the sample chamber properly cleaned?
- Was a new, unused cup used for each standard?
- Are the standards within their expiration dates?
- Were contents from a freshly opened tube used?
If the answer to any item is “no,” resolve the issue and repeat with new cups and standards. If failures persist, remove the correction at Instrument Settings > Correction Reset or contact Customer Support.
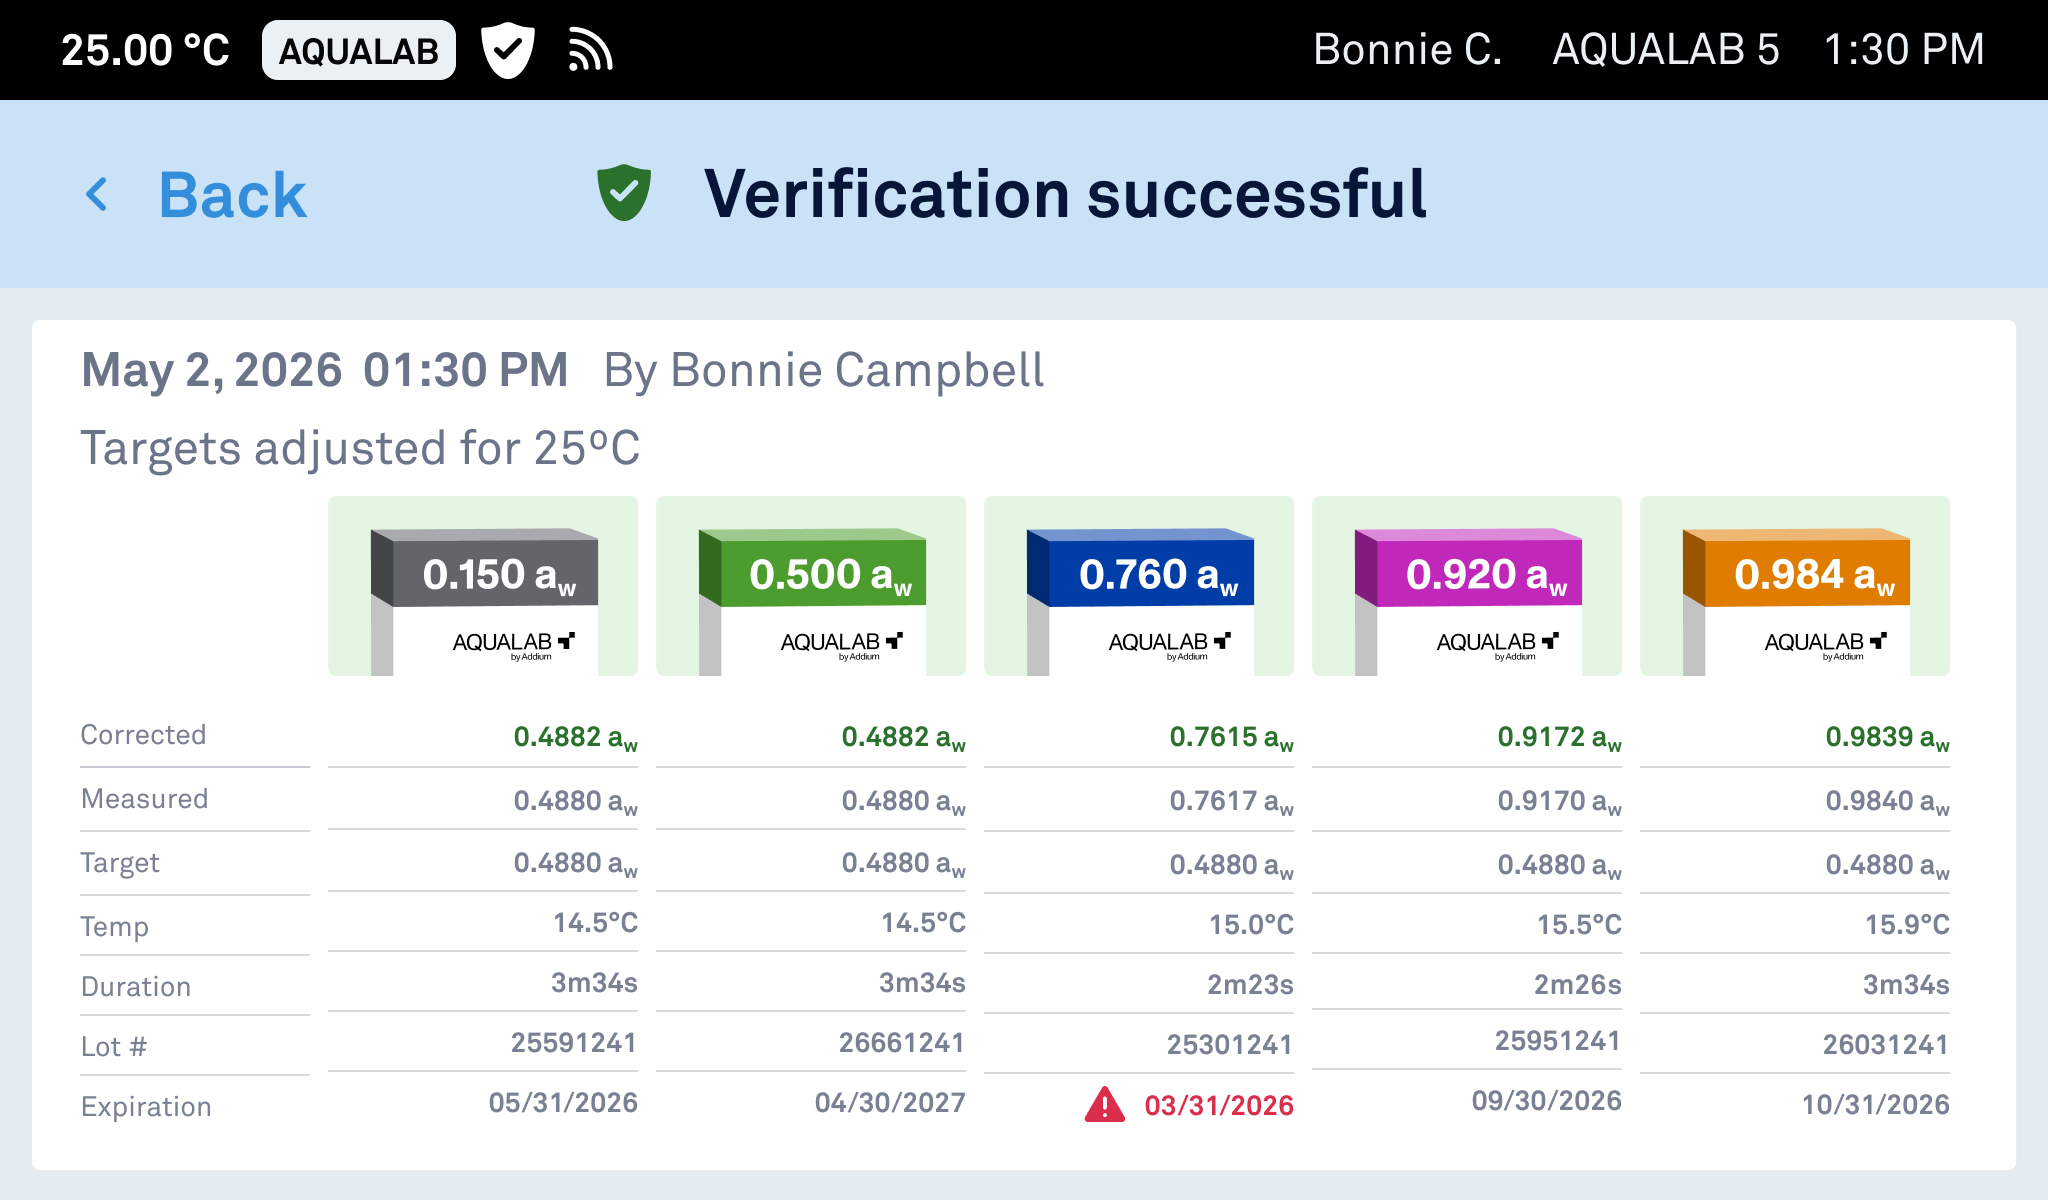
7.8 Verification Results Detail Screen
Tap
 on the results screen to view per-standard data: corrected value, measured value, target value, temperature, duration, lot number, and expiration date.
8. TAKE A READING
This section describes how to take a reading with the AQUALAB 5TE.
8.1 Prerequisites
Before starting a reading, ensure that:
- The instrument is warmed up for at least 30 minutes after powering on
- The sample chamber is clean (see cleaning the sample chamber)
- The instrument has been verified (see verification)
Following the practices below will help ensure accurate and reliable results.
8.2 Sample Preparation
8.2.1 Use Clean Sampling Practices
Select a clean location and supplies to prepare samples.
- Use a new cup for each sample. Fill the cup so that the base is fully covered, to no more than half the cup height. Underfilling extends reading time; overfilling risks contaminating the sensor block.
- If there is any debris on the cup edges, wipe with a KIMWIPE® tissue before putting the cup into the instrument.
caution
Do not reuse cups. Residual contamination or moisture from washing causes inaccurate readings.
8.2.2 Preparation Best Practices
Consistent sample preparation reduces reading time and improves accuracy.
- Select a representative subsample that maintains the original components and proportions.
- Improve equilibration by cutting or crushing samples to increase surface area.
- Avoid grinding, as it introduces heat and may adversely affect measurements.
8.2.3 Sample Protection
Water activity may change when a sample is exposed to ambient conditions.
- If preparation takes longer than a few minutes, cover the cup with a lid.
- For preparation times longer than 30 minutes, seal the cup and lid with parafilm.
8.2.4 Manage Sample Temperature
Keep sample temperature within ±2 °C of the instrument control temperature. Greater differences extend temperature adjustment time.
NOTE
A temperature equilibration plate minimizes this delay, particularly for One-Minute readings.
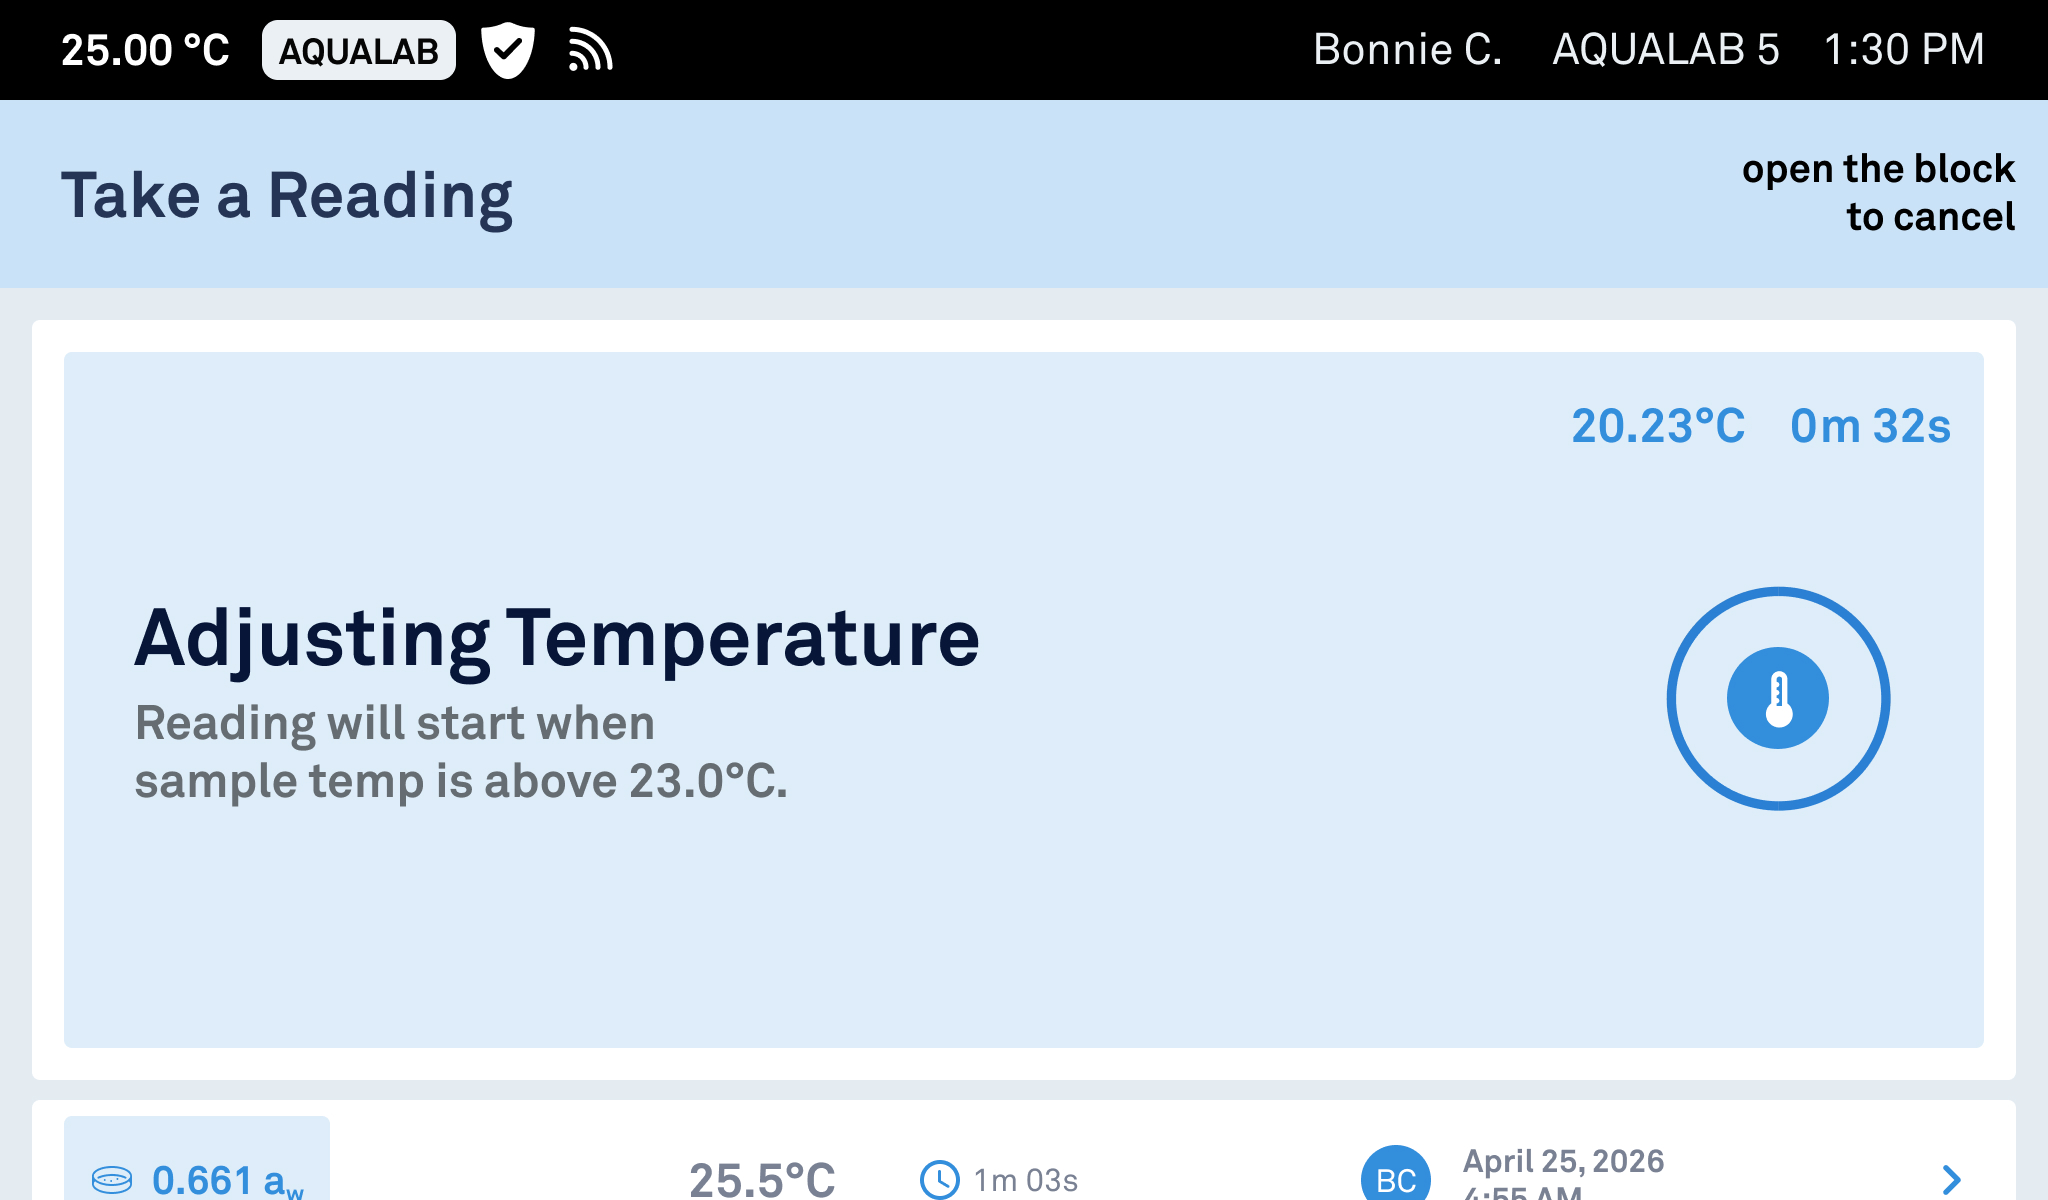
Samples exceeding the control temperature by >4 °C trigger a removal prompt.
8.2.5 Difficult Samples
Coated or high-fat products equilibrate slowly. Volatile-containing samples (alcohols, propylene glycol) may interfere with sensors. Contact Customer Support for guidance.
8.3 Reading Procedure
Start a reading
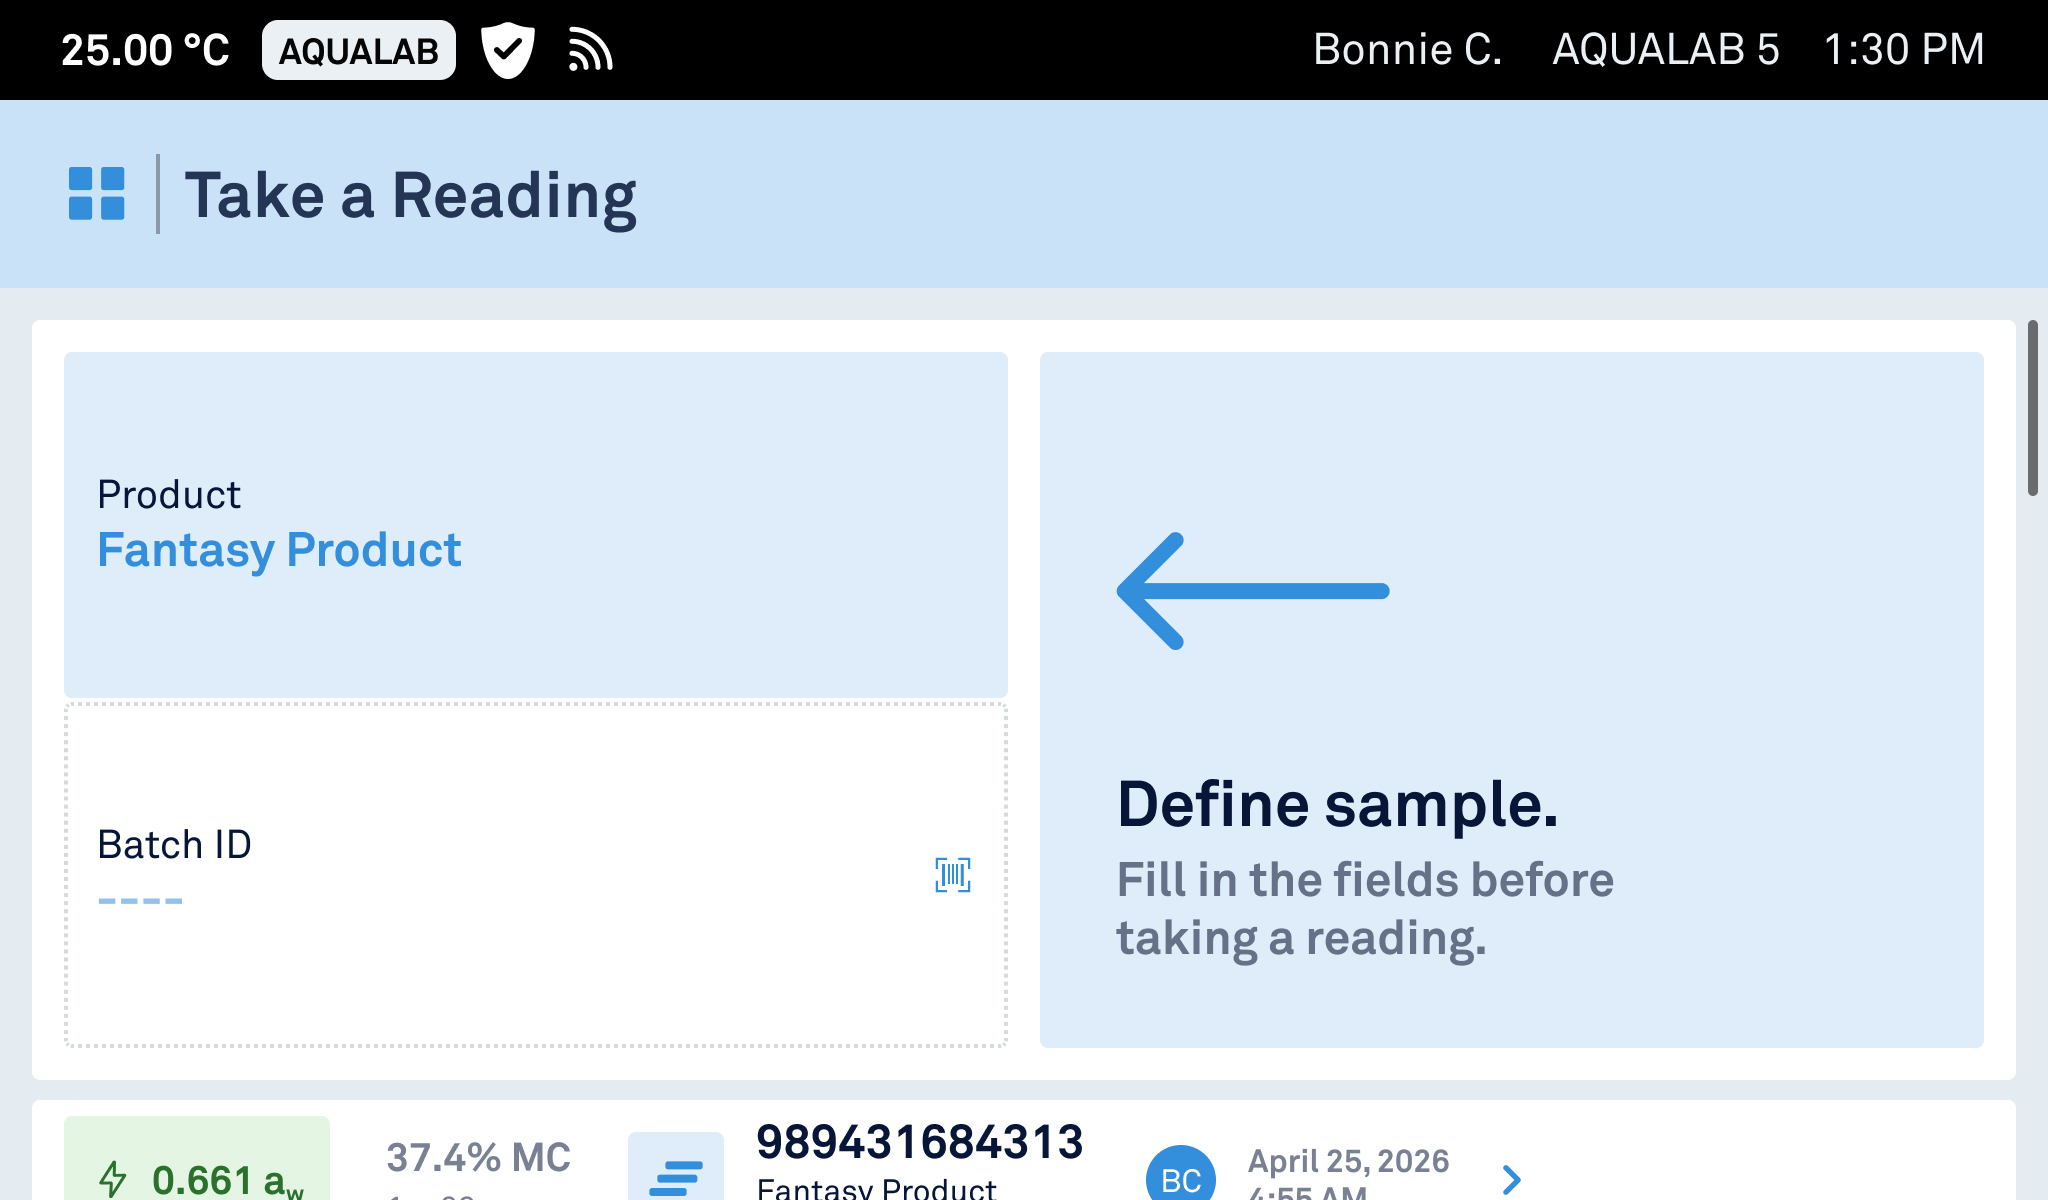
From the Home screen, tap Take a Reading. For cloud-connected instruments, assign the reading to a Product and enter Lot/Batch information if applicable.
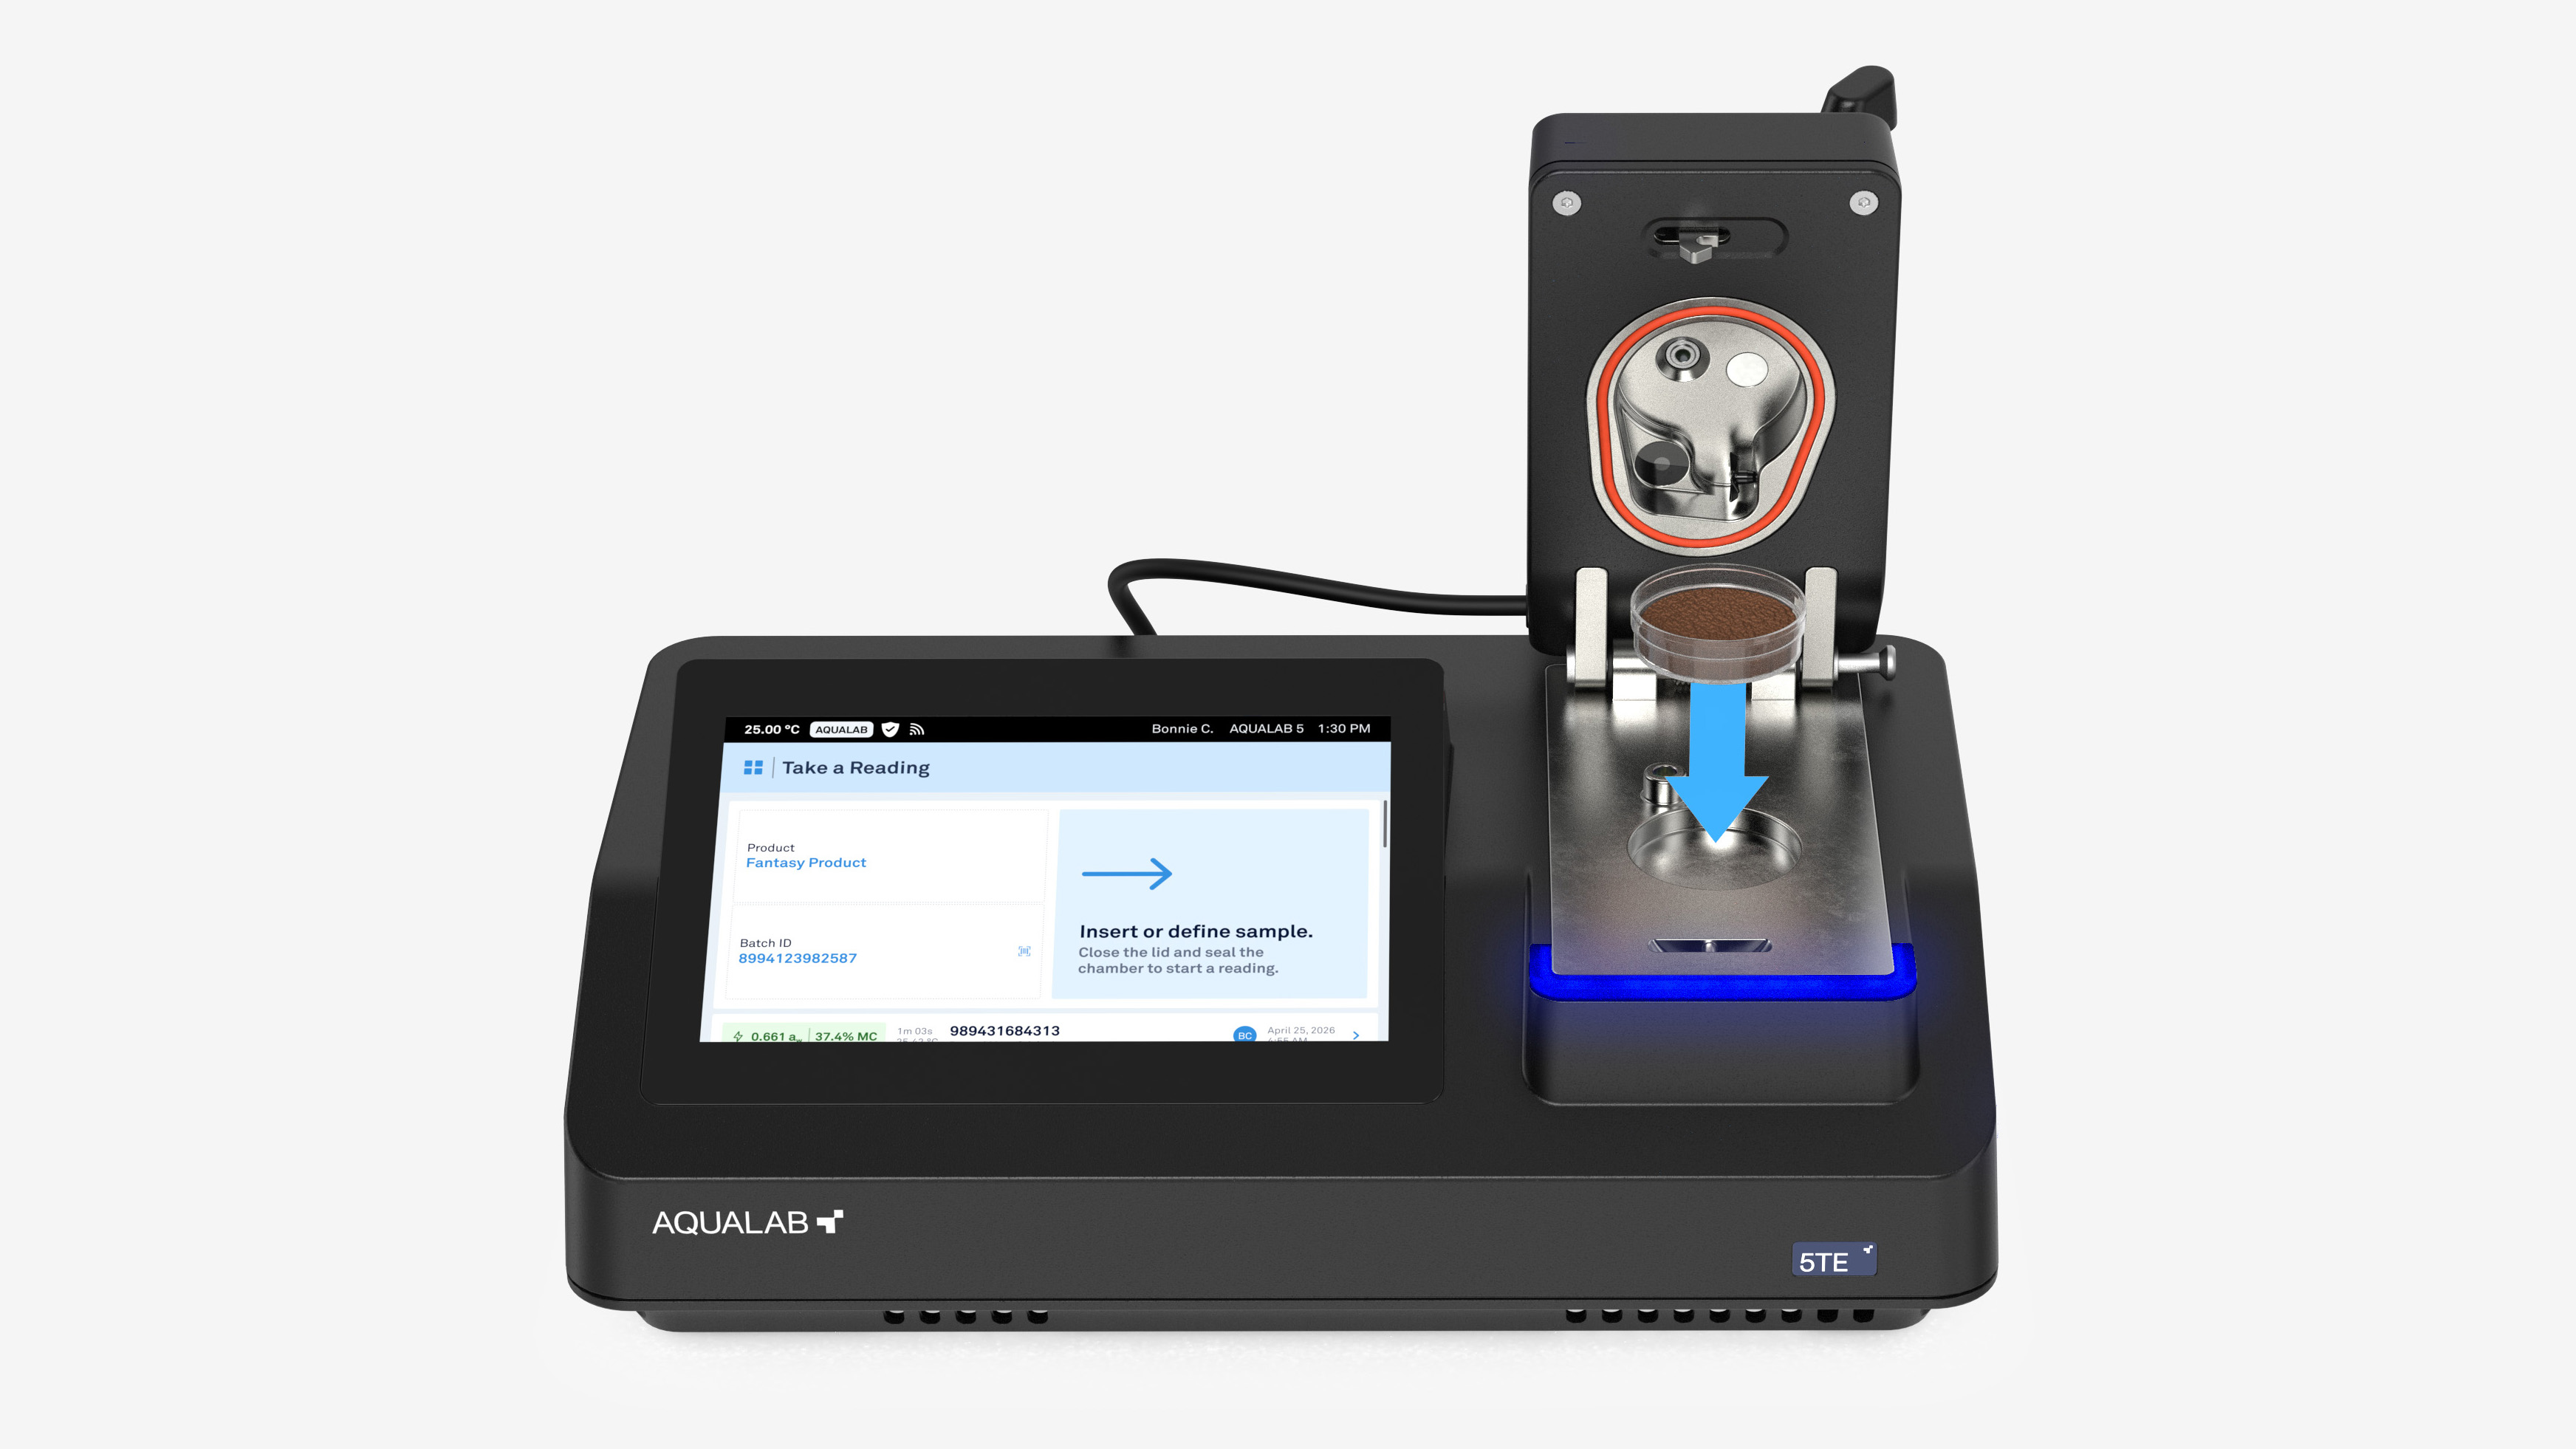
Insert the sample
Place the prepared cup (without lid) into the sample chamber. Close the sensor block lid and move the lever to READ.
Temperature adjustment
The instrument automatically equilibrates the sample to within ±2 °C of the control temperature. If already in range, this step is skipped.
The control temperature can be configured in Instrument Settings to any value between 15 °C and 50 °C (59 °F and 122 °F).
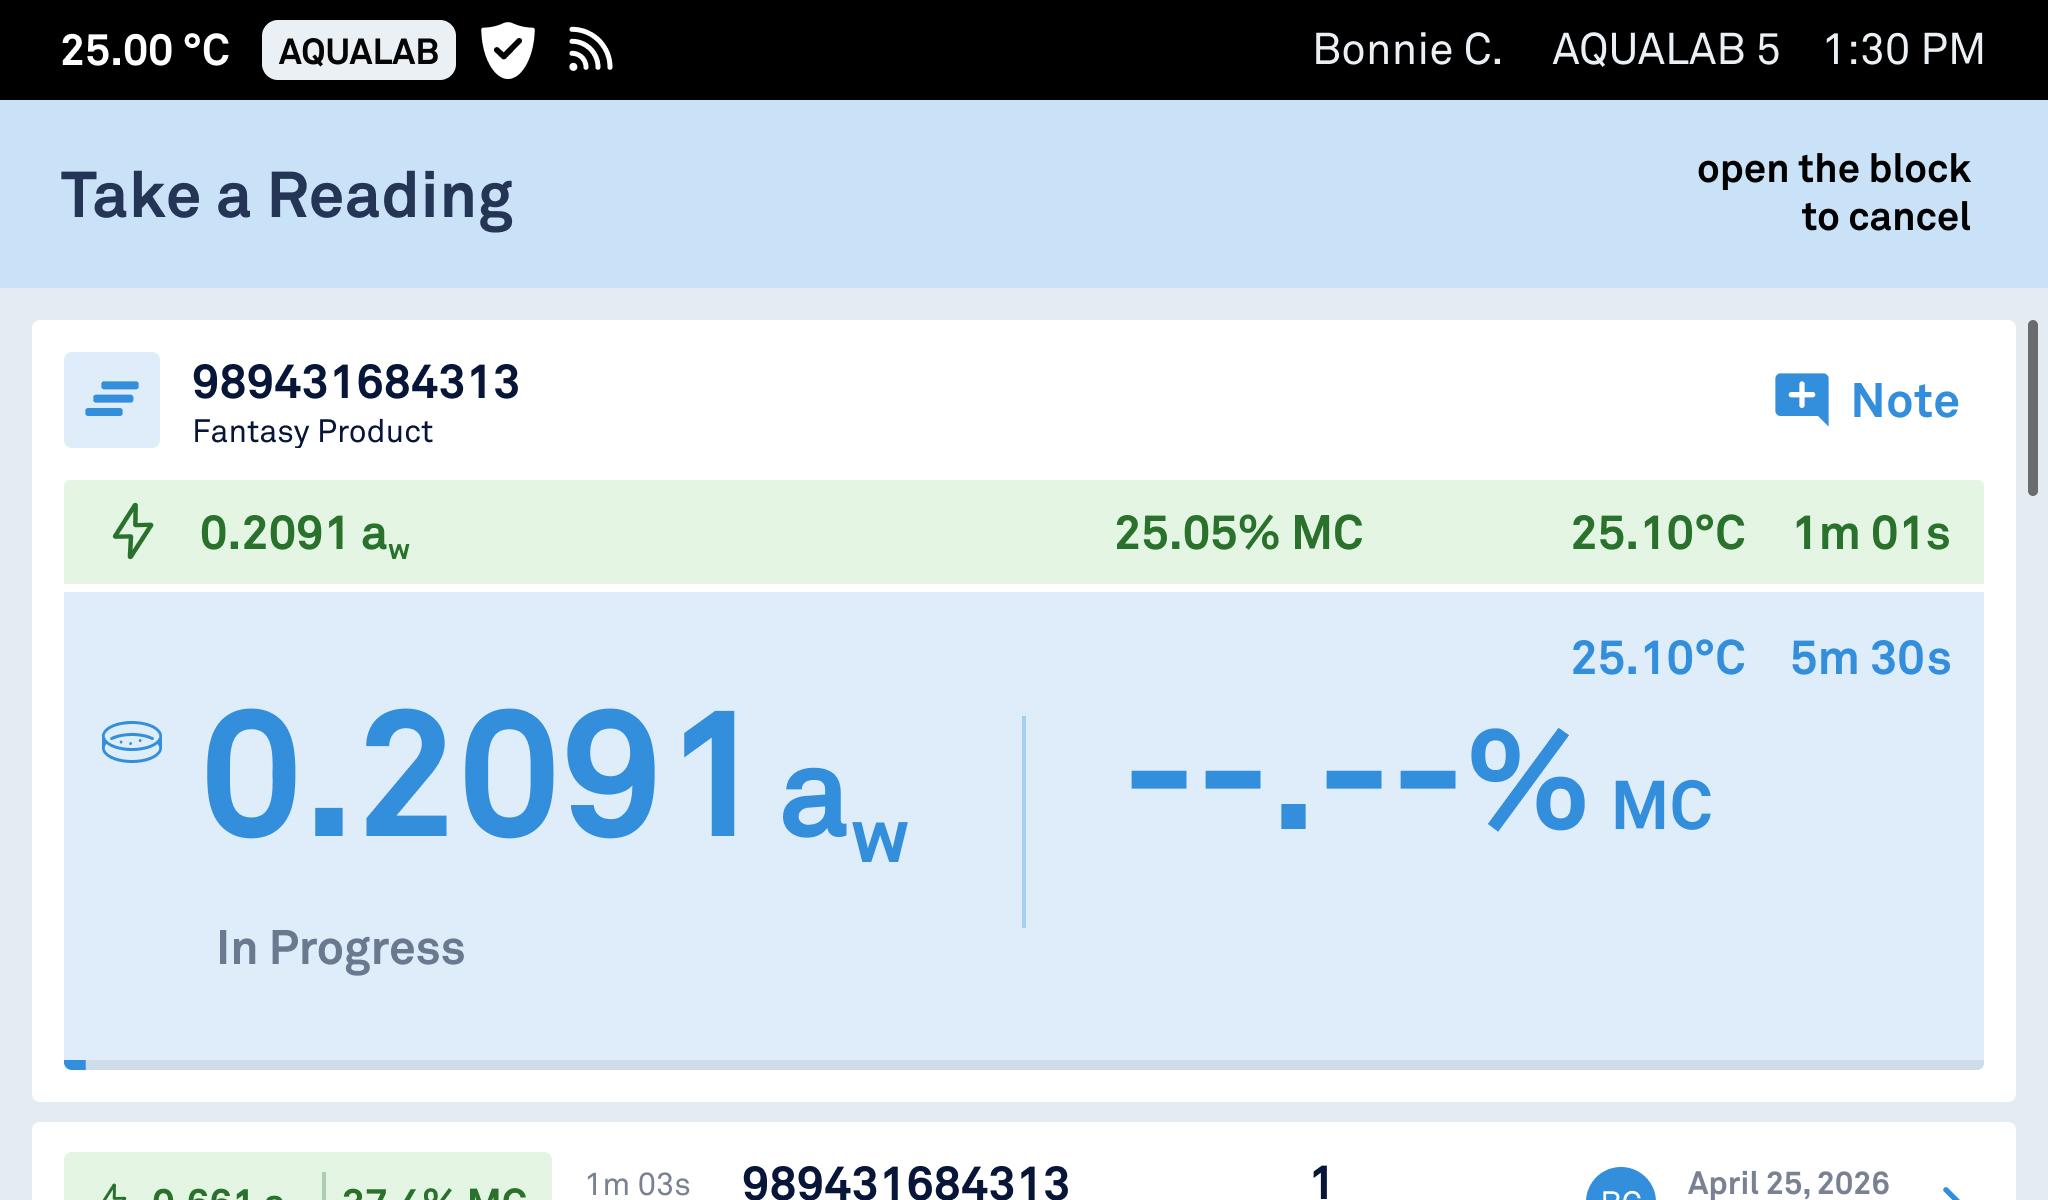
Reading in progress
During the reading, the water activity value updates until stability criteria are met.
For AQUALAB Cloud connected instruments with the feature enabled, a One-minute Water Activity Reading
 may be displayed first. The full reading continues until equilibrium is reached to provide the final confirmed result. If a full reading is not required, the chamber may be opened after the one-minute reading is complete, and the next reading can be taken.
NOTE
One-Minute readings is an AQUALAB Cloud powered feature that provides a reliable estimated sample-specific water activity value within approximately one minute. This is achieved by using a proprietary algorithm that predicts the final water activity based on product-specific data collected and stored in the AQUALAB Cloud.
One-Minute readings require at least three prior full readings of the same product.
NOTE
If readings begin taking longer than previous measurements of the same sample type, clean the instrument and ensure the sample temperature is within ±2 °C of the instrument control temperature to minimize additional temperature adjustment time.
Reading result
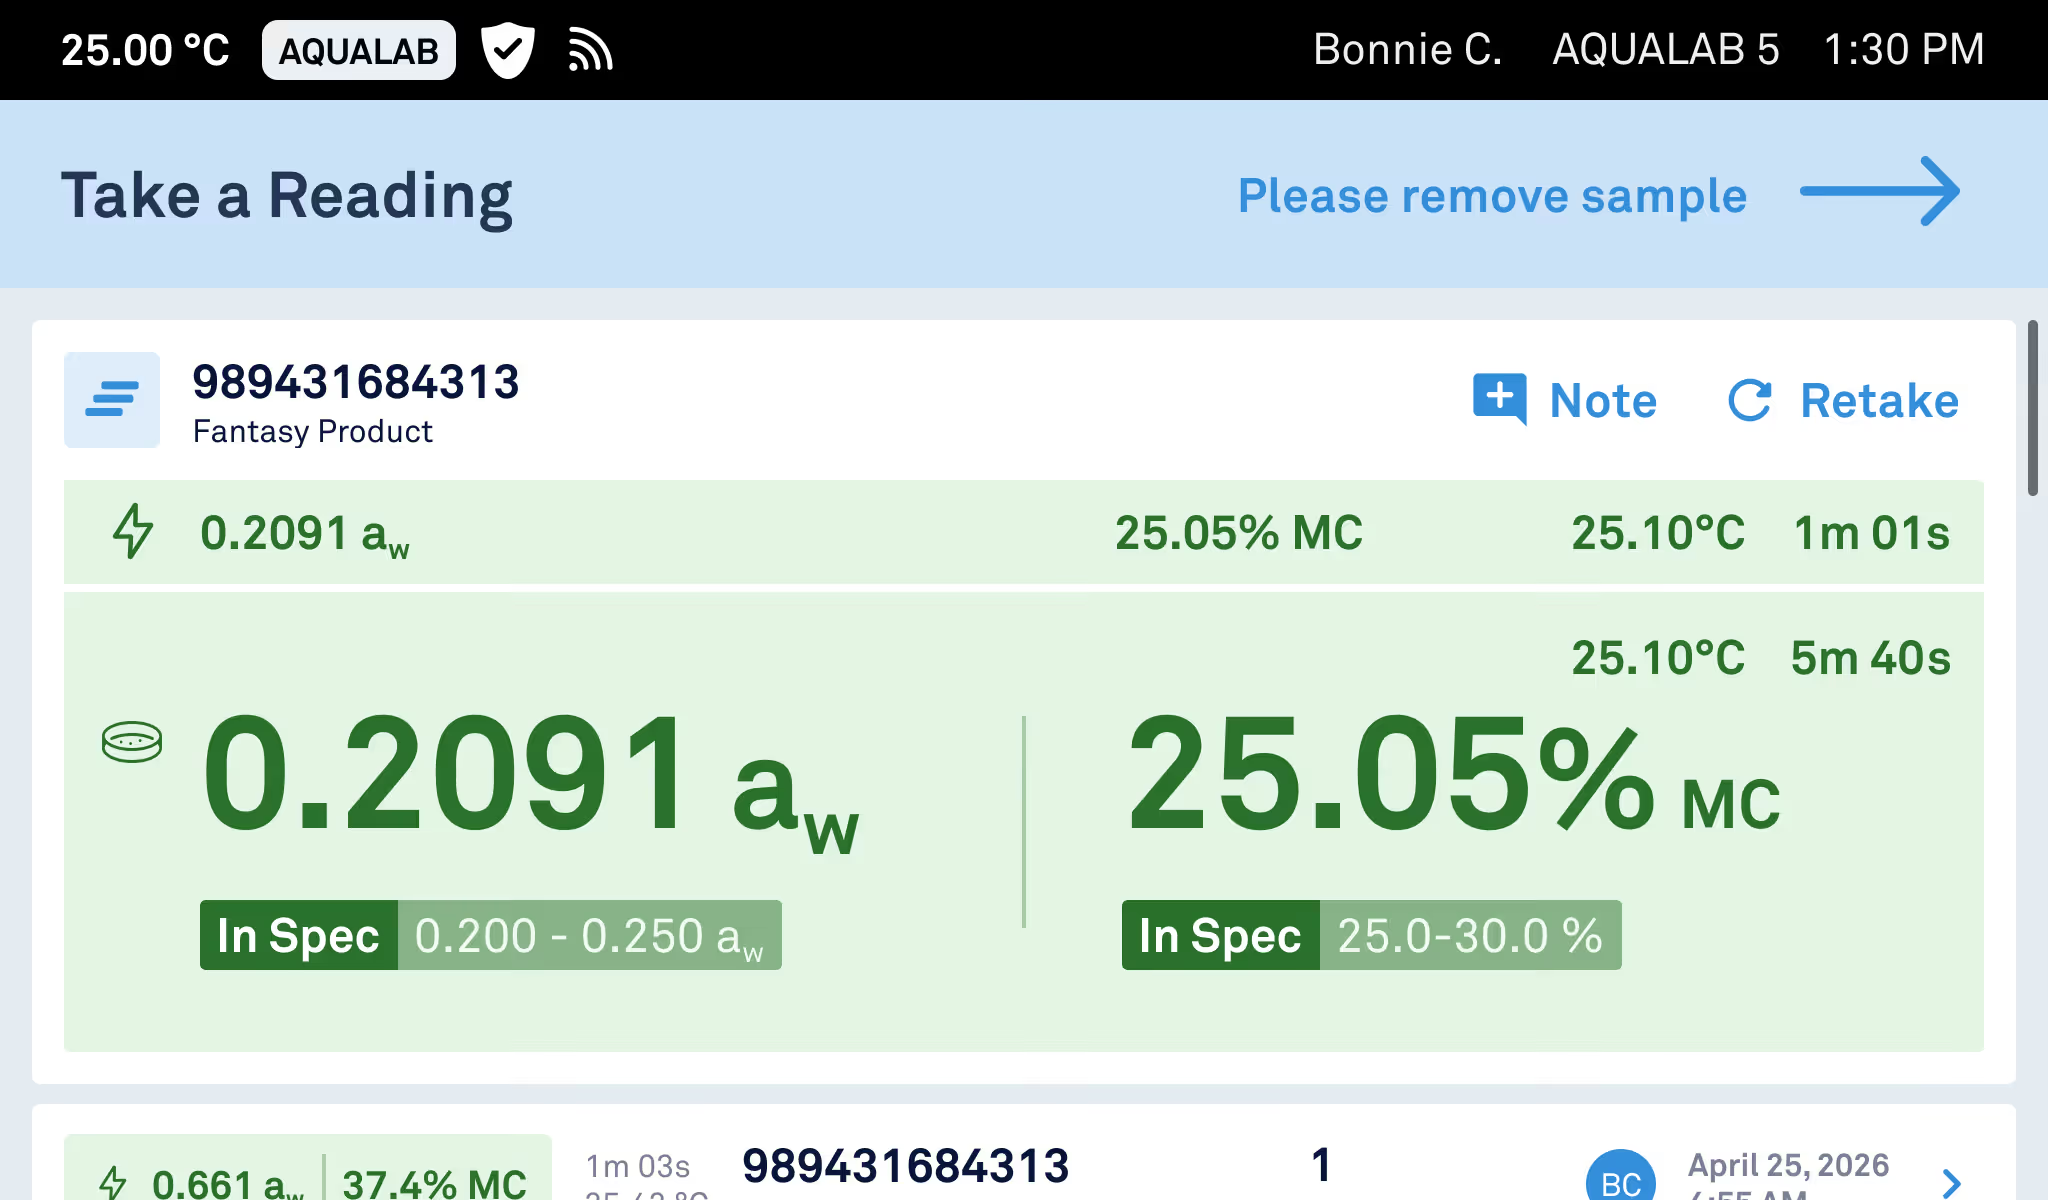
The final water activity is displayed.
For AQUALAB Cloud connected instruments, the result may also include a pass/fail status if limits have been configured. Results are saved locally and uploaded to AQUALAB Cloud (if connected).
NOTE
A note can be added to a reading record to document additional context, such as sample conditions, preparation details, or observations made during measurement.
Remove sample
Move the lever to the OPEN position and carefully remove the sample cup.
Warning
Always remove samples immediately after readings. Material left in the chamber may corrode or damage sensor components.
9. VERIFICATION & READING HISTORY
The AQUALAB 5TE maintains two history logs, Verification History and Reading History, both available on standalone and cloud-connected instruments.
Readings and verification records cannot be deleted or removed from the AQUALAB 5TE. A reading may be voided in AQUALAB Cloud to exclude it from evaluation, but the original record is retained permanently.
9.1 Verification History
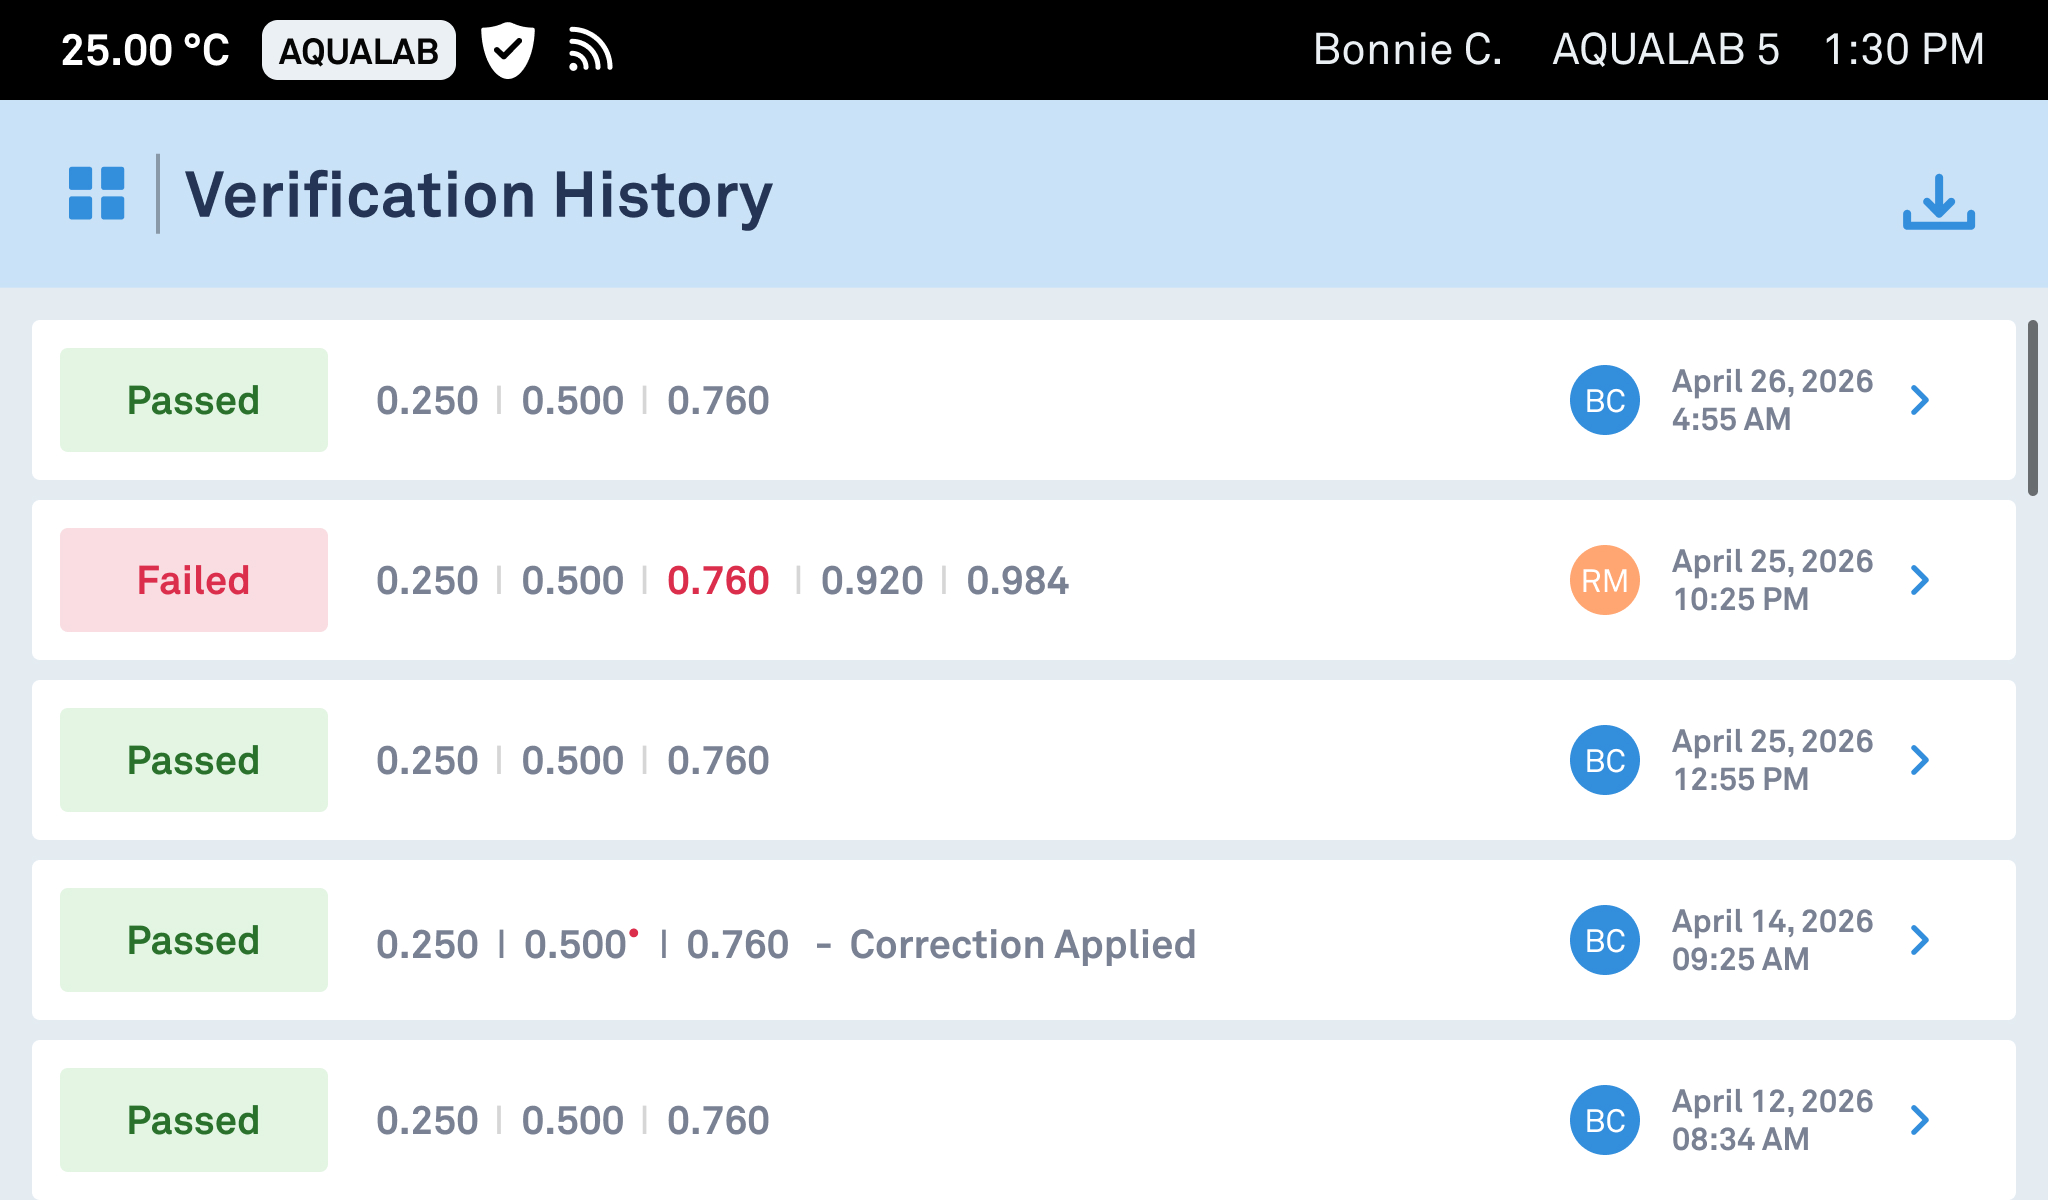
From the Home screen, tap Verification History.
Entries appear in chronological order. Tap any entry for detail: measured, target, and corrected values; temperature; duration; lot number; and expiration date.
9.2 Reading History
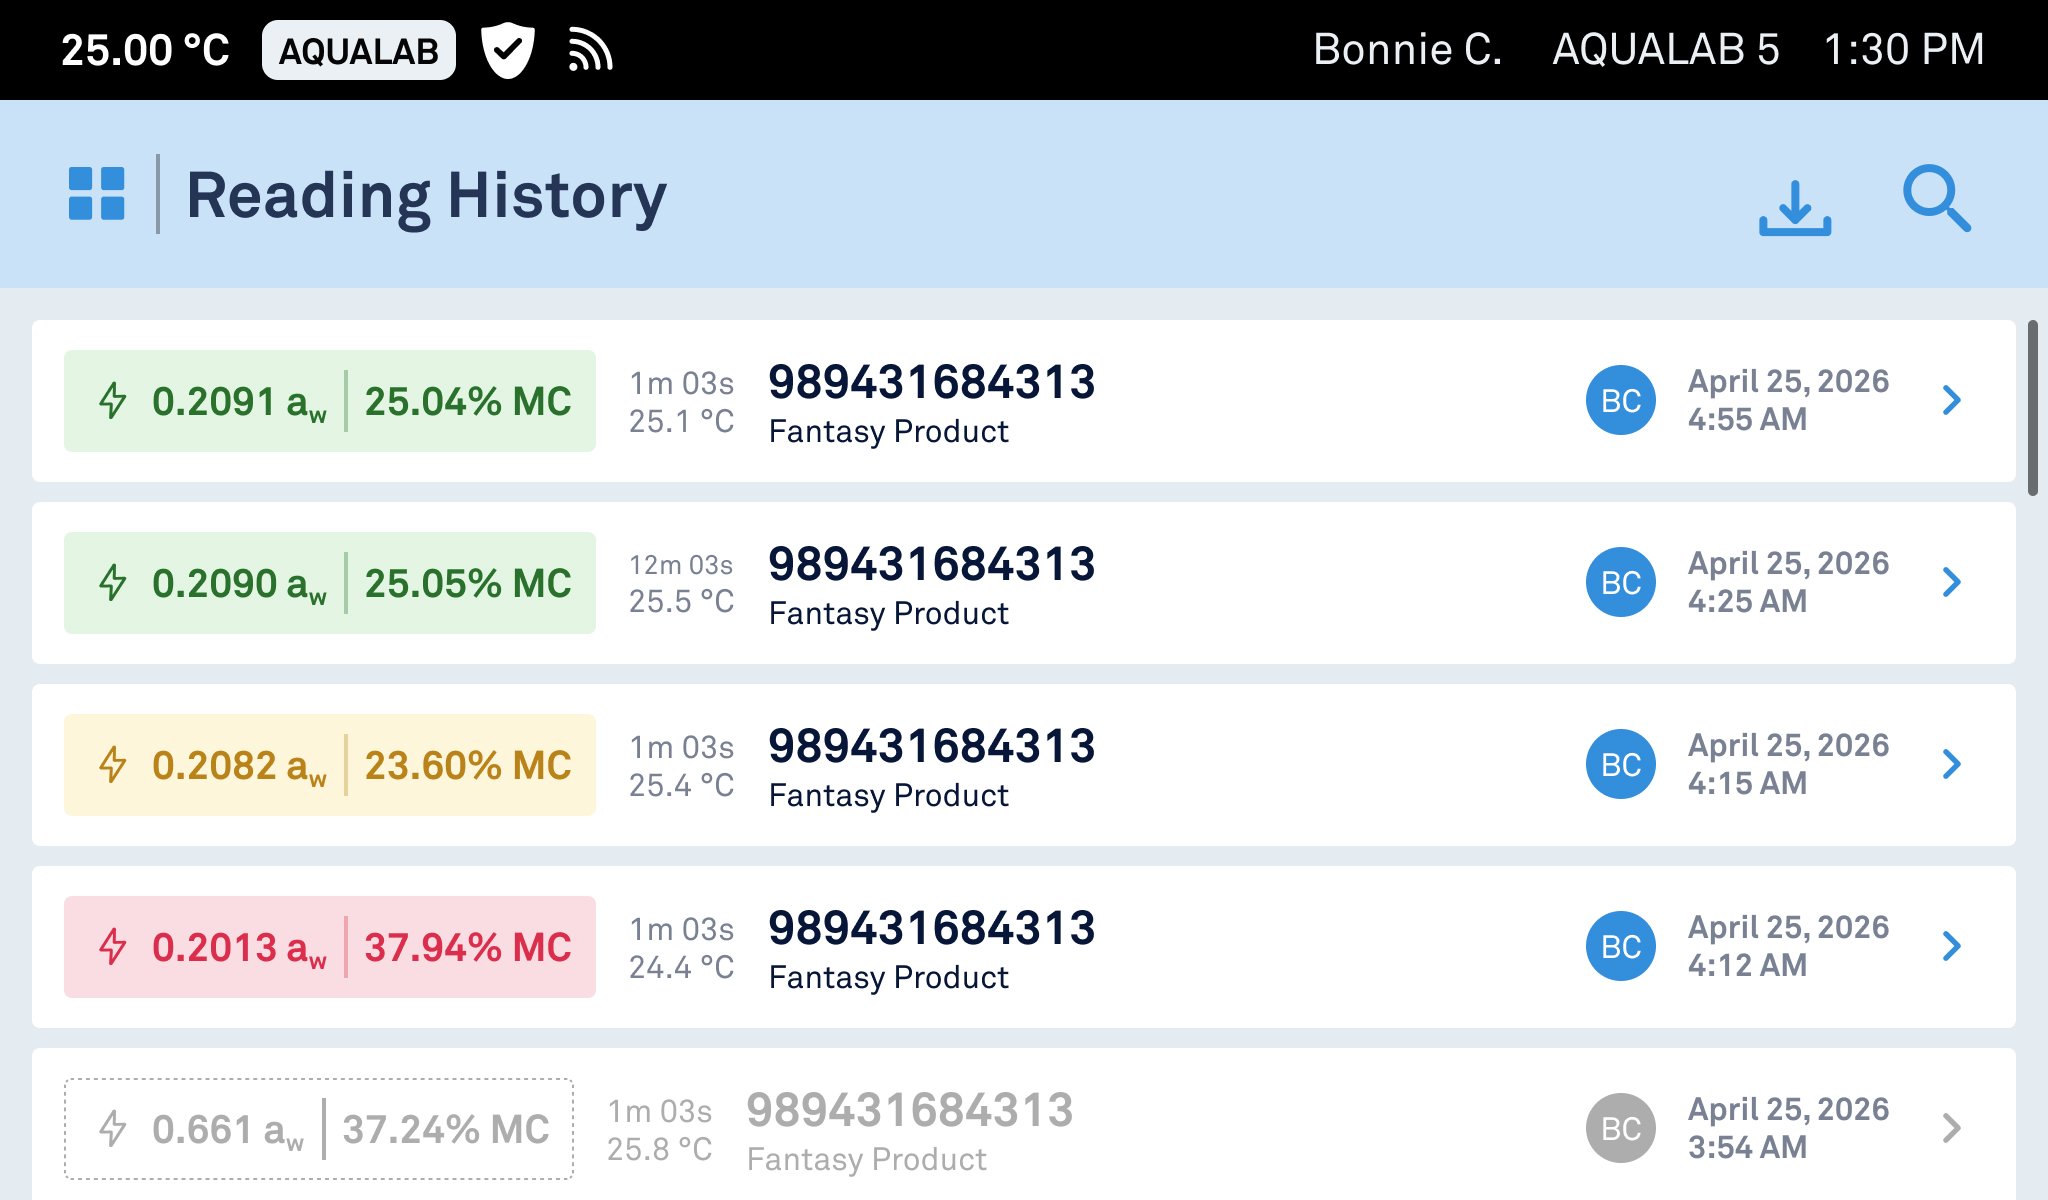
From the Home screen, tap Reading History. Entries appear in chronological order. Tap any entry for full detail: water activity, moisture content (if applicable), temperature, duration, product information, and user.
To search, tap
 in the upper right corner.
9.3 Voiding a Reading
Readings cannot be deleted or removed from the AQUALAB 5TE. To indicate that a reading should not be used – for example after a spilled sample, an incorrect product assignment, or a procedural error – the reading can be voided instead.
Voiding is performed in AQUALAB Cloud and requires an active AQUALAB Cloud license. It cannot be performed on the instrument.
Voiding does not remove the record. The original reading is retained permanently, including its measured water activity, moisture content (if applicable), temperature, duration, timestamp, product assignment, and the user who took it. Voided readings remain visible and are identified as Voided.
To learn how to void a reading, refer to the AQUALAB Cloud User Manual.
9.4 Exporting
Both Verification History and Reading History can be exported to a connected PC using the same process:
NOTE
Direct export to USB thumb drives is not supported. For cloud-connected instruments, data can also be exported from the AQUALAB Cloud web interface via the “Create Report” feature. This supports both manual report generation and automated report scheduling. Refer to the AQUALAB Cloud documentation for additional details.
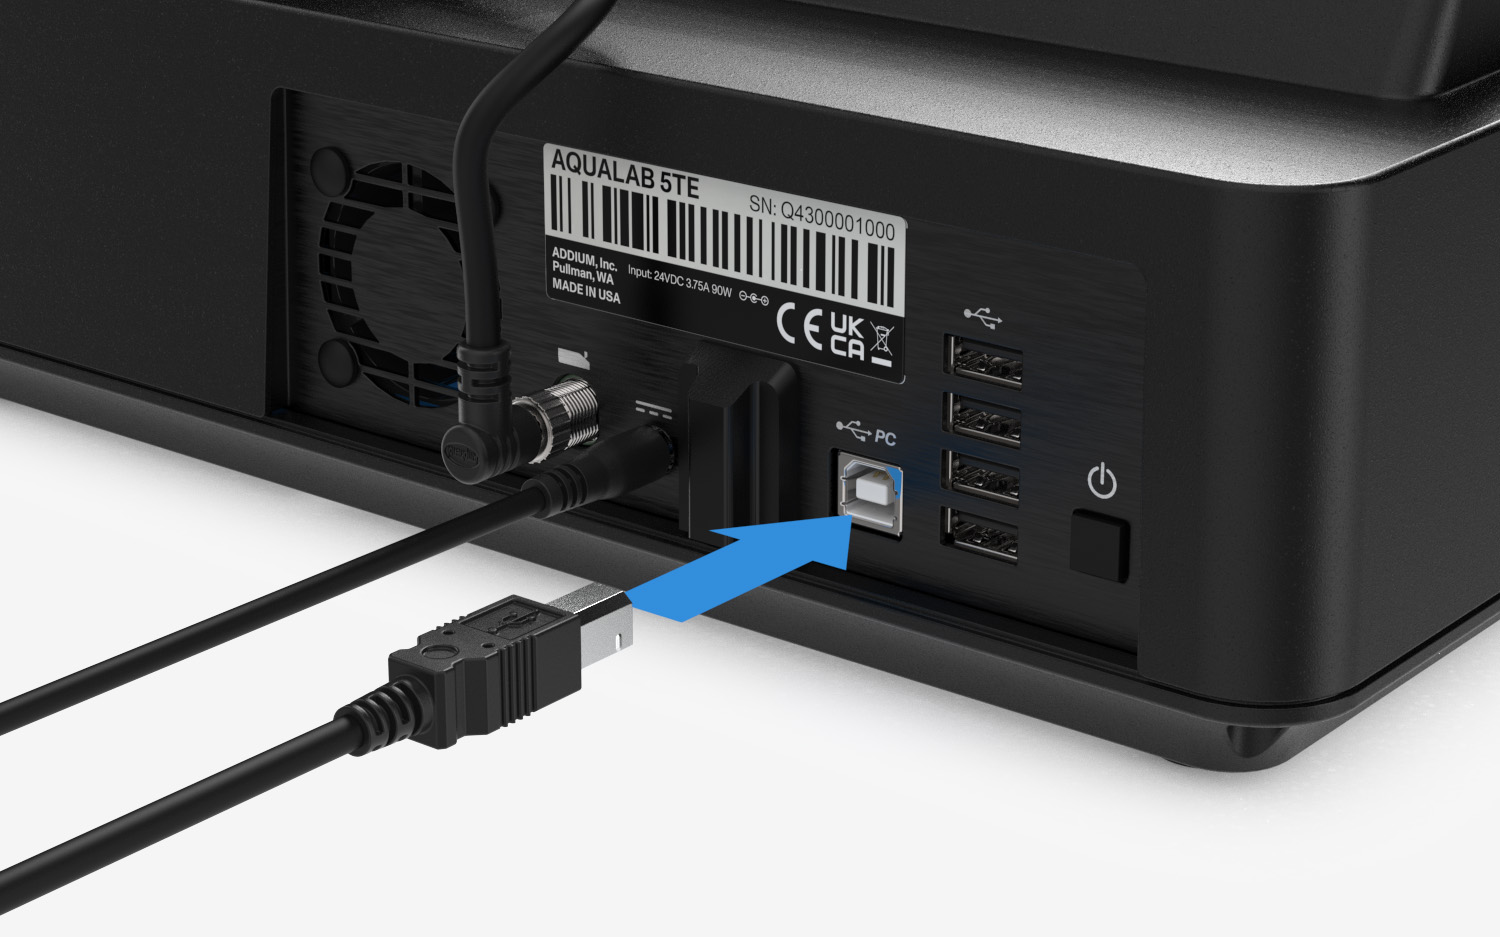
Connect the AQUALAB 5TE to a PC via the provided USB cable (USB-B port on instrument to USB-A port on PC). The instrument appears as an external drive.
On the Verification History or Reading History screen, tap
 in the upper right corner.
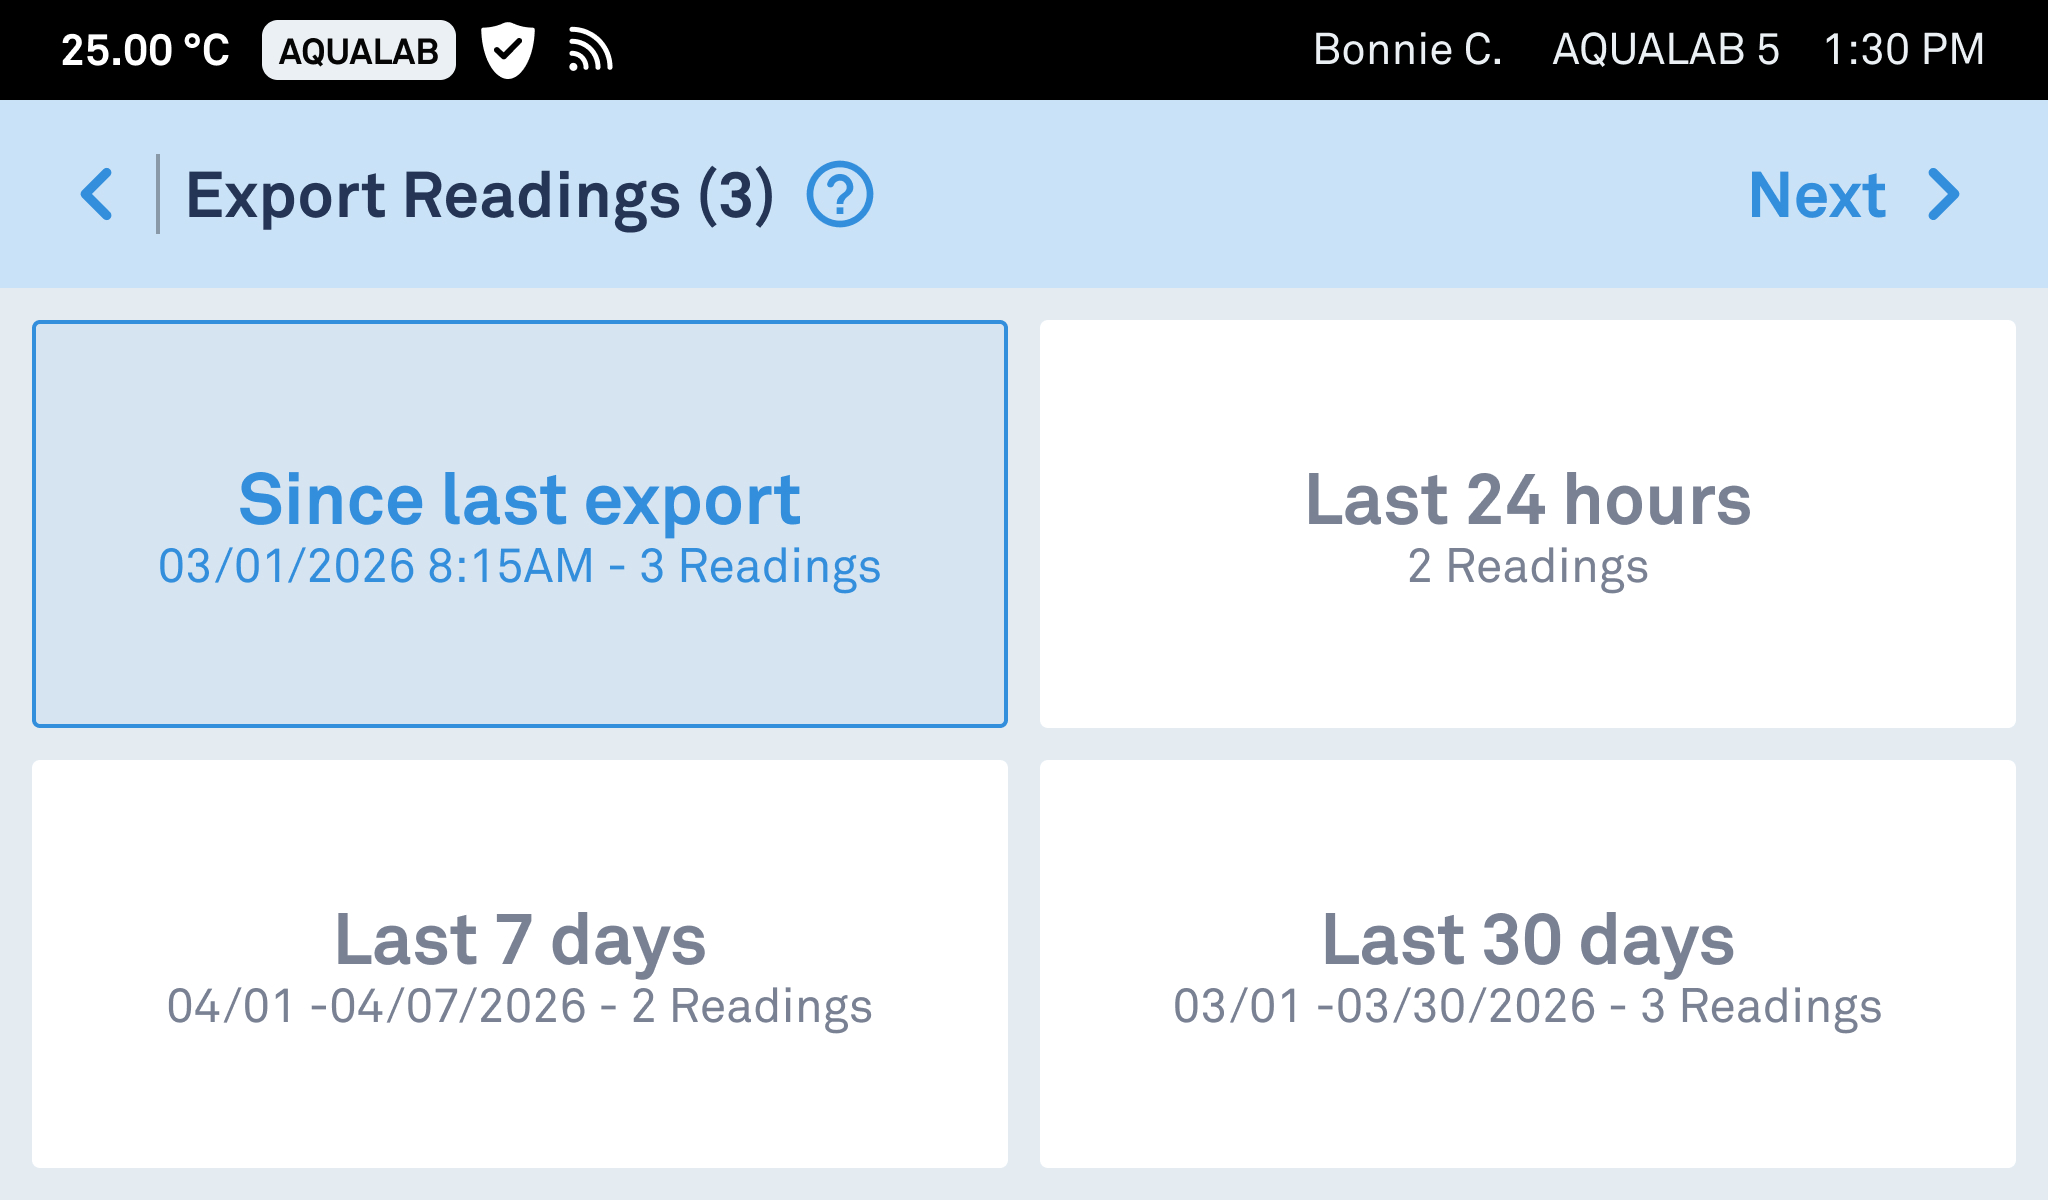
Select the date range.
Tap
 .
.
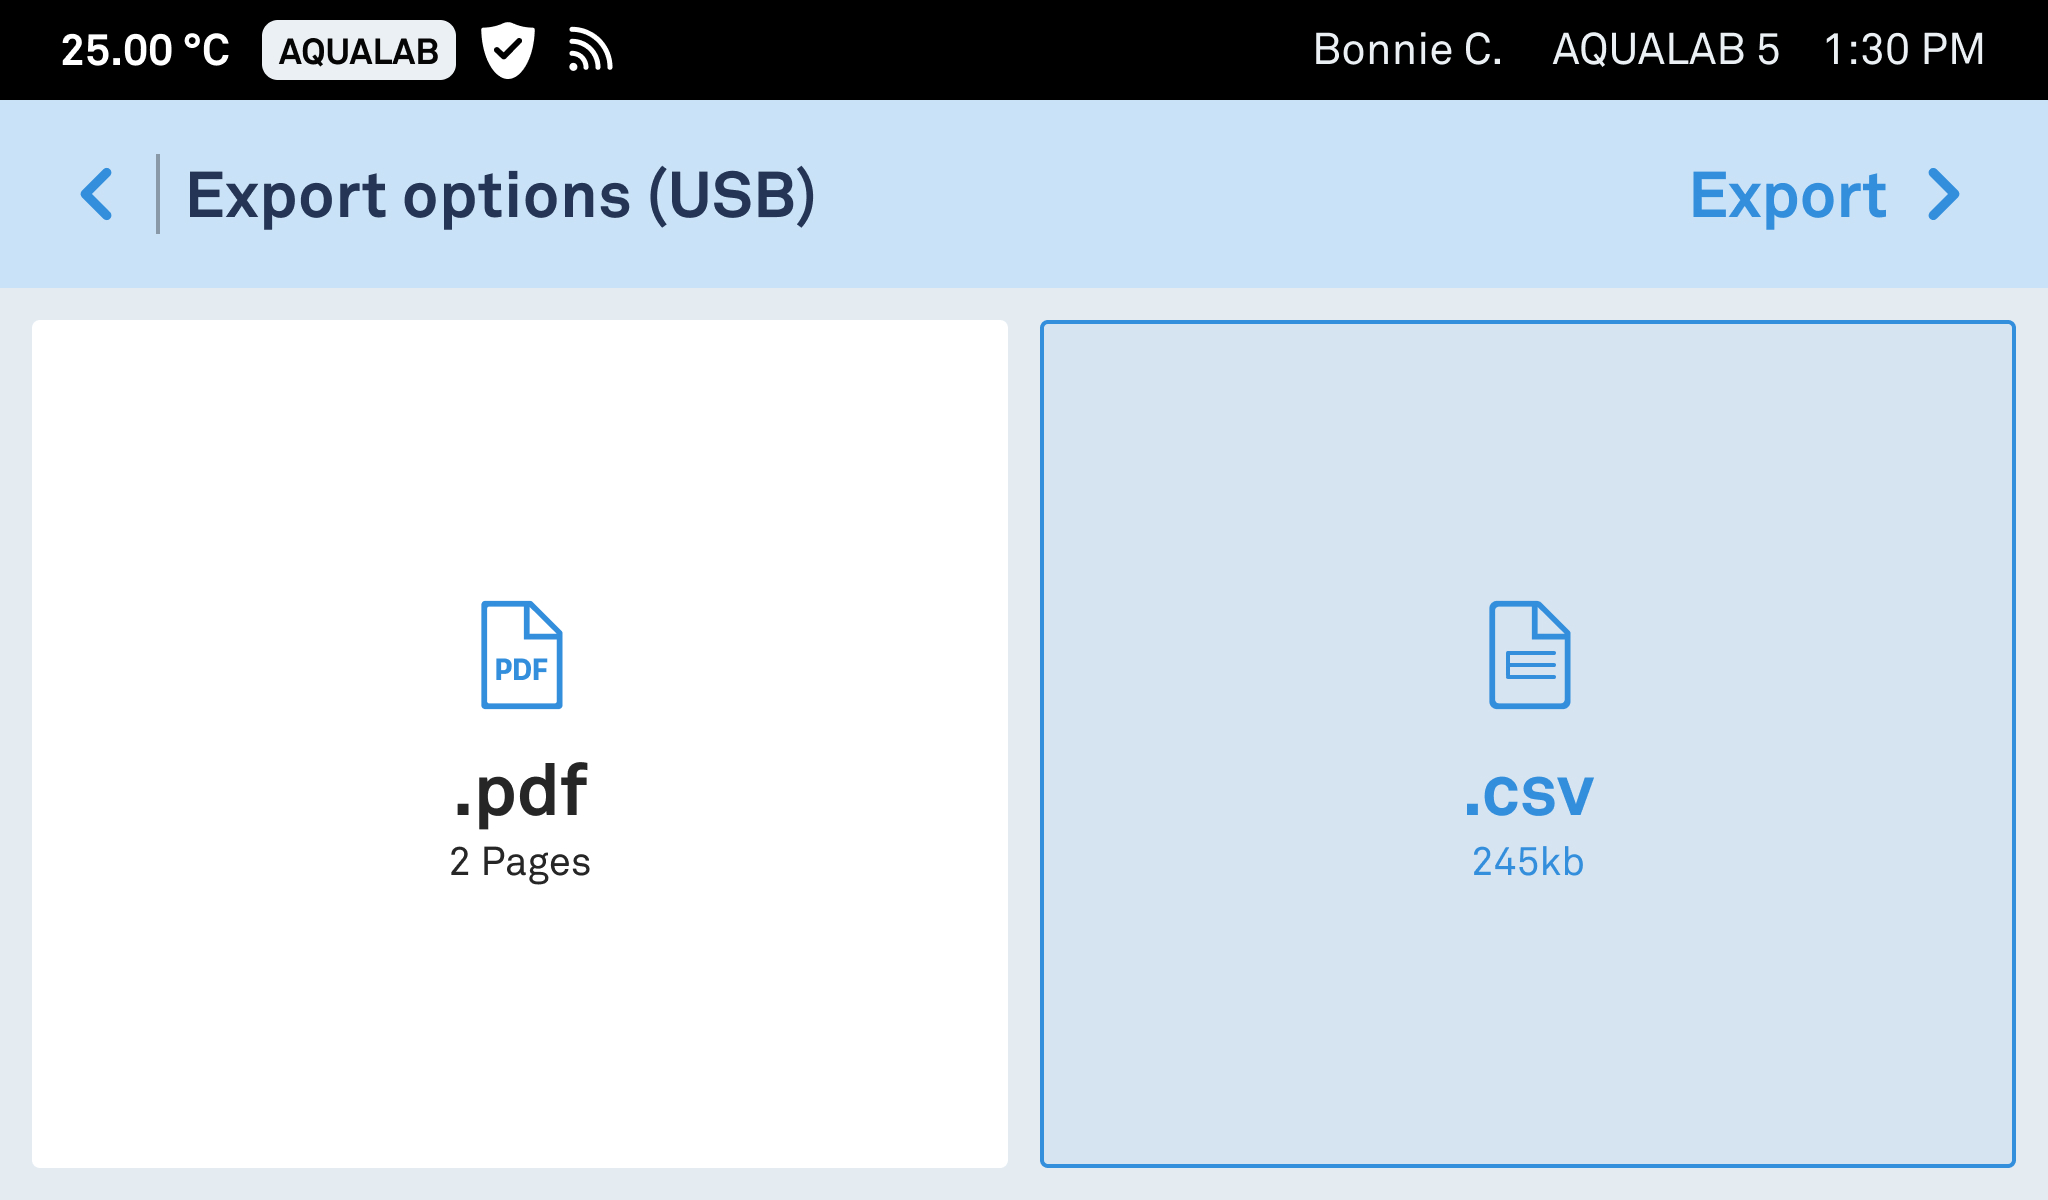
Select the file format (.pdf or .csv).
Tap
 .
.
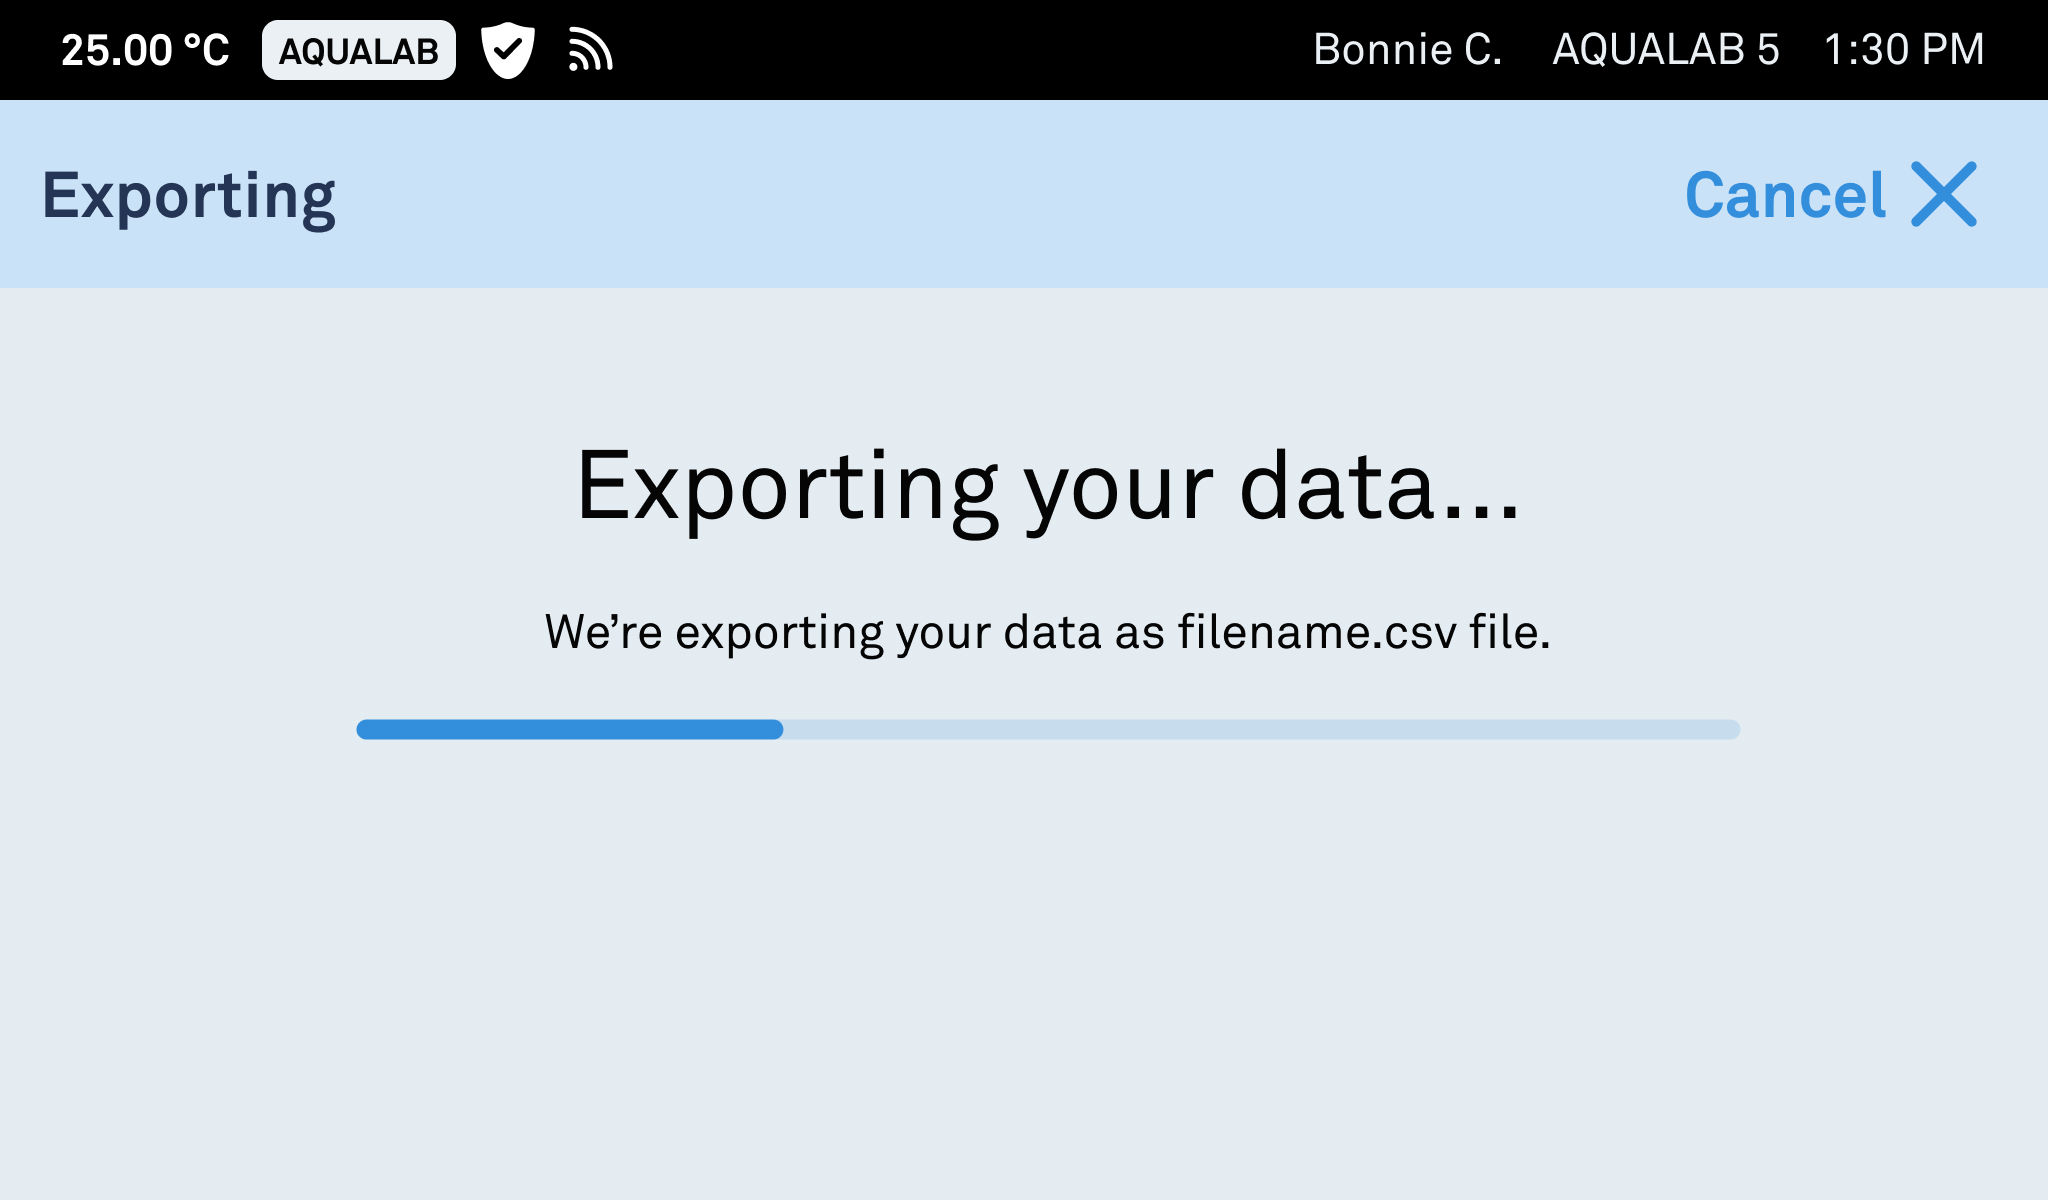
A progress bar indicates status.
Copy exported files to a local or network drive before disconnecting.
10. PRODUCTS
Products associate readings with metadata: product names, limits, targets, custom fields, and manual tests. Products also enable moisture content and One-Minute Readings.
Products are created and managed through AQUALAB Cloud and require an active AQUALAB Cloud license and internet connection.
On the instrument, products appear as a selectable list when starting a reading. Selecting a product applies its configured limits and targets to the result and enables moisture content and One-Minute readings for that product. Readings can be taken without assigning a product; in that case no pass/fail evaluation is applied and moisture content and One-Minute readings are unavailable.
To learn how to create and manage products, please refer to the AQUALAB Cloud User Manual.
11. SYSTEM UPDATE
Updates provide new features, performance improvements, and fixes. Admin login is required if Access Control is enabled.
Warning
Do NOT power off, unplug, or disconnect the instrument from its power source while a system update is in progress.
11.1 Over-the-Air (Internet Connected)
Available updates are detected automatically. A “System Update Available” notification appears on the Home screen. Tap the notification or navigate to Diagnostics & Help, then follow on-screen prompts.
11.2 USB Update (Offline)
- Download the system update file (.upd) from the AQUALAB Resource Center.
- Copy to a USB drive (FAT32 formatted).
- Insert into a USB-A port on the AQUALAB 5TE rear panel.
- Follow the on-screen “System Update Available” prompt on the Home screen.
12. MAINTENANCE
12.1 Cleaning the Sample Chamber
Regular cleaning is essential for accurate measurements. Clean the sample chamber before each verification and whenever readings increase in duration.
12.1.1 Required Materials
The following materials are needed to clean the instrument:
- Three or more new cleaning swabs
- Deionized water
- Isopropyl alcohol (IPA)
KIMWIPE® tissues can also be used to clean larger surfaces.
NOTE
Both solvents are required to dissolve different contaminant types. Do not omit either step.
12.1.2 Procedure
Regular cleaning and verification ensure optimal instrument performance. If cleaning does not improve measurement quality or further assistance is required, contact Customer Support at [email protected] or visit aqualab.com.
CAUTION
Always wash hands or use gloves before cleaning to avoid contamination.
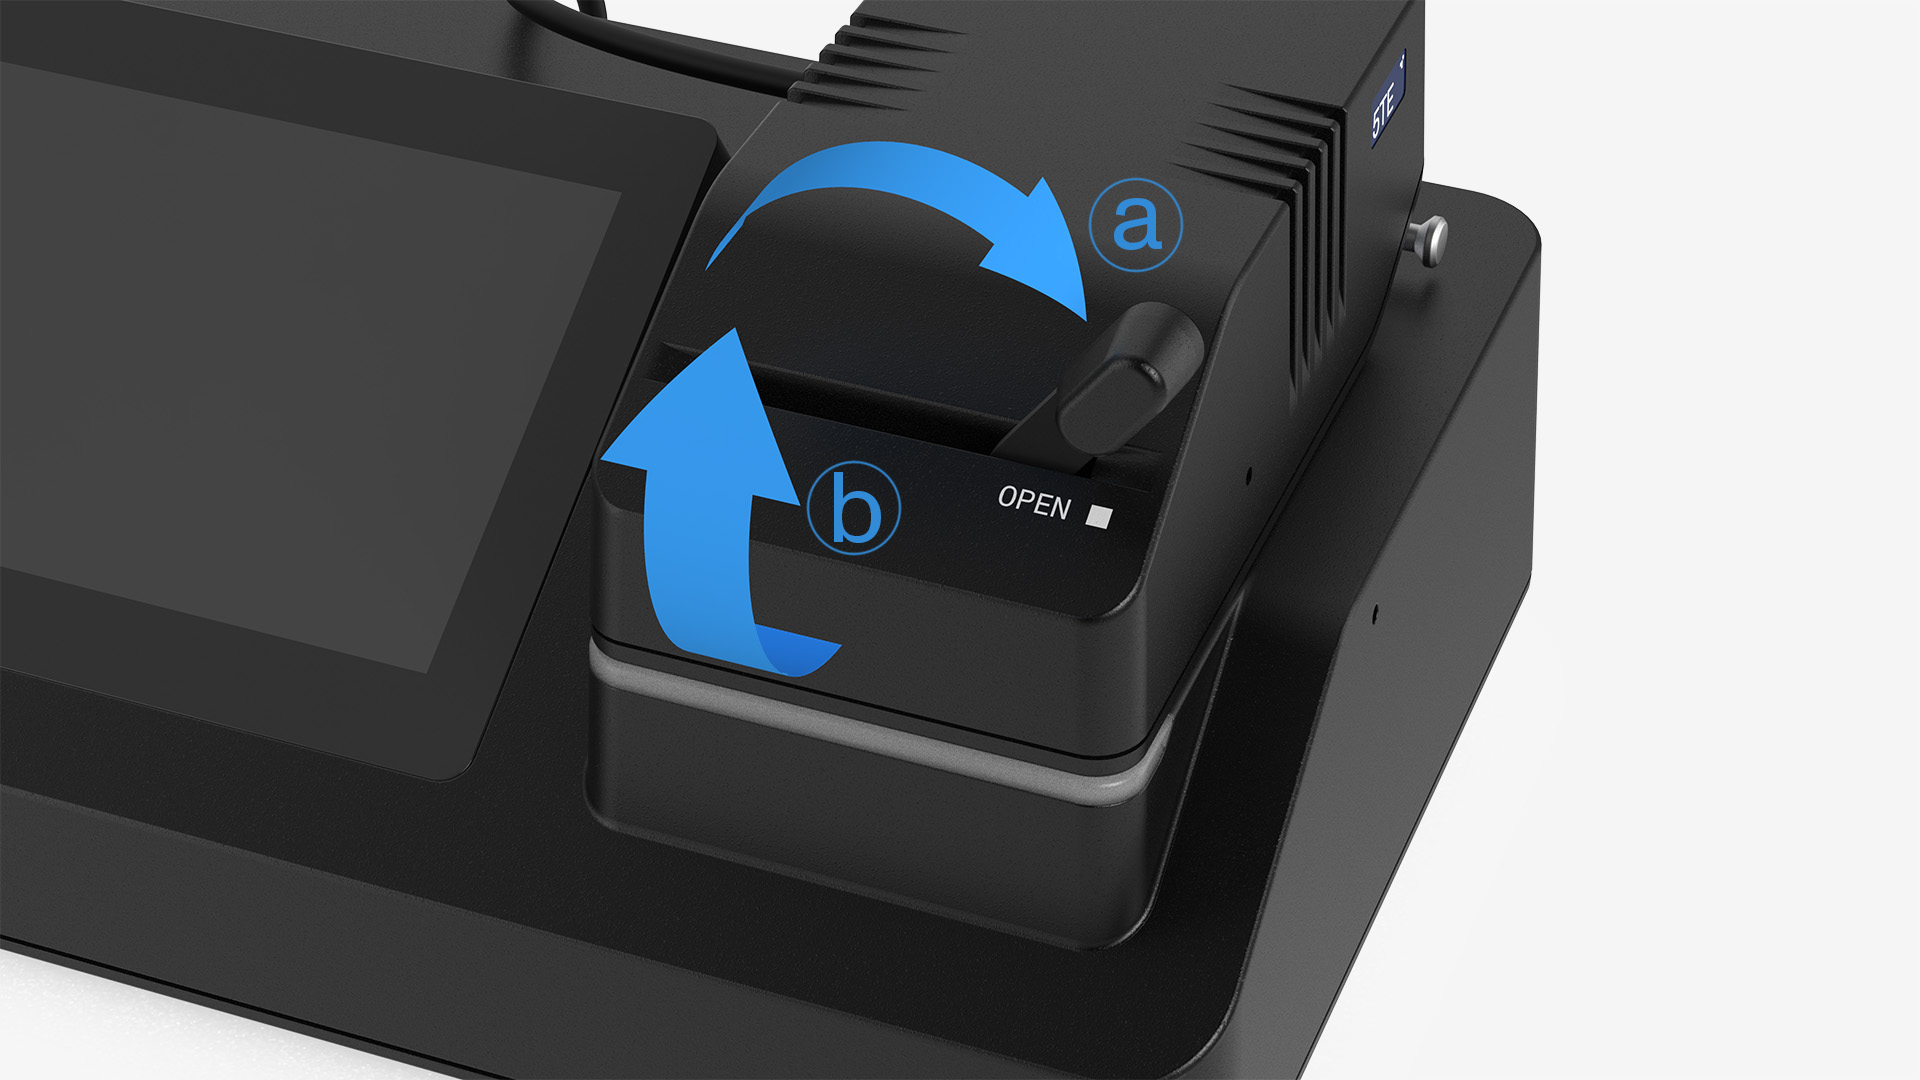
1. Open the sample chamber
To expose the sensor block and sample chamber, open the sample chamber lid:
Move the lever
 to the OPEN position and lift the block up
 .
.
For easier access, the sensor block can also be removed from the instrument (see Sensor Block Replacement for more information).
2. Clean with deionized water
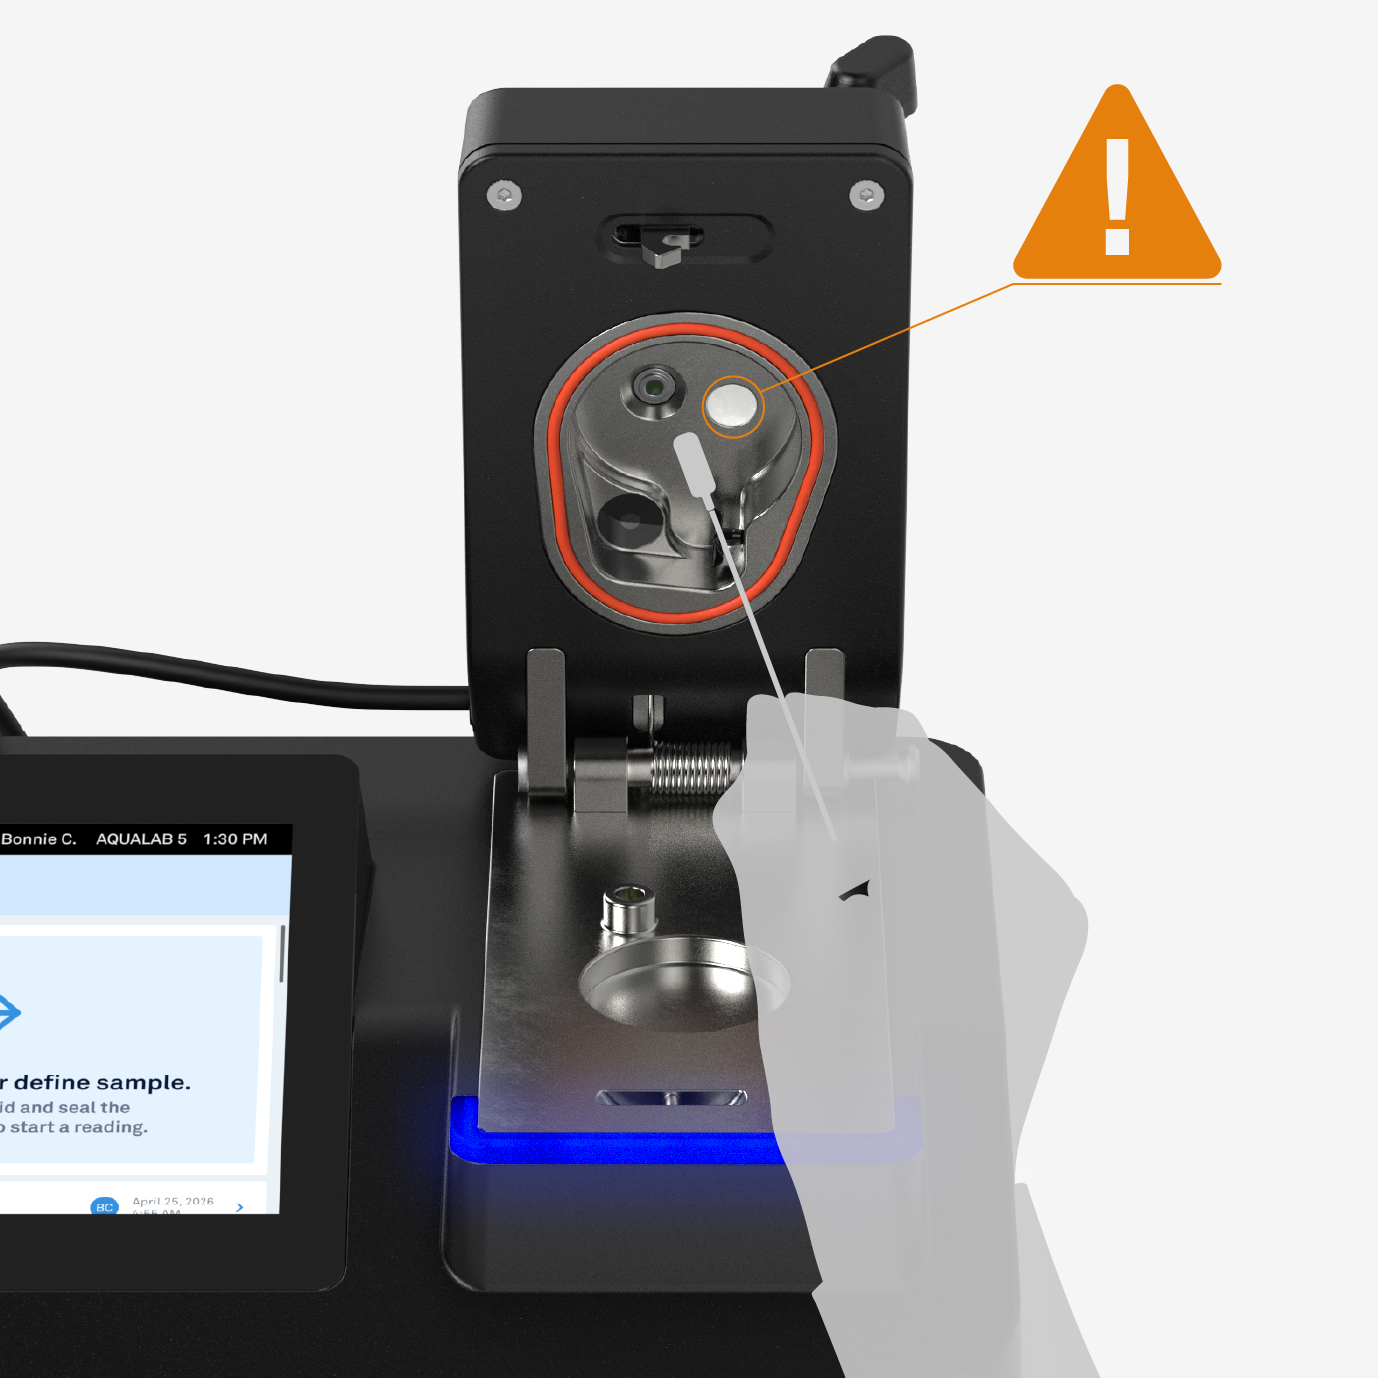
Apply two drops of deionized water to a new swab. Wipe the mirror, optical sensor, and thermopile. Do not touch the capacitive sensor filter. Carefully wipe down the top and bottom of the chamber. Gently wipe around the fan blades to avoid damaging them.
CAUTION
Do not touch the capacitive sensor filter (may require replacement if contaminated). Do not damage the fan blades. Never re-dip a used swab into the cleaning solution.
3. Clean with isopropyl alcohol
Repeat previous step by adding two drops of isopropyl alcohol to a new swab.
CAUTION
Isopropyl alcohol is flammable. Keep away from ignition sources and ensure adequate ventilation. Refer to the manufacturer's Safety Data Sheet before use.
4. Dry
Thoroughly dry the chamber using a clean, dry swab.
5. Inspect
Visually inspect the sensor block and sample chamber for cleanliness. If the chamber or the swab used for drying has any visible discoloration or contaminants, repeat from step 2.
12.2 Sensor Block Replacement
The sensor block is user-swappable for cleaning access, annual calibration shipping, and quick replacement with a spare.
12.2.1 Sensor Block Removal
To remove the sensor block, follow the steps below:
Power off the instrument.
Warning
Power off the instrument before removing or installing a sensor block.
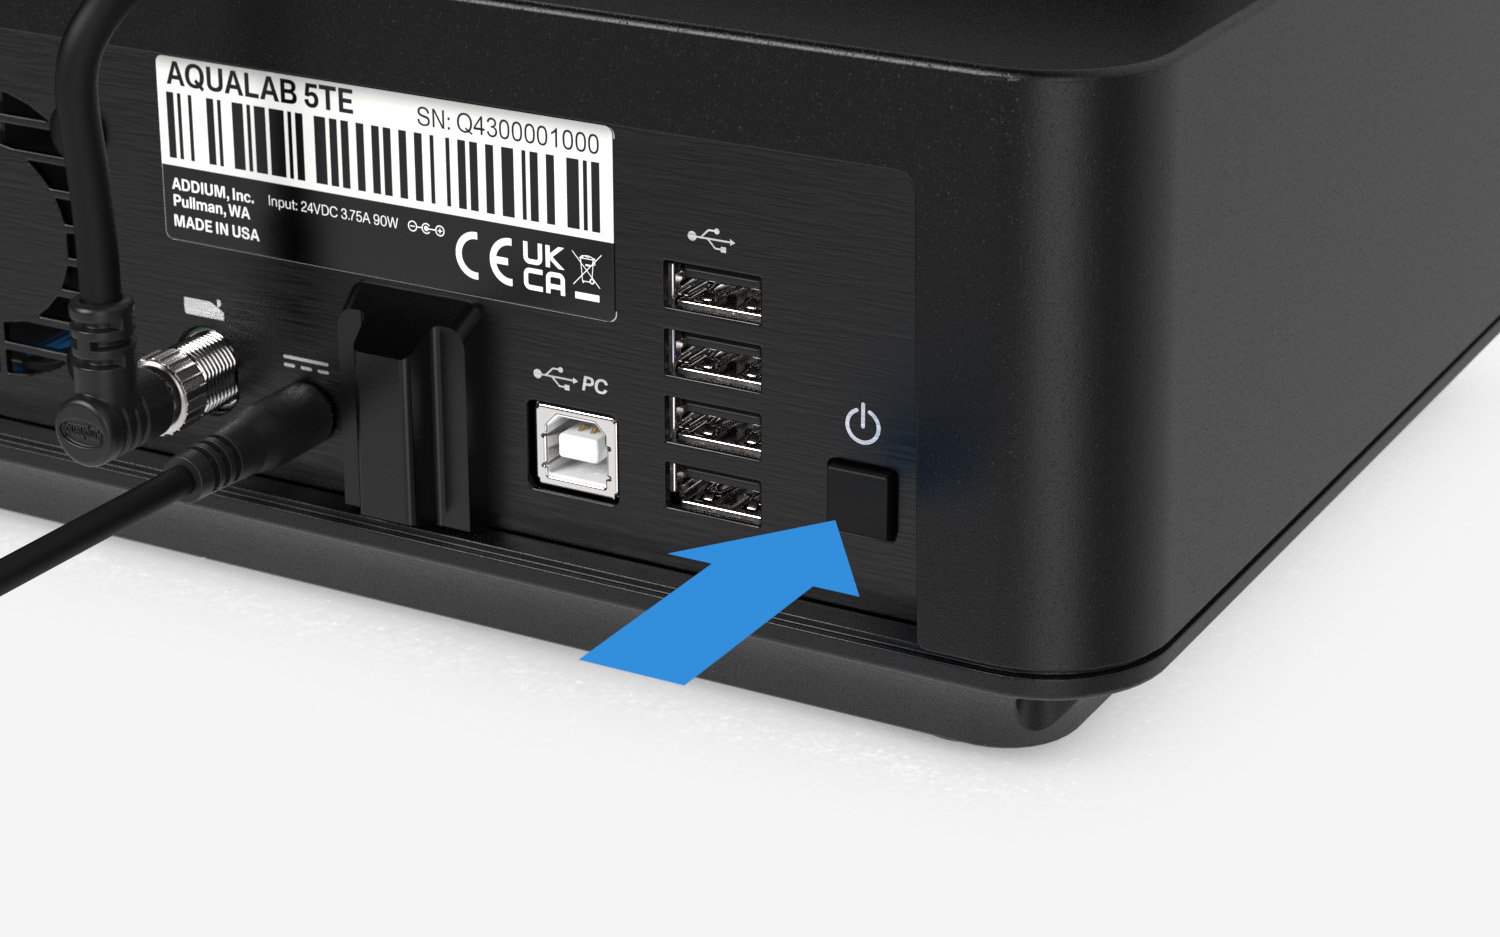
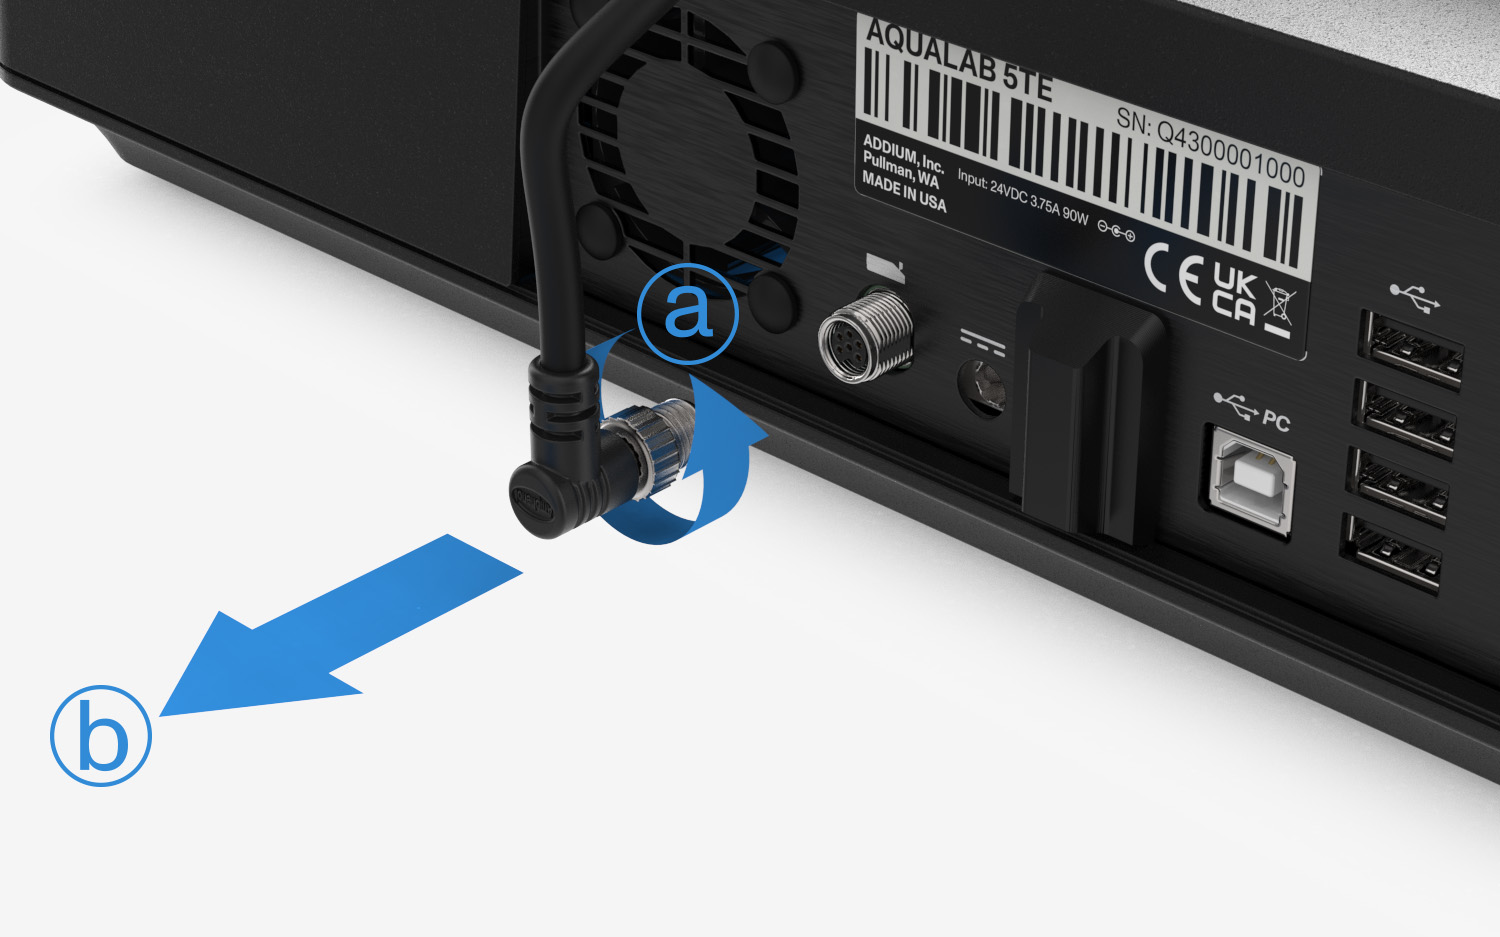
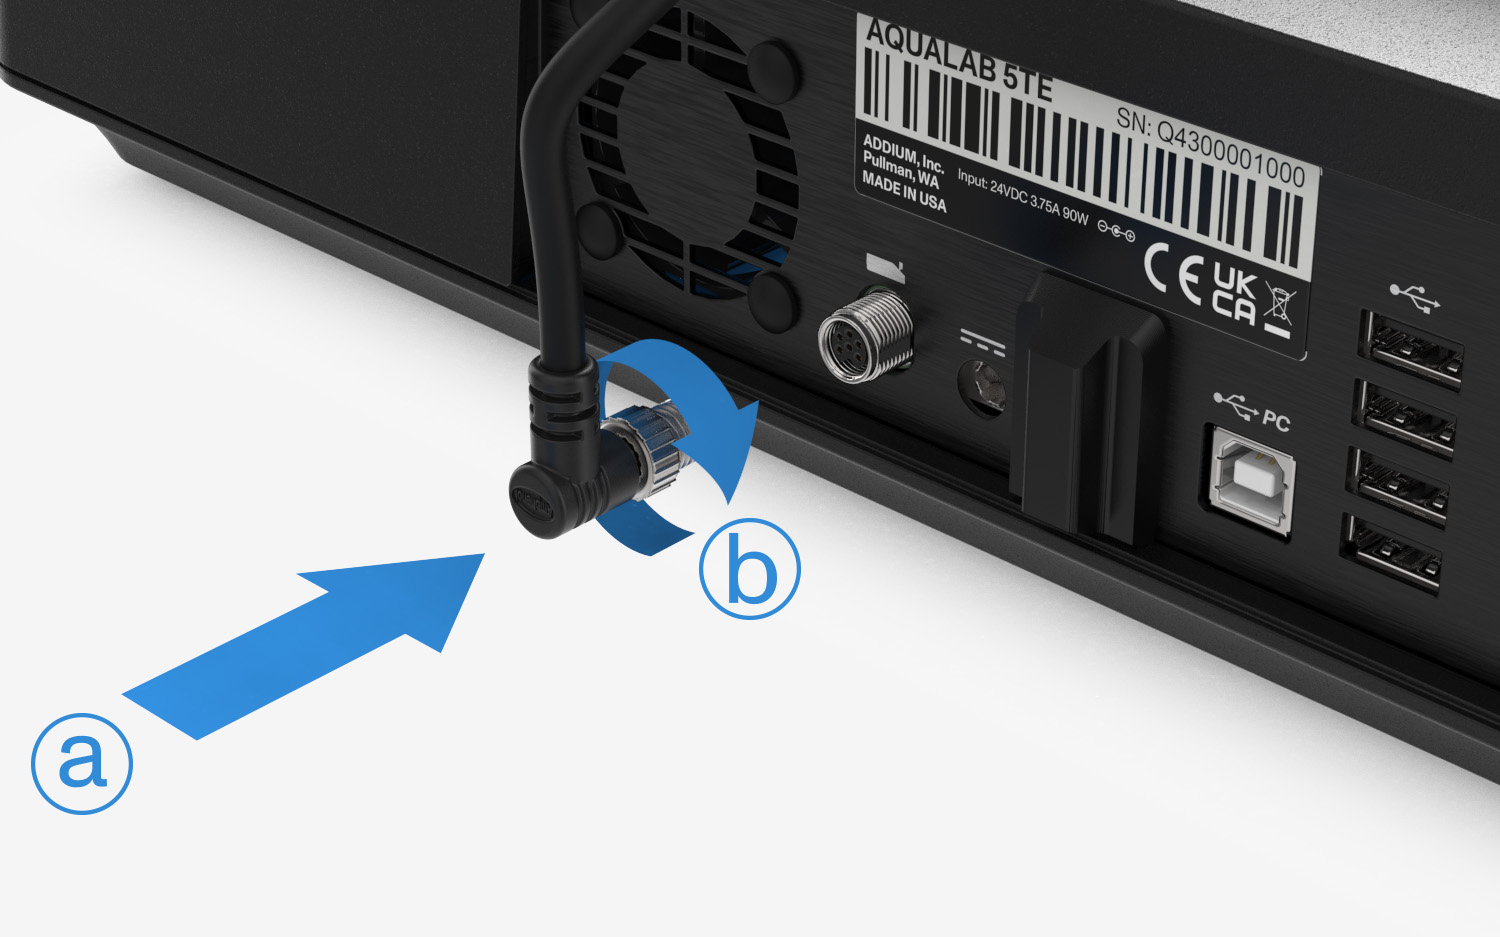
Unscrew the connector lock ring counter-clockwise
and pull the cable straight out
.
CAUTION
Do not twist or angle the cable when disconnecting. This may damage the connector.
Move the lever to OPEN
and open up the sensor block
.
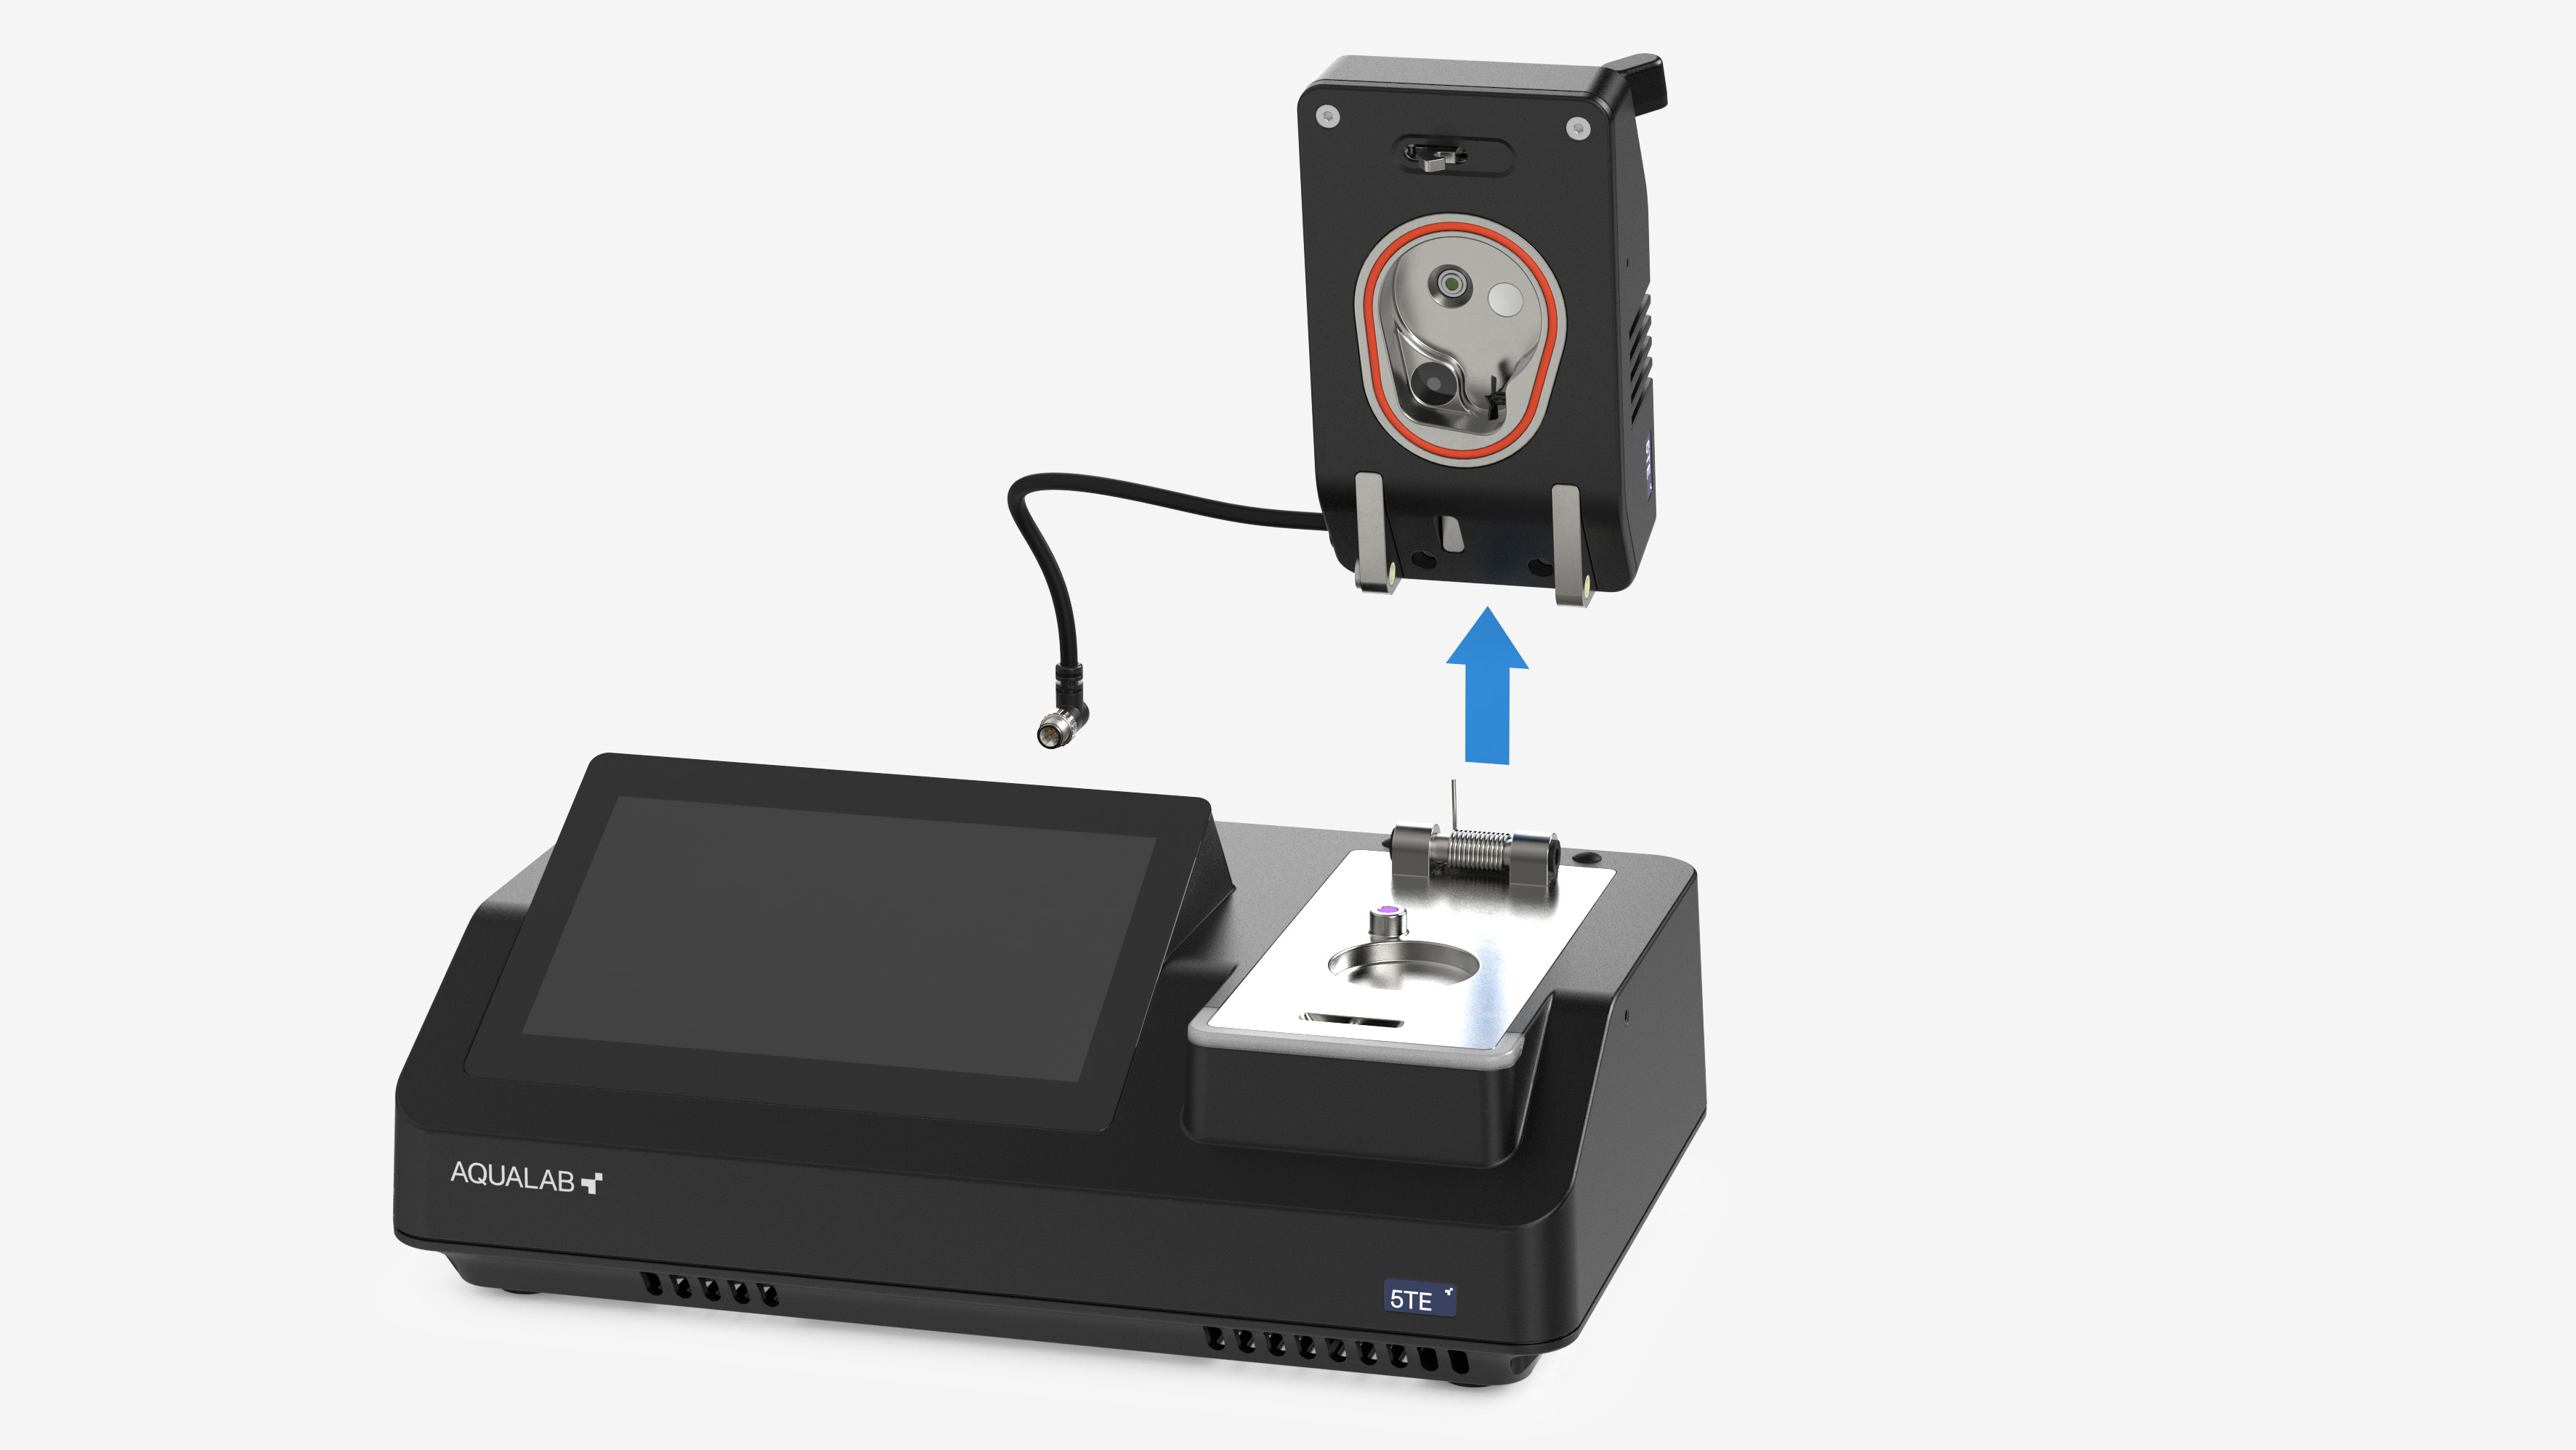
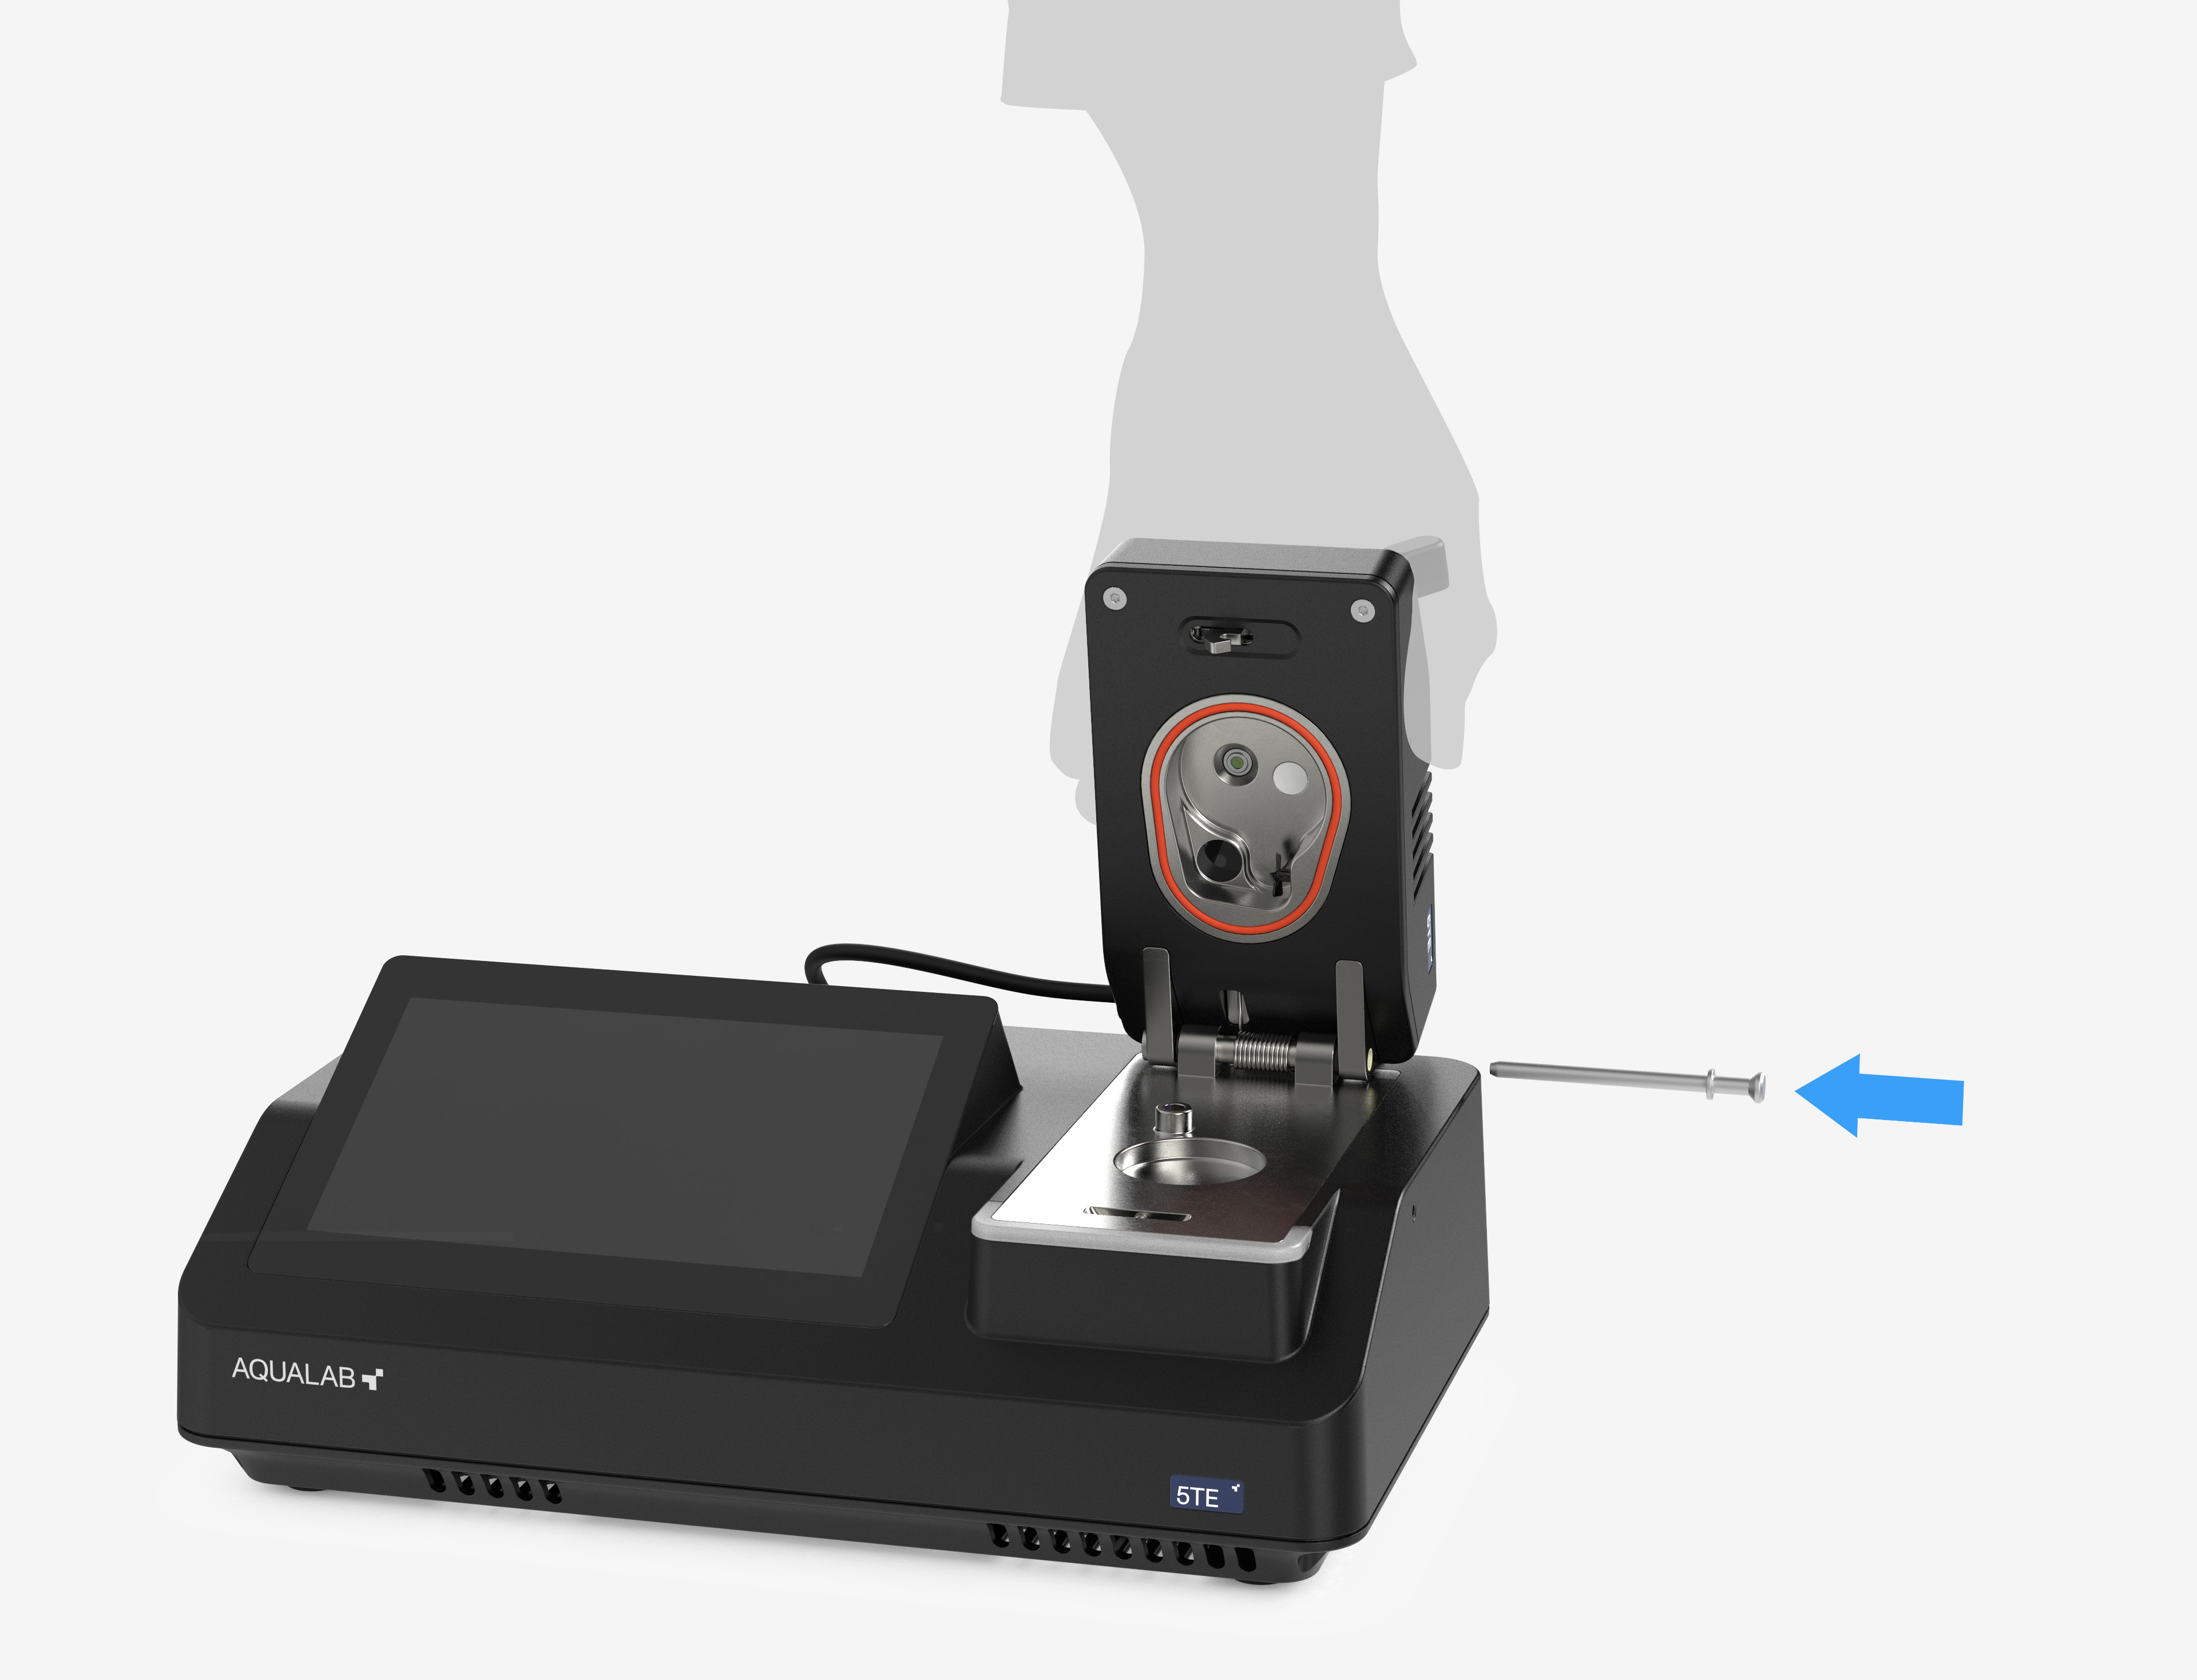
Support the sensor block with one hand and remove the hinge pin.
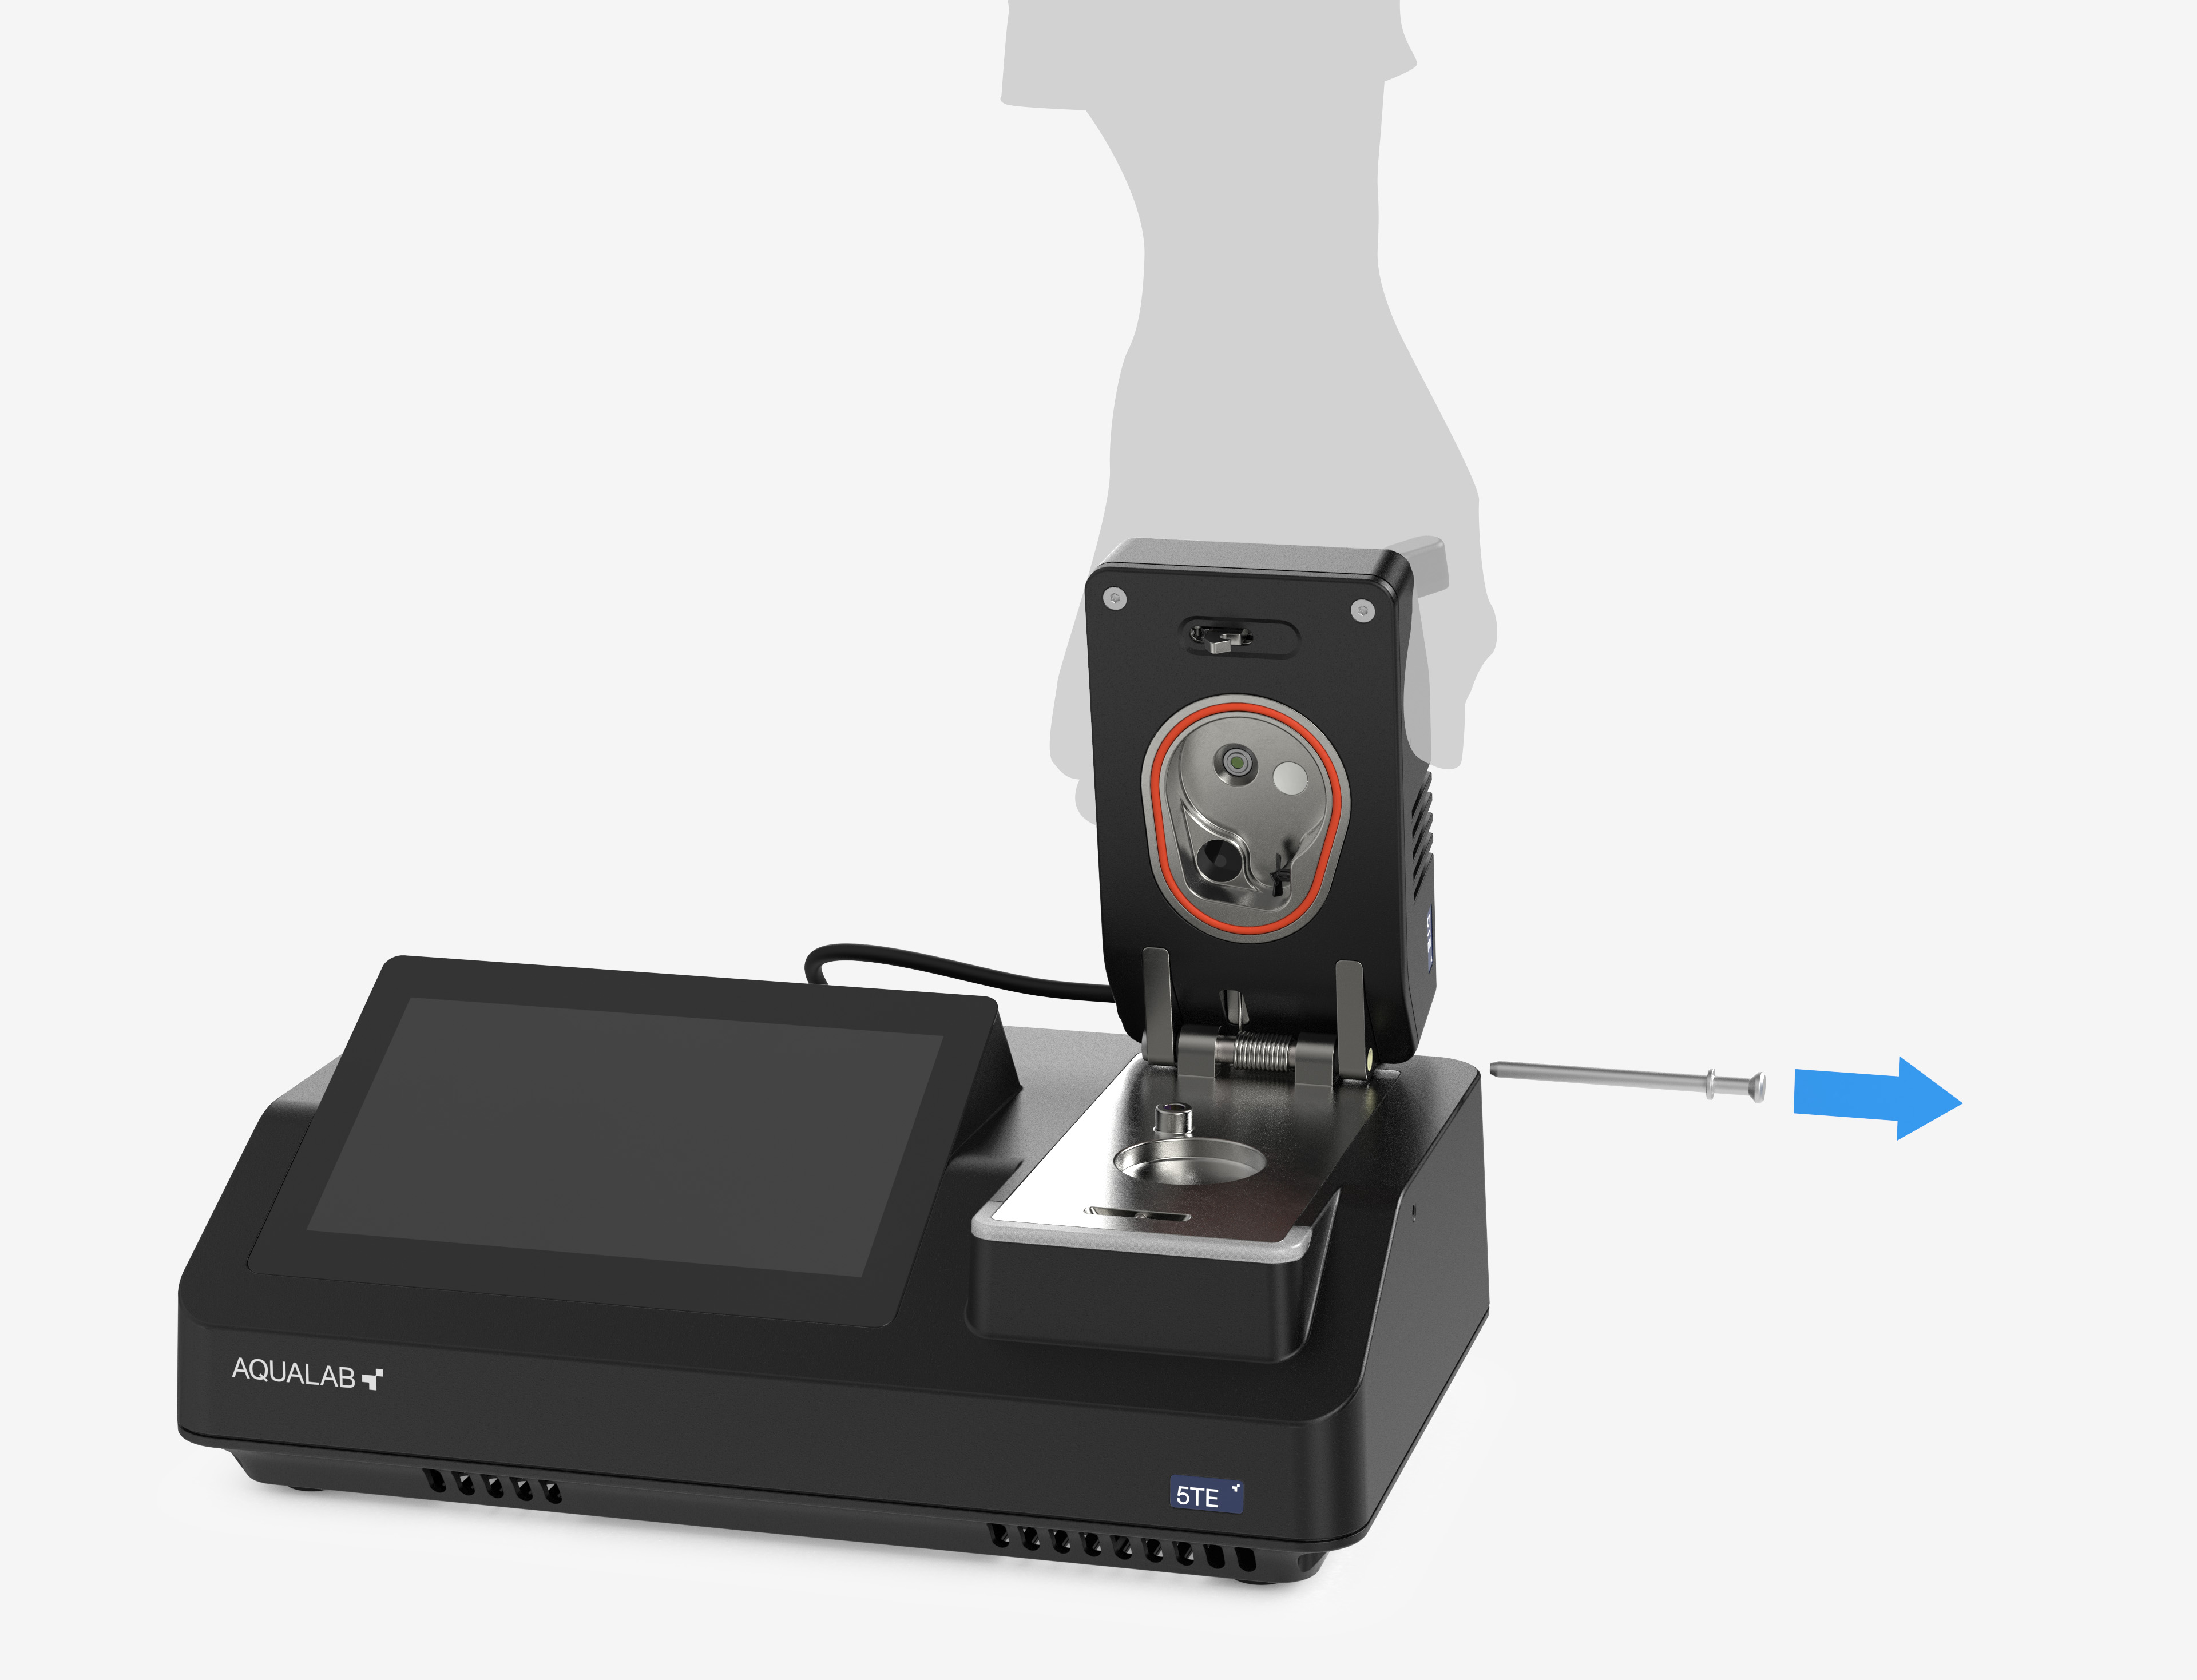
Lift the sensor block away.
12.2.2 Sensor Block Installation
To install the sensor block, follow the steps below:
Power off the instrument.
Warning
Power off the instrument before removing or installing a sensor block.
Place the sensor block (in the open position) onto the instrument, aligning the hinge holes.
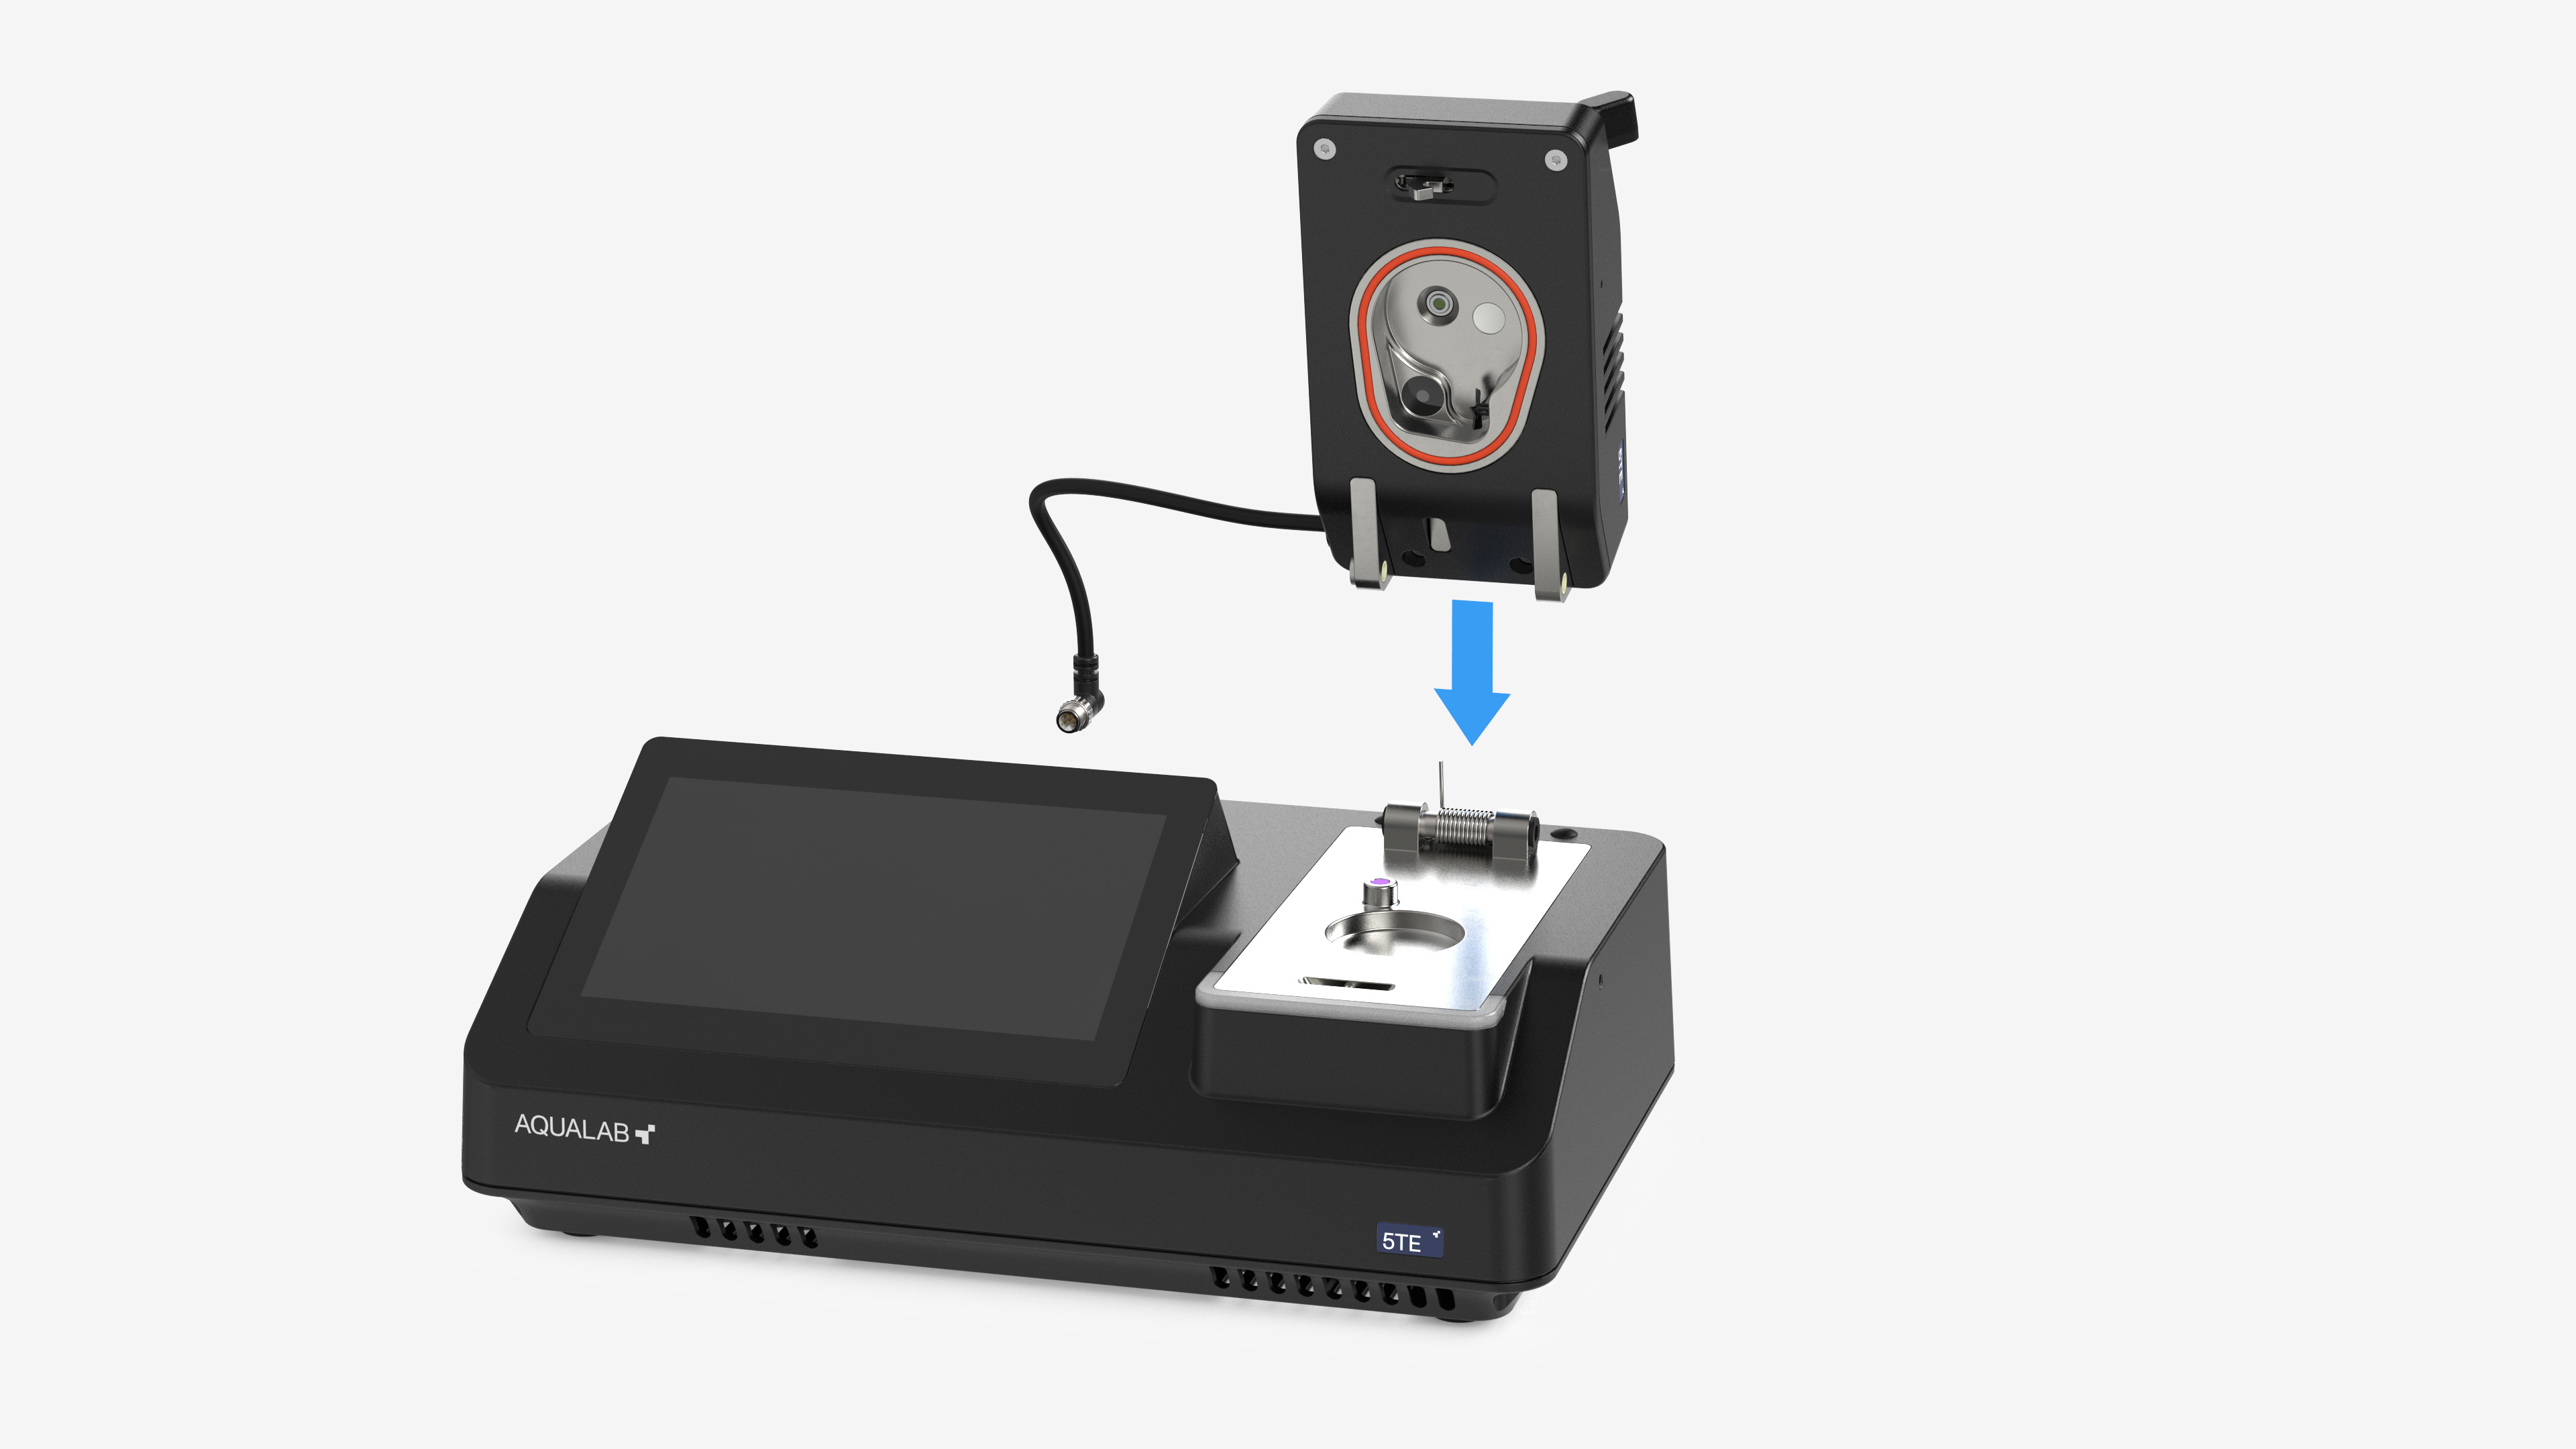
Support the sensor block with one hand and insert the hinge pin. The pin is held in place magnetically. Push it in until it fully snaps into position.
Close the sensor block.
Insert the cable straight into the port
. Tighten the lock ring clockwise
. Hand-tighten only.
NOTE
Verification is recommended – though not required – after a sensor block change.
13. DIAGNOSTICS & HELP
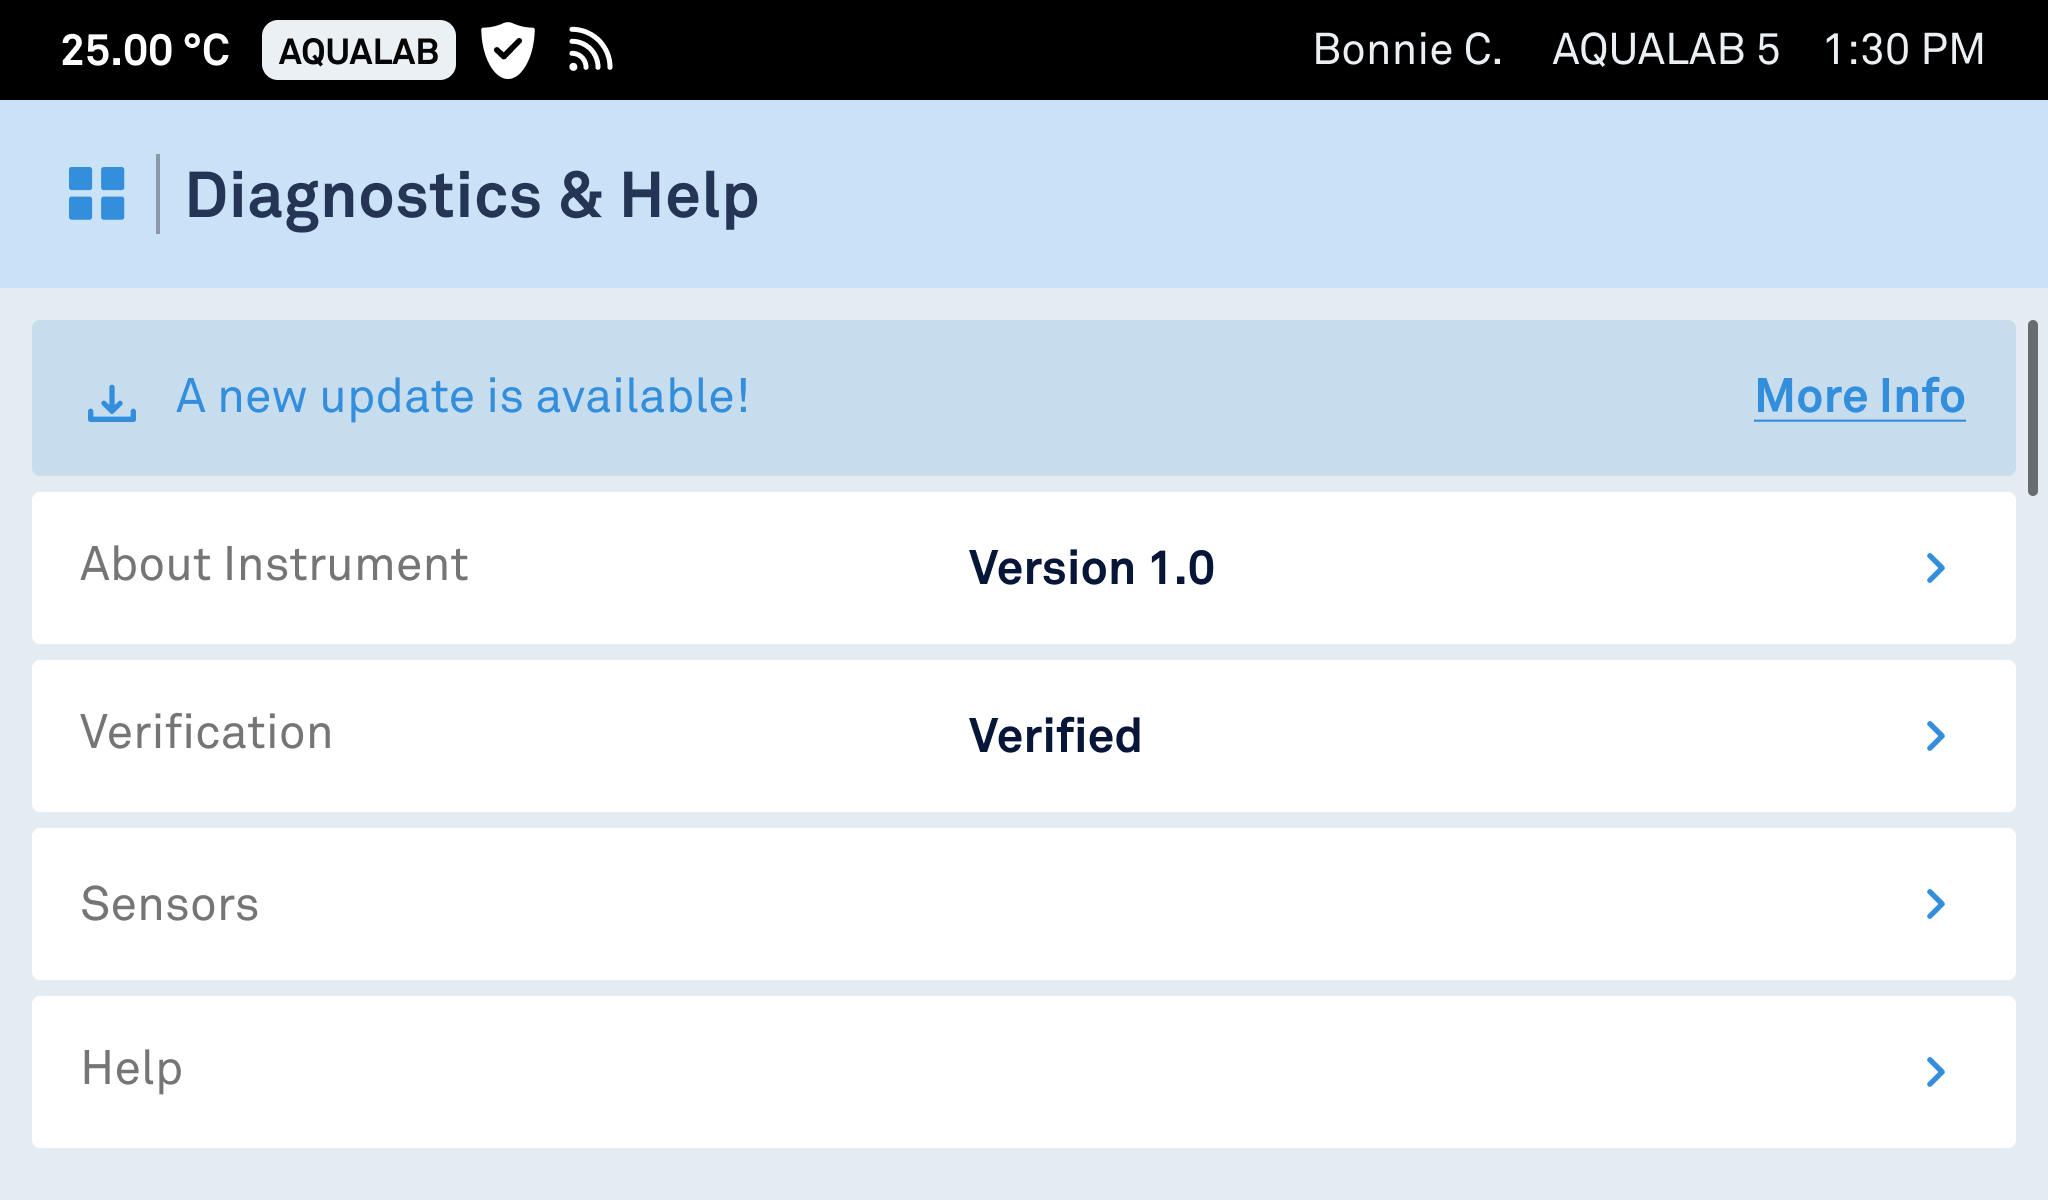
System Update
Informs when a new system update is available.
About Instrument
Provides basic reference information about the AQUALAB 5TE, including device identification, versions, storage usage, and any connected USB devices.
Verification
Provides verification information, including the applied dew-point and capacitive sensor offset correction.
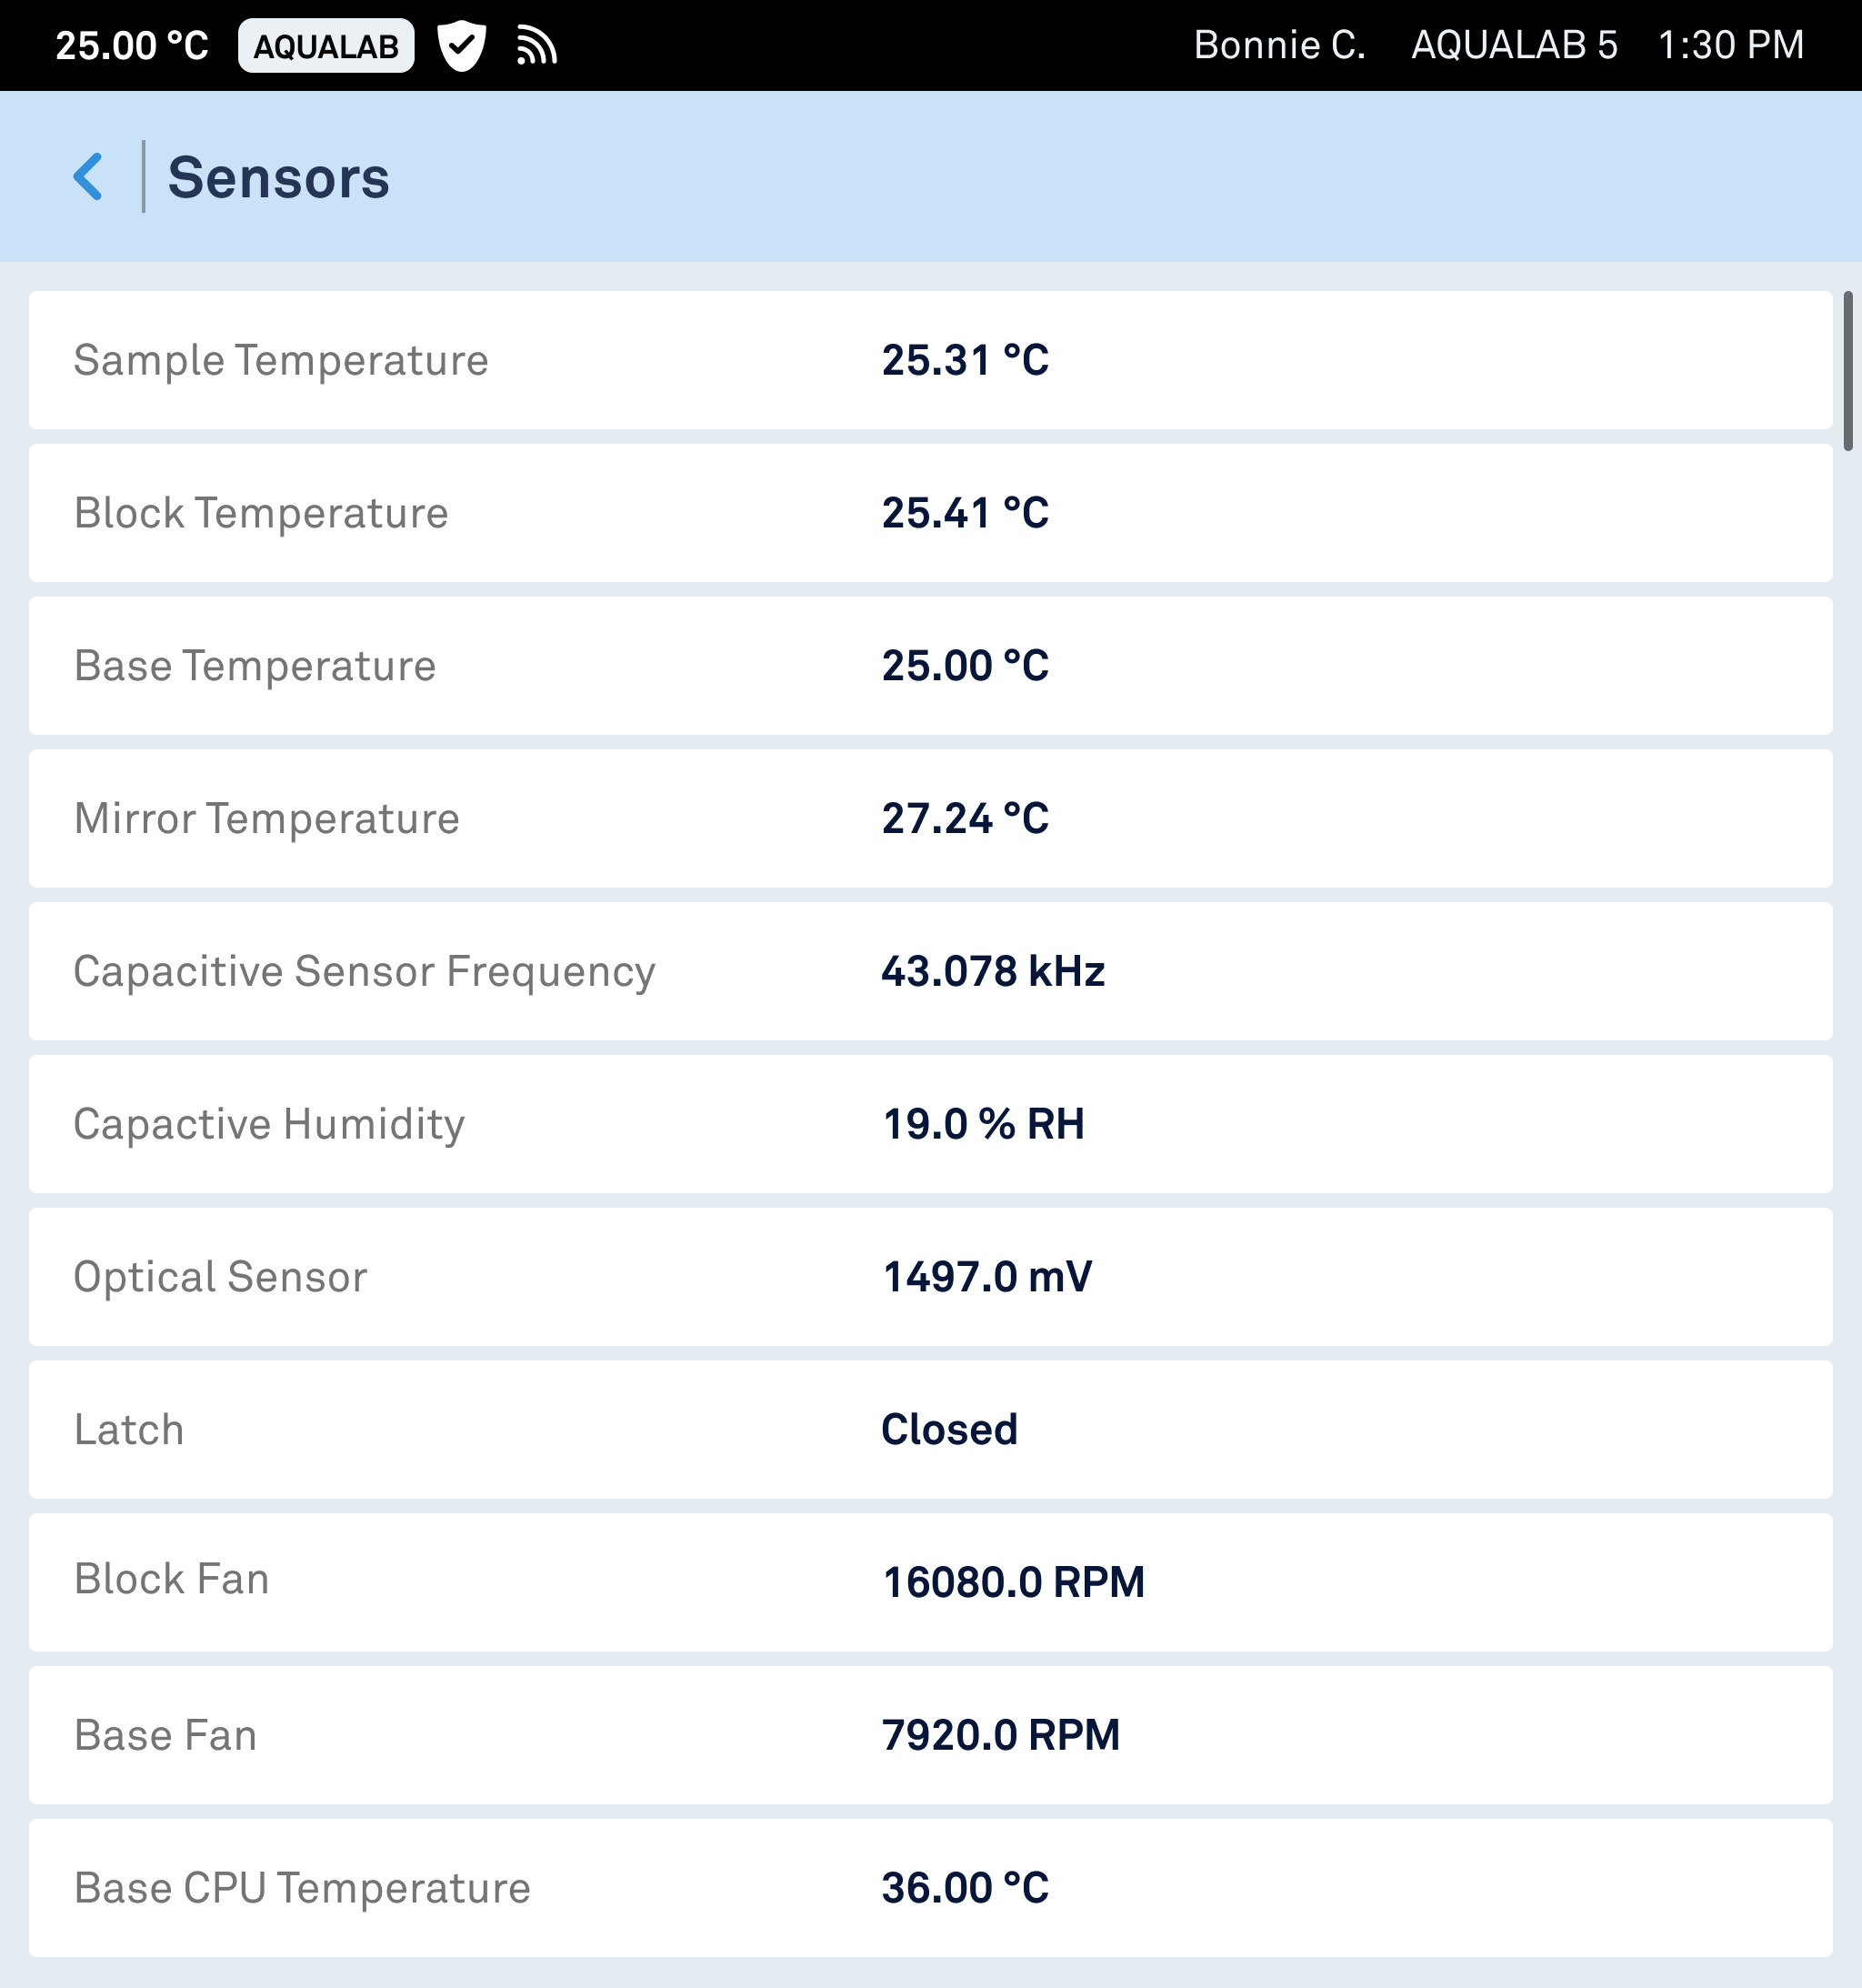
Sensors
Lists live readouts for all instrument sensors.
Help
Provides guided tutorials for common tasks.
14. TROUBLESHOOTING
Use the table below to troubleshoot the AQUALAB 5TE. If there is no solution to the issue listed in the table, please contact Customer Support.